Why does one image have better detail with few iterations.
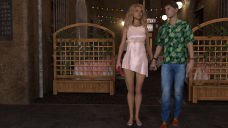
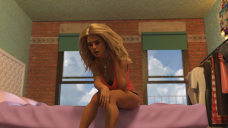
Image 1 of leaving the restaurant has only 1200 iterations and less light, but the models seem to have better details than image 2 which has 10,000 iterations and more light.
What am I doing wrong?


Walking out of Restaurant 1200 it.png
2560 x 1440 - 7M


Alena Bad Choices.png
2560 x 1440 - 5M


Comments
Too much light can wash out fine details. Lighter surfaces take longer to render as the paths bounce more times before reaching a final value.
Thank you, thank you, thank you.
I've got 3 ghost lights above set in a celing lamp.
Luminence Units = W
Emmision Temp = 3000 (soft white bulb)
Lumnence - 32000
Luminous Efficacy = 15 (default)
Should I start with turning down the luminence?
If the ghost lights are relatively large then they will have a softening effect - rather the way that candle/gas light, with the light coming from a volume, were said to be more flattering than electric light, with the light coming from a much smaller area. If you want sharp details then you need a fairly strong light source that is relatively small (though you can still use weaker area lights to even the tone out, so that you aren't left waiting for light to bounce to the areas without direct lighting).
You are the man!
I ran these to only 1200 iterationas and I can see it is much much better.
On the closeups I can see it would be easy to add a weaker light in the front for the shadows and make it look even better.
Do you have any suggestions for medium and long shots?
I'm workign on a visual novel and trying to give it a cinematic look.
Have a look at the histogram - by saving the image, or these is one in render>Render Editor - both of those images have a relatively narrow range of tones on the figure and most of the room, the further shot has pols of light on the furnitue at the side of the room but not on what I assume is the focal point, the woman. Trying to get plausible light on her, less light on the background behind her, and toming the lighting at the sides down so it isn't distracting. You might also want to try a diffeent point of view, so everything isn't four-square.
Just as Richard pointed out, emissive lights incl. ghost lights, especially with big size geometry can eaisily flatten / blur the details. In 1st image, I guess there's a different lighting pattern, probably with an HDR ~~ In 2nd image, there's also DOF, so some details are out of focal plane...
In such an interior with wide angle composition, better use spotlights rather than ghost lights. Ghost lights with properly-defined volumetric size better be used in Portraits with close-up. So, you may try:
1) Reduce emissive lights Lumen on the ceiling, add two spotlighs that lighten the character from below, with different Lumen. On the one hand, it can create contrasts, on the other hand can give her a bit catchlights in the eyes.
2) Finetune DOF.
3) In Render Settings pane, Tone Mapping, increase cm^2 Factor a bit. Change Pixel Filter to mitchell, with a value of 1.0. That'll help with sharpening the final render.
Certainly, in the new renders, the DOFs are gone, you got more sharpness. With this pose, she may be still in need of some rim light as well as catchlights to be more vivid. Besides, higher sample value is not the true culprit but in such a scene, you really don't need the value that high.
If you want to get some cinematic effects in DS, better focus on the composition and tweaking settings in Tone Mapping. Or, it'll be also a nice choice to go for post-work.
Thanks everyone!
D'oh I forgot to readjust the DOF on the camera.
Crosswind - on the wide angle shots where would you place the spotlights? In the back of the room? I didn't do any post on these, but I usually adjust at least the brightness/contrast in GIMP.
Richard - there is a light in the kitchen that is casting the light on the settee.
Maybe you can try what I thought in the below screenshot if you'd like to ~~ This is a sort of "cross lighting". If you make the interior environment darker, it may bring you some dramatic effect with certain compositions.
You guys are both my heroes! I was supposed to do just coding in Ren'py and write the script, but my friend who is great at Daz has some serious health issues so I may end up doing it all.
If you're ever in San Francisco I owe you a drink.
You're welcome and thank you !
Well, I'm very far from San Francisco now but I've ever been there for two times. I like your city which is much better than NY.