It is possible to animate a single figure with Genesis?
 otodomus
Posts: 332
otodomus
Posts: 332
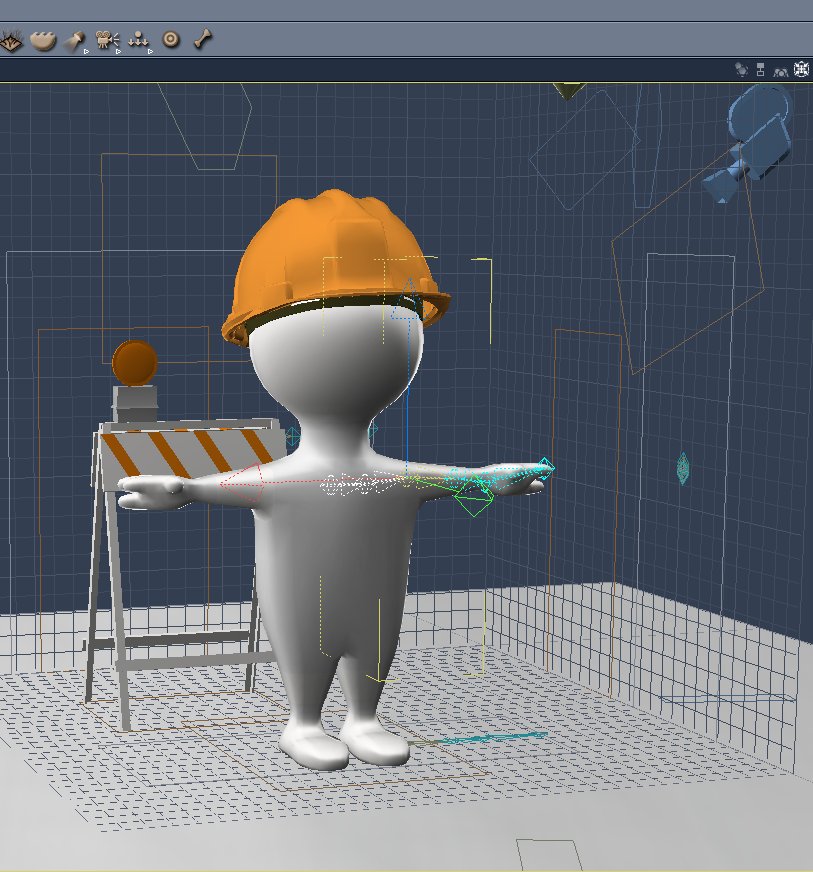
Hello everyone, sorry if this sounds odd enough but at this time I have the needing to animate a simple figure, is the worker that you see in many clipboards, I want to pose that figure by holding some props that my client wants, and as there aren't in the net, I figured out that creating the model and then posing some scenes would be the solution.
What I have is the figure and I am adding the bones necessary to be animated, but my question is: Can I export that figure to DAZ Studio and apply the default psoitions Genesis have? If so, what is the format the figure may be saved? And at last: I need some scenario the worker may be settled, once my figure have the pose I want, can I bring it back to Carrara to finish the Scene?
Sorry for those many questions and thanks in advance.
Here are some pics of the model:
Otto
Daz 3D is part of 
Connect
DAZ Productions, Inc.
7533 S Center View Ct #4664
West Jordan, UT 84084
Licensing Agreement | Terms of Service | Privacy Policy | EULA
© 2025 Daz Productions Inc. All Rights Reserved.
Comments
May be a stupid question but, why to jump to Studio to come back into Carrara ?
I use C8.1, but I know C8.5 can loads the scenes from Studio...
Not at all, what I wanted to create is a default pose Genesis have, because doing it at the eye I am not having good results.
Perhaps the model isn't made it the right way:
Oh and I am running the Carrara 8.5 and Studio 4.6
Ok I think that what I was doing wrong is the skeleton, I fixed it and I am more happy now, but I am still wondering if a default pose can be added to my figure...
Is it the skeleton of Genesis ?
If you have a good hierarchy in your skeleton, the program could reset it to the T pose, but I' not shure with a "home made" skeleton.
Yes, you can.
Create an animation group (Model+Skeleton)
Pose it like you want.
In the animation tab: Memorise the figure pose.
edit the pose of the skeleton and in the animation tab again: Zero figure pose
No the skeleton of genesis not unlike previous DAZ figures this one has no abdomen and chest
I am not sure what you mean by the default pose.
a t pose
a way to reapply one?
a way to use genesis or other DAZ poses?
the latter you cannot do with your own rigging.
you can create your own poses in carrara and save them as nla clips and reapply them or use the controller/puppeteer tab
If you want DAZ poses using the transfer utility in DAZ studio on your mesh with genesis and saving the result as a support asset the best way.
HI otto :)
when you make you model Figure,. you should model it in a "T" pose (vitruvian man)
When you add the bones,. and "attach the skeleton" to that model,. you can then Pose the model by moving or rotating the bones,.
Each bone can be given joint constraints to limit their range of motion. ( Motion panel / Constraints)
You should select the Bones and the figure mesh,. then go to Animation / Create Animation Group,. that adds an NLA track to your figure's timeline.
it also allows that "Figure" to work with (puppeteer) which allows you to "record" poses, (Pose dot's). and create animations by rolling your mouse over those pose dot's or apply poses to the figure by clicking on a saved pose dot..
I think your main problem is the bones you've made,. You have two long leg/spine's attached to the collar bones
You should start by creating a HIP bone at the centre of the figures hip area,. (use the front view to draw the bones)
Then draw a single set of spine bones with bones for the abdomen / chest / neck / head.
Select the "HIP" Bone again, and create an upper leg / lower leg /foot for one leg, then select the hip bone again, and follow the same process for the other leg,.
Select the "chest" bone and create some bones for the shoulders / Upper arms / Lower arms / hands /
See very rough bone pic
Hi 3DAGE
How can I add a HIP Bone? It is the same kind of bone just named that way? Or it is an special one?
Regards
Otto
It's the same type of bone,. it's just named Hip,. My bad.
The first bone you create becomes the "root" bone for the rest of the heirarchy,. and in a figure like that, the root would be the HIP,.since the legs are attached to that,. and the Head and arms are both attached to that via the spine and chest
if you look at the structure on the left,. the HIP is the root,. then the belly/chest/neck/head (all the spine bones)
then you select the Hip bone and create the leg bones.,. then select the chest bone and create the arms,
Naming the bones helps keep things organised
See slightly better example
Once you have the bones,. and they are attached to the model,. then the next step should be to add some constraints to those bones to limit how they move,
The Hip should have none ,. it should be free to move,. and move all the other bones along with it,.
the upper legs,. and Upper arms,. should be Ball joints,
the lower legs and arms can be an Axis which can be limited to the range of motion for that bone,.
I also like to make the whole figure, (Model and bones) into an Animation Group,. which helps keep things organised, and also adds NLA options and Puppetteer.
it also allows you to drag and drop that animation group into your browser, to save the figure to your My Objects .....then drag it into any other scene.
As Wendy mentioned,. the NLA (Non Linear Animation) allows you to save Poses or Animations as NLA poses or NLA clips,. these can then be dropped into the NLA track for the figure, to animate it,... the NLA clips and poses can also be saved to your My Clips section of the browser
.
Once the model is rigged, and you can bend the bones , you may notice some joint bending which doesn't look right,.
you can adjust this in the vertex modeller in "animation mode" using the weight painting tool, or the slider controls.
It works like this,.. The bones control the "Vertices" of the mesh,. so the fewer vetices at the areas where the figure bends,. will cause more deformation as the bones try to bend that area,. the more vertices,. the smoother the bend ,.
NOTE: To edit the model (add or delete geometry),. you need to first Detach the skeleton,. then edit the model,. then re Attach the skeleton.
by adding a couple of edge lops around areas like the shoulders, elbows, knees, etc you can refine the model to adjust the bending
Each bone creates an area of influence over the mesh,.(like a magnet) this is called Bone weights,. these are added automatically, but sometimes you'll want to adjust hiow the bone effects the mesh,.
In animation mode, in the vertex modeller,. you can see your posed figure,. and select the "weight painting" tool to manually paint the strength of influence.
these weights are saved with the mesh,. but if you Detach the skeleton,. the weights are lost,. and re-attaching the skeleton applies the default weights.
Thanks Kevin :)
https://dl.dropboxusercontent.com/u/7907045/Lirrle_Man_Animaterd_.car
Have a look at this scene.
I've created a simple walk loop,. and a Waving animation,.
these are saved as NLA clips,. ..although you can "import the data" from those clips into the timeline as keyframes if you want to edit the animations.
save your edited animation as a New Master clip,. with a new name.
the figure model, rigging and the animations were quickly thrown together this morning,.
since I apparently did something to upset Carrarar last night, and it locked up and eventually crashed with the previous scene / model I had been using,
In the Puppeteer panel,. i've created some poses, for a basic walk (group of four dots),. and a T pose, at the top left corner.
I hope that makes sense, and helps
quick render
https://youtu.be/jedquDp6054
Awesome - you've got help. Sorry, I had no internet for a little over a week now. Thanks for WiFi hot spots, but I don't get to those very often.
Yeah, 3DAGE has it right. I just wanted to add that, it was almost sounding as if you wanted to use DAZ Studio at first. Like others have said, you really don't need to. But doing so can have some advantages in certain situations, if done in a specific method. For example, if we create our 3d model to the same dimensions as Genesis, for example, then we can actually use the Genesis rigging transferred to the model from within D|S. To do that you'd be using either the Genesis 1 and 2 Triax rigging system, or the older Poser-style rigging made via naming parts of the model to appropriate groups. hen the model would be saved as either D|S's DUF or Poser's CR2 format, which would allow for pose packs and other animation/pose files to work with your rig. Again, you'd need to have proportions set up quite similarly to the origin figure for the pose files to work as expected. But then also, D|S gives us (though I do not remember how) the ability to set a default pose for the rigging - which is useful in the event that the model required bits to be out of normal pose for ease-of-rigging purposes. Like we can model the fingers spread out, as an example, and then set them more naturally cupped to a normal T-Pose and set as the default "0.00" point of those bone's rotations. One thing that throws off pose files that were made for V4 and/or M4 is that they were both modeled with their feet pointing downward, then their ankles are bent to straighten the feet, and the figure's were saved like that. So Animation > Zero Pose, while the feet of either M4 or V4 is selected, and they'll point down, even though they're straight when the figure is loaded. So poses actually have a hidden bit of rotation within them to negate that downward rotation, whether the pose file artist actually realized that or not - it's just the way it is for them. So if we load a pose or animation mage for those Generation 4 figures to anything else, the feet will awkwardly point upward away from the ground - something easily fixed, however, using the graph editor ;)
For what you're doing, I'd just stick with what 3DAGE has been saying above - unless you wish to make it into a product to sell.
Thanks 3DAGE, I haven't respomd before because I was setting all the above mentioned, it was error and try and the ones I have arrowed were done with no problems.
Now I have a couple of questions before to move to the next steps:
1-How can I make a bone smaller? I had to upper-size the worker because the bones were too large for it.
2-How can I attach the helmet to the head and make that both moves along
3-I am also working in a vest that needs to have attached also the movements of the rest of the body
4- And at last, I am interested into make my model as a puppet I imagine that would be in the last step that I have bolded and I didn't get it at all....
Thanks much for your help!
Otto
In the meantime this is how I fixed the bones as you mentioned before, and I have added the moving parameters too. :
In the meantime this is how I fixed the bones as you mentioned before, and I have added the moving parameters too. :
This is the first set almost complete:
Hi Ottto :)
I thought we'd scared you away :).
what you're doing normally scares people,. there's so many new things, and so much to learn,. you're doing well,.
Two ways,. "when you're drawing the bones",. Click and hold the SHIFT key while holding down the mouse button,. you can drag to shrink the size of the bone,
After you've built your skeleton,. (but before you've attached it to the model) , you can go to the Animation menu / Orient joints,. (this has an option to effect the children) so if you select the HIP, and Orient joints,. this should align and scale all the bones.,.
This is actually quite easy,. You can drag the Helmet "model", (in the scene list),., and drop it into the "Head" bone of your figure in the list,.
What that does is "Parent" the helmet to the head,. (the helmet can still be moved or rotated into position),. but if the figure is animated,. the Helmet will stay parented to it's head and move along with it.
This one is a little trickier,. but simple,. you can Copy the "Vest" model (in the vertex modeller Select all / copy),. and Paste it into the figure model in the vertex modeller,.
Or ....Model the "vest" directly onto the figure in the vertex modeller,. (see pic)
NOTE: You need to detach the Skeleton from the model before you edit the model.(Select the model,. go to Aimation menu / Detach skeleton) ...Once you've added the "Clothing" to the "Figure" Model,.you simply re-attach the skeleton again.(Select the model and it's bones,. go to Animation menu / Attac Skeleton)
That's pretty easy,.
In the scene list,. You'd select the Model,. and then Shift Click, to select the Bones (which should be attached to the model at this point (Animation / attach skeleton)) ,.. then go to the Animation menu,. and select "Create Animation Group".
By making the model and it's bones into an animated group,. it does two things,... (apart from grouping it and making it easier to manage)
It adds a new Track to the timeline,.called an NLA track ,..(Non Linear Aimation) which allows blocks or "clips" of animation to be placed in that track,
You can create animation by creating keyframes in the timeline, in the normal way, by moving forward in time and posing the figure,..
Once you're happy with that animation,. you can convert that to an NLA clip,.
When you create an NLA clip,. it get's added to the "Clips" panel, on the bottom right,. and you can save these animations to your browser (My Clips) or drag them from the Clips panel,. into the NLA track for your figure,.
When you drag an NLA clip into the NLA Track,. it's a movable Block,. which can be placed where you need that animation to happen,.
You can add several clips to the timeline,. you can also adjust some option for each clip,. such as the timing (speed of playback) or Reverse,. or Loop that animation as many times as you need it to, before it plays the next NLA clip in the timeline.
An "Animated Group" also adds the ability to use the Puppeteer (Controlers tab)
Puppeteer was originally a Plugin for Daz Studio,. and is now built into Carrara,.
It allows you to save Pose "Dots" in the Pupetteer grid,.
It has three options at the top,. Edit / Preview / Record.
In EDIT mode,. you can pose your figure by moving or rotating the bones,. then click in the Puppeteer grid to save that pose,.
continue doing that until you have a bunch of different Poses, saved as dots in the grid.
Then in PREVIEW mode,. you can roll your mouse around those poses, and the figure will move as you do that.
If you find a pattern of motion around the dot's which you like,.
You can jump into RECORD mode,. and move your mouse around again,. which records the motion of your mouse over the poses,. and creates the animation.
This animation can be converted to keyframes in the timeline,. by using the "detach animation" option.
(you can also save and load a whole set of poses for your figure) (see pic)
If you really like that animation,. you can convert it to an NLA clip,. save it to your browser,. or drag it into the NLA Track, from the Clips Panel,. and add it to your other clips.
If it's not so nice, but has nice bits' in it,. you could either tidy it up manually,. or delete it and re-record the motion in puppeteer.
It can be a bit sticky at times,. so .... You can also use the Timeline in a more conventional way to make Keyframes by moving forward and Applying a Pose dot tou the figure at that point, to create a set of keyframes,.
Again,. any keyframe animation you create,.. can be saved as NLA clp.
NOTE: when you "Create a Master clip" (NLA Tab) .. there's a little options panel, which allows you to set a "loop Offset" for that clip.
If you've created a Walk cycle,.(one ccomplete step) which was Loopable.. then this "Loop offset" is used to make the animation loop as many times as you need,..
For most animations the "loop offset" would be the HIP bone of the figure.
I know there's a lot of information there,. and there's more to come,. so i'm trying to pace it out a little bit,. but any questions you have,. just ask.
The bones you've got now, look much better, ....one concern is that the arms seem to have one bone from the shoulder to wrist,. (that may be due to now knowing how to sale the bones as you draw them),..but it also depends on what you need the figure to do, or how it will move,. and you can rebuild thoseif you need to have more flexibility,. Bending arms.
I'm fairly certain (though I've never tried it, but heard Wendy mentioning it) that it can be a lot easier than that by just selecting the vest and using "Follow Skeleton" (?)
HI Dart :)
Yes, you can do that too,. but the vest needs to have the same bones,. just like V4/Genesis etc and clothing,. If the clothng has the same bones,. and then you can use "fit to"
you'd just duplicate the bones and Attach those to the clothing,. then you can use "Fit to" and select the figure.
so that's three ways to do it:)
Actually , that seems the better option , and more user friendly for DS / Poser users
Very Cool model Otto :)
I hope you don't mind me playing around with my version of it,. ..really nice helmet too, I'd like to see how you've made that.
I agree. Very cool model, Oto!
Hi, I am checking out all your above suggestions. Thanks much.
The helmet is an existing model I have downloaded, I do this sometimes to improve my own models, and sometimes to save time modelling.
Thank you, I think that the white guy needs to be better modelled, but I left it that way trying to solve first the animation features but I am thinking seriously to re-model him again.
Thanks for all your input guys is really helping me to learn something that is absolutely new to me.
Cheers!
Otto
This is something that I rally need to see :) With you expertise I am sure it will be a great work.