Learning 3Delight Again
 Tynkere
Posts: 834
Making this topic to avoid cluttering “Show Us You 3DL Renders” which probably wasn’t meant for questions. If such a topic already exists, let me know & will ask Moderator to delete.
So on to the fun. As title implies, forgotten how to use most of 3DL and would like to use the shader more often.
1.) How are users able to get pull-down menus for 2D files in DS 4.20? I’m having to swap between 4.12 to load some of them.
2.) Cornea & ‘popping’ eyes out.
“3Delight message #43 (Severity 1): R5009: “displacementbound” attribute without “sphere” value has no effect”
In plain English, what does that mean?
Eye moisture seems reflective but the cornea rsl I saved from G3 doesn't seem to have any reflection & appears flat. Tried the old “cornea bulge” trick-- no luck.
Suggestions to get the eyes to pop out?

3.) Pint of ale looks dark. The back of the 10 meter test room is dark, or I'm missing something?
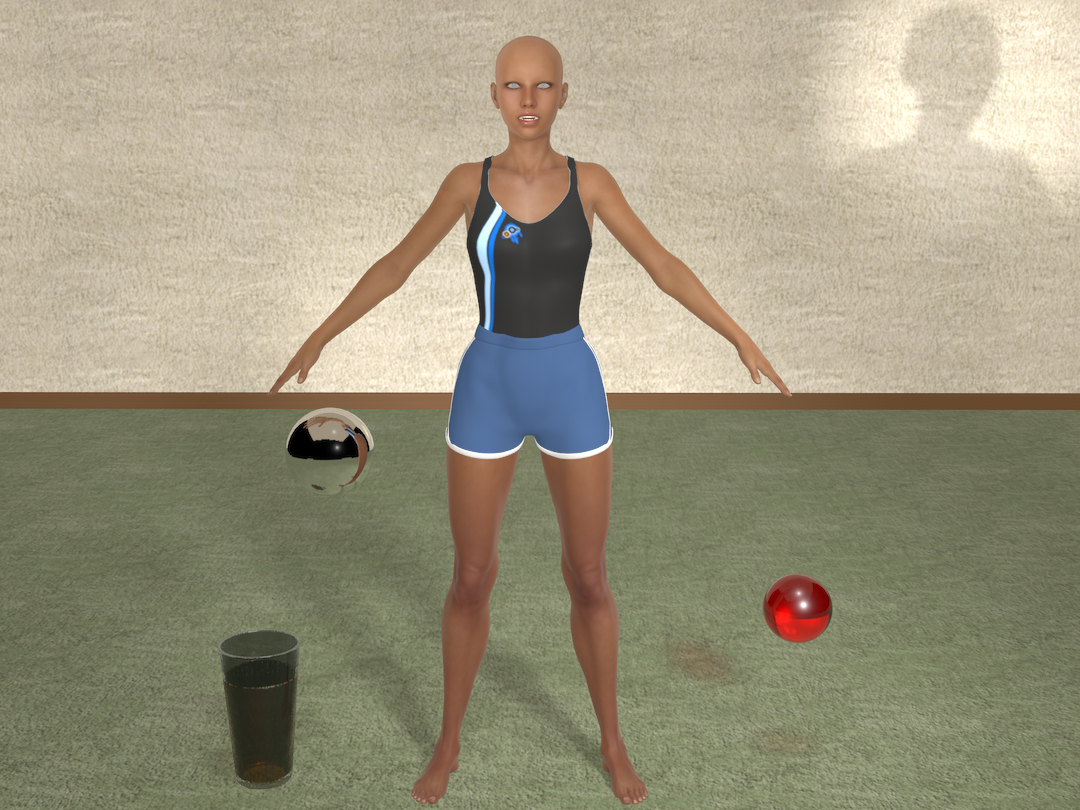
For that matter, not sure if glass would be casting a slight shadow. It's enabled.
Anyway, tips, points or links to previous topics about it welcome.
Adding shortcuts so I can find in one place.
3Delight Lab Topic -- Requires some knowledge as they refer to terms in passing.
Script to update a 'different user interface error and recompile. Might be out of date but offer insight.
https://www.daz3d.com/forums/discussion/23867/
Render without using DS using rib files (out of date?)
https://www.versluis.com/2014/11/how-to-render-daz-studio-scenes-without-daz-studio/
AWE-Shader topic, possible download location, discussion etc.
3DL Useful Stuff Topic. Tute and also urls to topics
https://www.daz3d.com/forums/discussion/comment/6287071/
Another member who had requested help. Has AWE-Surace "barefoot dancer" tute in Awe-environment
https://www.daz3d.com/forums/discussion/303011/in-depth-tutorial-for-squeezing-the-best-of-3delight
Define some of the terms. Other info is dated?
https://www.daz3d.com/forums/discussion/37022/3delight-rendering-engine-for-dummies
Uber2 user guide by omnifreaker (dated?)
https://omnifreaker.com/index.php?title=UberEnvironment2
If need topology for water, etc. and have Carrara
https://www.daz3d.com/forums/discussion/37867/building-carrara-terrains-intro
Handy kelvins to rgb calculator for lighting
https://academo.org/demos/colour-temperature-relationship/
understanding index of refraction tute & ref. table (link to more detailed explanation if want to understand math behind concept)
https://www.cgdirector.com/ior-index-of-refraction-list/
list of common IoR: meant for blender, but handy ref chart
https://pixelandpoly.com/ior.html
glass ior for automotive
Kelvin to RGB calculator/converter tool
https://academo.org/demos/colour-temperature-relationship/
Kelivin to rgb chart
https://andi-siess.de/rgb-to-color-temperature/
Tute for uber emissive planes by Szark
https://www.daz3d.com/forums/discussion/14536/tutorial-uber-area-lighting-the-basics/p1
Basic Props & Water / liquid shaders (if glass is enclosed geometry?)
https://www.sharecg.com/v/82337/related/7/Material-and-Shader/Fistys-Liquids-DS-Shaders-Poser-MT5s
Preset product suggestions: discussion at DAZ
https://www.daz3d.com/forums/discussion/367481/best-shader-sets-for-3delight
Free content-- some of it older-- that might have rsl presets (2022)



Comments
1) Not for a backdrop, I assume, because that hasn't changed. If you can tell us how too do it in 4.12 we can advise how to do it in 4.22.
Severity 1 messages are the lowest severity, just informational, letting you know that you're spending render time calculating displacement when there is none./
Opinions may vary, but generally I set up eyes as follows:
Pupil: Matte black, zero diffuse strength
Iris and sclera: Diffuse and SSS, no specular, no reflection, no refraction
Cornea: No diffuse, only refraction with IoR around 1.35, no specular/reflection, no shadows
Eye moisture: No diffuse, no shadows, no refracton, only raytraced reflections and specular (provided it covers the whole eye)
Tear: Only spec/reflection and refraction with IoR 1.35:ish, no diffuse no shadows
For G1 that does not have the eye moisture I use reflections/specular on the sclera and cornea.
And I don't use the bulge morphs as refraction starts doing funny things at some point;)
Not sure what you meant regarding the back wall?But it seems to me that your lights don't have a physical fall off, which may or may not be part of the issues?
Yes glass and fluids should cast shadows (and caustics but that's a different story). Might be a refraction issue or ray trace depth issue?
Thanks for the help.
Switched to 4 light emissive array for key, rim and two fills. Noticed with rim light as only light source-- the front of actor had nice highlights shoulders, ears, arms, etc., but her eyes were visible. 0_o!
Causing sclera, moisture and lacrimals look too white or pink? Missed a setting? Teeth too for that matter.
I did find “3Delight Useful Stuff” topic, so hopefully fewer questions here when read up on hair, glass, etc.
Final question before going to bed though. AWE-Surface and !Ubersurface just don’t have as many options in 4.20? In DS 4.12, they have dozens of variables and slots for texture files. In 4.20 they seem to be gone. I’m overlooking something?
Right, I'm also about to pass out, bad, bad fullmoon:)) But, before I go, no, my 4.20 has all the goodies, so not sure what's going on there...and yes, the teeth look very bright. Do you use SSS on them? If so, tune down SSS scale or strength or darken the SSS color. Could also be highlights with too low glossiness or too high roughness, whichever you prefer. The sclera is also to white for my taste...maybe they suffer from the same thing? And, obviously, if it's just the diffuse color, should be an easy fix;)
What I thought. My 3DL settings not quite ready for "Show Us Your Renders" topic. ; )
Very strange about the DAZ Studio UI. Support ticket time if open in 4.22 & can show them screen shots.
Anyway, take of yourself. Almost constantly dark for you this time of year? Would drive me crazy I think.
In central Texas, had record cold snap & now time for pruning/removing bushes & plants killed off. Looking forward to the exercise. : )
Thanks again for taking time to help out.
Finger crossed that you find a solution!!
Likewise, friend! Yeah the darkness is something I'll never get used to, but not much you can do about it other than keep a lot of lights on and eating blueberries and fruit:))
Well eating fruit sounds good.
On my end, brush clearing has shoulder acting up, so not much time for figuring out how I did 3DL. Unfortunate real life got in way & I left right about the time Awe-Surface came out.
Decided to give it a shot if serious about this. Using Store version v1.1 I think.
The skin tone is closer to iray version of the actor. : ) Seems to be better with eyes & teeth? : )
2 DAZ spots for left & light fill lights pointed at cheek bones. They are set at 2 but could not find falloff distance. ???
Now for the problems... Tongue and lacrimal (eye socket?) still look weird.
Big question though is the RGB grain. The test renders take about 5 minutes. Doesn’t have time to finish?
Max Ray Trace Depth is 3
Gamma at 2.2
Shading rate is default of 1
Lower shading rate, will take more time but allow finish, or check something else causing noise?
Hopefully if I can just get passable skin, eyes, mouth, etc.-- things like cars & clothing will be easier.
.
Here's a link to DL the latest awe shading kit. I tried to help this user get awe up and running, so please have a look, there is some OT comments as always, but should get you going if you have the patience to browse through it.
For awe to work properly you must use scripted rendering, the vanilla renderer is out of question and will take ages to finish with sub par quality. The scripts are part of the kit and are named Raytracer Final or Raytracer draft.
Explainer: The scripts make it possible to access the 3DL pathtracer in its full glory. It's possible to use the standard renderer (kind of) but then you must use progressive render. Progressive taps into the raytracer, but with many limitations, it's just meant for fast previewing.
You’re very patient & generous with your time.
Apologies for the duplicity. Will bookmark & follow the other one.
As for my own... Oh nooo! You’d warned me about hair. Missed some texture slots or settings. : /
Be interesting to see how the other topic handles it. Foggy drizzle this morning, so can do some reading to find out more about AWE-Surface-- how to turn a hair don't into a hair-doo.
Anyway thanks again for your help & best wishes in 2024!
No worries mate, I'm retired and have nothing better to to atm.
So, you'll find wowie's aweHair shader in the new update, it's meant to be used on transmapped hair. It can blend between using the original hair diffuse maps and using melanine-based procedural surfaces. (So, in practise, all you need is the transmaps and height/normalmaps, the diffuse maps can be ditched or used as much as you want. I don't recommend using aweSurface on transmapped hair, although wowie provided some presets. (Unless you need to use SSS, which is not a property of the aweHairshader)
D/S standard lights can be used, although render slow compared to the awePT arealight shader. And you can only adjust falloff rate, not distance. You'll have to use AoA lights for that;)
PS: If you insist on using aweSurface on transmapped hair, atleast add translucency and adjust specular roughness with anisotropy, to simulate the 3DL hair specular BRDF;)
Also, if you convert IRay hair to awe, transmaps will have to be added manually!
Hopefully type and attach before automatic sign out error: : O !
Am missing something obvious (I hope) for hair color? Hair g3f with rsl preset. Color in the presets makes no diff.. Hair renders black in scripted Awe-Surface.
Hoping easy fix.
Looked at link you suggested. Member has answer or ran into hardware probs? Did not see activity. Might've run into odd 'Signed Out' error.
OOT Sporty Ponytail, I presume?
By presets, did you mean the OOT presets or wowie's aweHair presets? Make sure (surface editor pane - top left) the AWE Hair shader is applied to all the hair surfaces. The hairbands could use aweSurface, since opaque. With AWE Hair applied, check the main parameters for hair color strenght (diffuse) and the "Override Hair Color" slider, down at the bottom of the surface pane. If 0%, the hair will use the diffuse color (with or without maps, you can pick a generic color), and if 100% it will ignore the diffuse and only use wowie's procedural colors, controlled by the black/red melanine sliders. You can blend between the two, obviously.
Also, your testrender is rather underexposed, might be good practise to use a higher intensity while setting up surfaces;)
A good workflow could be: Pick the OOT preset you plan to use, apply AWE Hair, re-load transmaps if lost, Apply one of the AWE Hair presets (blond, brunette, black etc), balance the original maps against wowie's melanine approach using the "Override Hair Color" slider. Ajust Hair Color strenght, translucency strenght and specular strenghts to your liking, for the final result.
Let me know if you get lost on the way!
And, I'll repeat, if you use a standard shader in this context, the diffuse will render pitch black.
Not at my workhorse atm, so forgive me if I remembered the properties incorrectly::-) RTFM, btw
Not my problem;) If I decide to try help someone, I go the distance And yup, this site is a real mess right now...
Thanks. Very good of you. : )
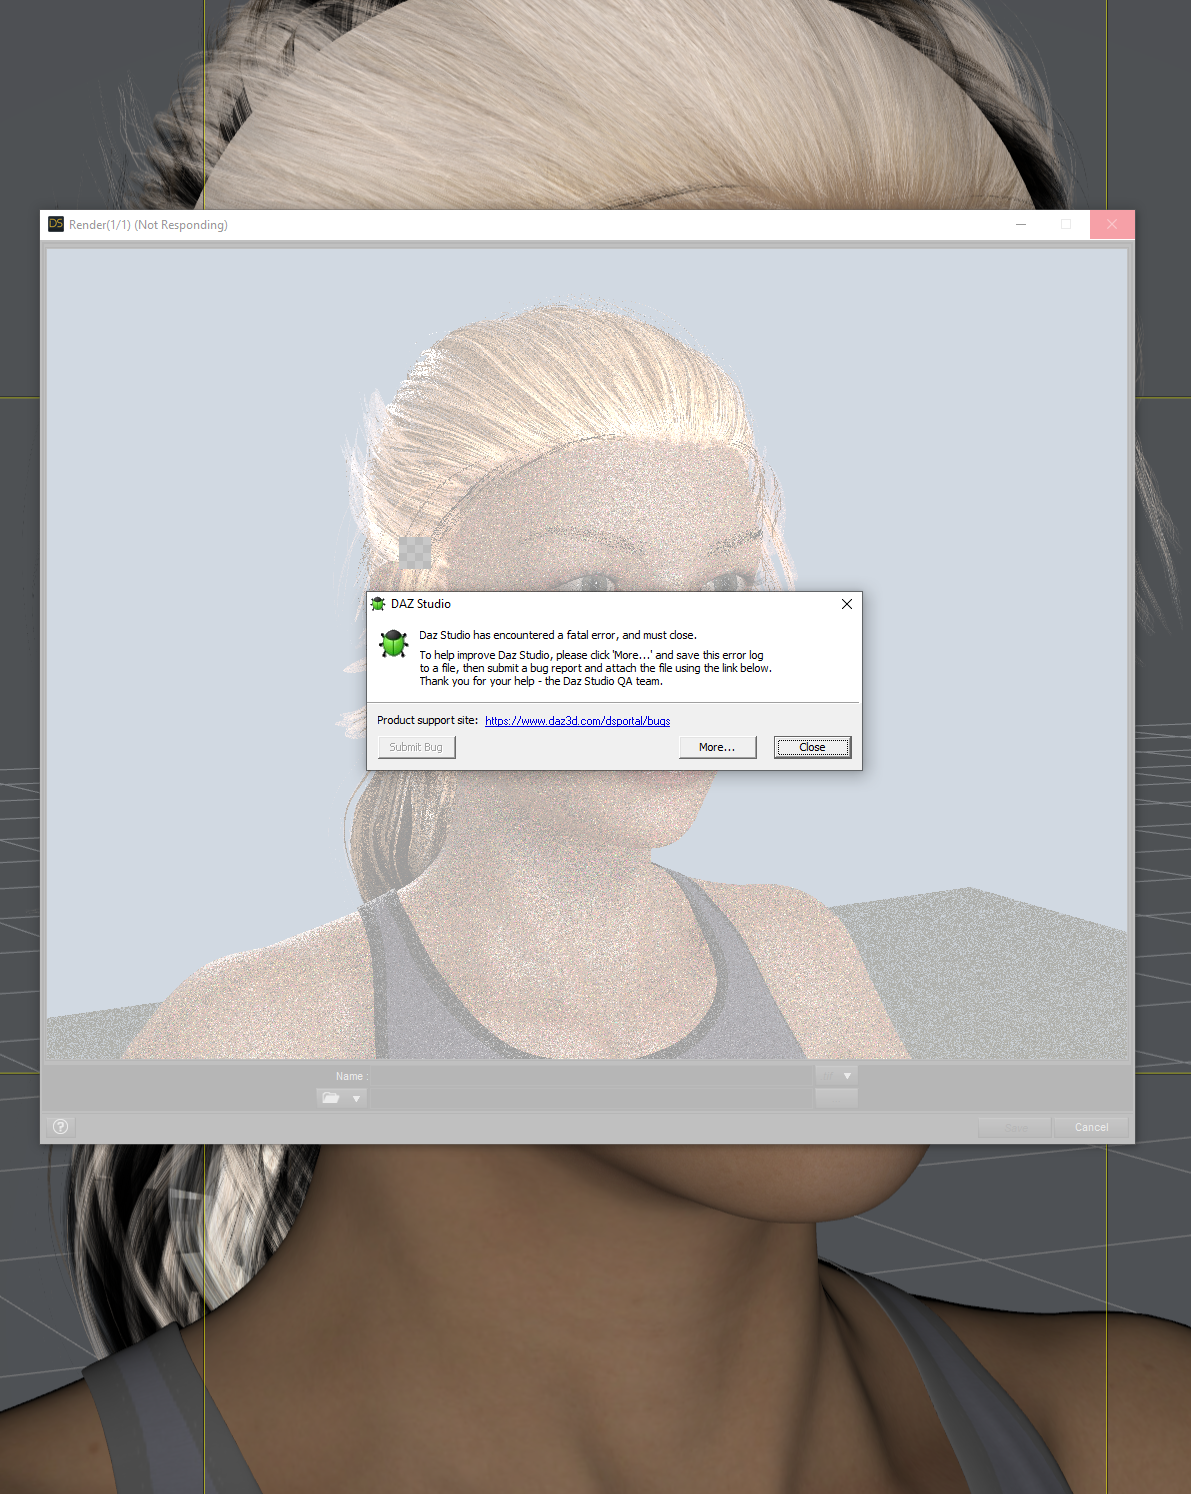
Might've accidently replicated the other member having technical difficulty. : (
I'm going to take a break from it and do some reading. Maybe I'll have a "Eureka!" moment tomorrow or figure out what happened that made DS crash.
Fortunate maybe that you're on a Mac. ; )
The good news (if I can get it to render) is that the hair color should be pretty close.
This sign out thing is getting worse in my esitimate.
On to topic tho. ooks like "pony tail" (or transmapped?) might’ve caused crash.
Trying a simple one for G1 to learn more about tweaking color.
For now at least that’s it. Hopefully, the sign-out difficulty resolved soon.
Glad you're making progress, despite technical issues! Let me know if I can help!
I checked, and wowie seems to have tested it on 4.7 and 4.20(WINDOWS) with no issues reported. I'm having opacity issues using 4.20 on the Mac, btw. Looks like "multiply opacity with specular/reflections" is flawed when using an opacity strength value of 0 or 1. My workaround: I use 0.99999 for hair/lashes/foliage with transmaps, and 0.00001 for "zero" values. Wowie couldn't replicate it on his end.
Also,he reported that there's a bug with specular maps: To use them in spceular lobe 2 you need to insert them any map into specular 1 also, even if it is not turned on.
Don't miss the utility scripts he provided, insert spec. maps into lobe 1 and use the "transfer specular maps" to duplicate them into spec2 and coat strength;)
Maybe I should ask a diff. question before a long drawn out one.
You *did* suggest avoiding awesurface for transmap hair, so how do you go about it? Read the “Tips & Tricks” section on hair, but still not sure.
Render .rsl preset hair in Uber (or have to manually set each hair card if iRay)? Render the rest of the scene in Awe-surface & composite in PS?
===
Sort of related news. Good to know about Wowie. Last I read he’d called it quits & last activity was to leave free version of AWE-Shader in Dec. 2020 if memory serves right.
Anyway, in mentioning Wowie and DS 4.20, I installed zips to its respective folders. Surprise! Where is omnifreaker? : 0 ! Copy those folders from DS4.12 to 4.20 -- I have all the bells & whistles now.
Will try the workaround and Wowie’s fix as suggested in 4.20-- saves me having to convert to G8.1
A remark someone typed at 3DL Lab topic stuck with me. "Progress comes slow." You’re very patient. Many thanks ; )
No, no compositing needed!
If you have installed the latest build (AWE Shading Kit, AWE Hair and AWE Surface), you should have 4 shaders in ContentLibrary/ Shader Presets/ wowie/ AWE Shading Kit. These are all you need, and all there is at the moment, to use the 3DL pathtracer inside DS. (and, of course, the scripts, kindly provided by Mustakettu85)
1. AWE PT Arealight shader - Emissive shader
2. aweSurface shader - Surface shader, can be used on any surface except emissive surfaces
3. awe Environment Sphere shader - a simple emissive shader used for ambient surfaces
4. aweHair shader - a special shader for transmapped hair, using the 3DL hair specular BRDF (bi-directional reflectance distribution function)
You CAN use aweSurface for hair but it does not have that hair specular BRDF, you'll have to use one of the 4 BRDFs provided with aweSurface, then fiddle with anisotropy and translucency values etc to come close... and it does not have the melanine approach.
Be aware that any hair materials preset that ships with any hair, IRay or 3DL, will apply one of the standard DS shaders to the hair, along with the relevant maps. That's why I suggested to first choose one of those presets to load the maps, then change the shader to aweHair, after which it will render correctly with the Raytrace Final script.
Hope this helps, if not, shoot:)
Btw, was this crash due to not using the aweHair shader, instead using the OOT Hairblending shader (MDL)? Can you replicate it or is it crashing randomly?
Think crash was probably random. Didn’t happen this time around anyway.
An improvement over black only, but still sort of looks like she’s wearing a shower cap. Having a bad hair day...
One final question. Had tried “Super Messy Updo” but unsuccessful so went with “Sporty Pony tail.”
Free conversion script (Iray to 3DL) might be better than nothing but ran into an error with Uber to Awe script.
Probably put it in wrong place
“My Library > Shader Presets > Wowie > AWE ShadingKit > Utility Presets & Scripts.”
Greek to me from the DAZ log file.
“2024-01-30 19:22:42.016 Loading script: D:/3D Stuff/TyknreDAZ_Library/Shader Presets/wowie/AWE ShadingKit/Utility Presets & Scripts/AWE Transfer Uber.dsa
2024-01-30 19:22:42.018 WARNING: Script Error: Line 25
2024-01-30 19:22:42.018 WARNING: TypeError: Result of expression ‘prop1’ [null] is not an object.
2024-01-30 19:22:42.018 WARNING: Stack Trace:
<anonymous>()@D:/3D Stuff/TyknreDAZ_Library/Shader Presets/wowie/AWE ShadingKit/Utility Presets & Scripts/AWE Transfer Uber.dsa:25
2024-01-30 19:22:42.019 Error in script execution: D:/3D Stuff/TyknreDAZ_Library/Shader Presets/wowie/AWE ShadingKit/Utility Presets & Scripts/AWE Transfer Uber.dsa
Anyway, guess that’s about it. PDF walkthrough & maybe find some older hairs that don’t rely so much on transmapped hair cards.
Thanks again for all your help. If ever in Austin/San Antonio TX corridor, dinner & beverage of choice on me. : )
Heh, cool render:-) I think the specular roughness needs adjusting. Also, the IoR value might be too high, as that has a great impact on the (under the hood) Fresnel function.
I usually start with something like IoR 1.42, spec1 at 50%, spec2 at 80% strength, if there are specular maps I delete them, I never use those on hair. Translucency at 40-50%. Then adjust spec. roughness and bump/normal/displacement to scatter the highlights a bit. If this doesn't work for you, please share a screengrab with the currently used parameters!
Yup I get the same error message when trying to use the Uber to awe script, think some update broke it.
Tks, friend:)) And if you ever feel a sudden urge to visit the Finnish westcoast and check out the polar bears roaming the streets, the eagles and the midnight sun, let me know
Before surfaces, check light setup? Not sure why hair isn’t picking up much key light and fills.
Surface tab settings a great idea if you have the time. In addition to your suggestions, set “Opacity Optimization” to around 66.7% - 90% ? Showing as zero. Thought I’d changed that. Guess it didn’t get saved.
Hopefully will have time to work on it tomorrow.
PS: Did an image search and the midnight sun looks unbelievable. It casts a golden glow over everything or the photographers doing a little editing? Beautiful country -- would love to hike there, primitive camping.
Tks for the screengrab! It shows that you have aweSurface, not aweHair applied to the selected surfaces. With the hair and its surfaces selected, click the aweHair icon to apply the correct shader!
Opacity optimization, found in both shaders, is used to mask out non-white values from the opacity map. There are two filters, one for controlling black- and one for white values, can't remember which way it was from the top of my head, I'll check. Then the Opacity Optimization slider is used to mix the un-filtered values with the optimized ones. Setting the sliders incorrectly can result in a black map (hair is invisible).
This function should only be used for "problematic" maps, and, when parameters are set properly, it will will speed up the rendering process. (Or to make the strands appear thinner, as altering the opacity map will have a strong impact on the result, obviously.)
So I suggest to leave the optimization slider at 0, as a starting point.
@wowie said:
Here's a quick overview of the opacity filter and what they do. Basically any input value below the first filter will be treated as 0 (fully transparent), while any input value above the second filter will be treated as 1 (fully opaque). The filter themselevs has a gradient though so whatever value you choose for the first filter will always be less than the second filter. The optimization will try to cutoff half of your input range.
Like this
You will likely be tweaking the second filter which will lead to a more solid output (to avoid excessive render times rendering less than 100% opaque and discarding areas with 0% opacity).
A short note on lighting:
Use solely the AWE PT Arealight shader for best/quickest results. Wowie's light plane presets (ContentLibrary/ Light Presets/ wowie) are easy to use. Since they were not updated for the later awe builds you need to add light intensity. Try something like 7-8 EV with the default 1m x 1m emissive plane. The emitter can be scaled as needed, also in parameters there are morphs for scaling top/bottom etc. Use the pivot point for moving/rotating the emitter.
D/S standard lights work but wowie's optimizing will be lost.
Who'd have guessed hair would be such a stumbling block. Looks like I have two options but both will end up reading "Shader: AWE-Surface" in the surface tab.
Tried a G2 hair. Surfaces tab till reads AWE-Surface no matter what option, so either I've installed AWE-Surface incorrectly, or I keep making the mistake. 0_o
Back to basics. Find a hair with rsl and use Uber2 environment & 4 Uber2 emissives.
E&J's "Liberty Hair" seemed to work better.
Tweak for a lighter color maybe, then see how it does in AWE-Surface.
---
At the risk of repeating myself, you've been very patient with me. Thanks. What I'd thought would be quick refresher has turned into long-term project. A puzzle about hair. New found respect for hair in 3DL renders. Not just a matter of popping eyes out if looks like wearing a mop! ; )
Hmm, first check in Applications/DAZ3D/DAZ Studo4 64Bit/Shaders/wowie (for the DS version(s) you intend to use with aweShadingKit) that all the shader files are in there, should look like this: (Note, older build here on my laptop, the dates may vary)
Then check Applications/DAZ3D/DAZ Studo4 64Bit/Scripts/Support/wowie/Surface:
...and Applications/DAZ3D/DAZ Studo4 64Bit/Scripts/Support/wowie/Light:
I'm prolly stating the obvious here, but all the awe presets (hair, lights, surfaces, character, metal, glass etc, AND the scripts to apply the four shaders, should sit in your runtime (ContentLibrary) which is shared by all the DS applications you may or may not have installed.
So in ContentLibrary/Shader/Presets/wowie/AWE Shading Kit you should find two icons for applying the actual shaders (aweSurface and aweHair). Use one of these FIRST before applying any color presets. Select the hair and surfaces, double click aweHair to apply the aweHair shader, double click one of the aweHair presets if you want to start from one of wowie's presets for black, brunette blond etc.
If you decide to use aweSurface for the hair, first apply the aweSurface shader, then find the aweSurface Hair presets and apply one of your choice.
If you still have issues, we'll take it from there...
Correction: The aweSurface hair presets are simply called "Hair Presets", as they were made before wowie added the aweHair shader, sorry about that;)
Ah. Was missing AweHair_Displacement.sdl and AweHair.sdl - thanks for sharing that. Looking forward to seeing how it works now.
Last night’s tweaking is brings up question about how it renders, or maybe surface settings.
Swapped sclera & iris textures. Hopefully they look a bit better.
Odd thing in scripted ‘draft’ render. Difficult to describe, but eyes & mouth will look sharp and in focus until final pass. Then, as it finishes, eyes look slightly out of focus -- to me at least. Render settings or eye moisture surface?
Same for mouth. No idea what would be causing a sort of white mask over the lips-- esp. at corners and where mouth is closed. Tried adjusting specular 1 & 2 -- no luck.
Oh good to see it's working now!! Eyes are definitely much better.
Just guessing here but I'd say a little bit of both:) The draft render uses only 4x4 PS (pixel samples) for fast previewing. So the sampling is a bit rough. Combined with the pixelfilter (Gaussian 2x2?) at that pixel resolution it will be a bit blurred. At least, by the looks of it, you did not use progressive mode? Progressive will reset pixelfilter to box 1x1, which in practise is no filter. So will be sharper and noisier.
I render at minimum 16x16 PS (what the 3DL-devs recommend for final renders), non-progressive and use the CatmullRom filter at 4x4 or 5x5 pixel width, depending on pixelsize. The gaussian filter is too blurred for my liking, unless I need that effect. Another way is of course to render at double pixelsize and scale down in post, and take the render hit;)
Are you using specular maps? If so, check if the lips are too bright. To me it looks like they are too reflective, or have a too high IoR with a too low Fresnel roughness value? Or try to raise bump/displacement to scatter the reflections a bit more? Or it could be your ambient lighting that is overly bright? Are you using the environment sphere with indirect light/occlusion enabled? If yes, try turning off visibility for everthing except camera, see if that changes things. You can use the various offset parameters to finetune both the appearance and light/reflections of the env. sphere...
Also, if you use more specular strength on the lips than on the face, you can get this effect. The PBR solution is to use a roughness map with a gradient on the face and lips, which is how I do it, mostly. Import the face spec. map into GIMP/PS, create a white layer and paint the lips, maybe also forehead, cheekbones, under eyes, with a mid gray color, which will make those areas 50% less rough. Or make them even darker for a more dramatic effect. Save the layer as a RGB .png (not grayscale). I save my custom maps as 16bit .png:s but 8bit will work just fine.
Oh, btw, what hair is that, looks cool?
Regarding glossy lips: Consider using the coat layer or the base thinfilm layer to add specular/reflection. Make a grayscaleRGB thickness/strength map for the face, with black for no strength and white for 100% strength, and blur the edges slightly for a smooth transition. Apply to both the face and lips.
Also, I use about 70% diffuse roughness for female skin, but for lips and nails I use 0%, or a very small value. Instead I fiddle with IoR and GlossyFresnel roughness to get the sheen I want. I guess there are many ways of achieving the same thing...
We've been debating, off and on, the use of specular maps with wowie and Mustakettu85. Admittedly spec. maps are a "hack"(IRL reflectivity is pretty uniform over the whole body, only roughness varies), and no maps are def better than bad maps, if you ask me. Watch out for super dark maps, nothing but trouble! No maps is the PBR way, but that requires good topology and height/roughness maps.
And you only need to make one face roughness map for each UV-layout, or you could probably do just one map and use the UV transfer function to create copies for the other Generations? I haven't tried that myself,though.