Help with Sleeves
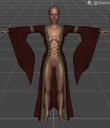
Can anyone help me fix the sleeves or point me to a tutorial that can fix this issue?


Screenshot 2024-01-15 134026.png
799 x 927 - 463K
You currently have no notifications.
Can anyone help me fix the sleeves or point me to a tutorial that can fix this issue?


Licensing Agreement | Terms of Service | Privacy Policy | EULA
© 2024 Daz Productions Inc. All Rights Reserved.
Comments
It looks like the dress has been autofitted, and the loose sleeves has been allocated to the torso.
Which garment is it, and which target figure?
It is the 'Fair Maiden Dress' for Genesis 9. It has been auto-fitted to a G2. Is there no way to fix after an auto-fit?
You made G9 Clone for G2F yourself or just use the clone product from MMX ?
I am using the one from MMX.
You can edit the weightmaps on the sleeves so that they are set to move with the forearms, not the torso or other bones as now (weight projection goes by proximity, in cases like this it would be helpful if it could take account of geometric connection too). Use the Node Weightmap brush tool, select a forearm, and paint in the weight on the sleeve. You might also be able to simply apply a dForce modifier and let that handle the sleeves..
I answered your PM.
I would recommend a good method without auto-fit for such a particular case of G9 - G2F clothing conversion. G2F has TriAx weight and this dress has long sleeves, so auto-fitting, rigging and weight projection are special. Tweaking them turns out to be pretty cumbersome.
Let's utilize G2F Clone on G9 to play the tricks, however, all default Clones on G9 have no ERC Freeze. Without ERC Freeze, we're not able to go for this way. Steps are shown as below:
1) Select G9, Show Hidden Properties, go to path: Hidden - Clones, dial Genesis 2 Female. Edit - Figure - Rigging - Adjust Rigging to Shape.Then ERC Freeze. (ss1)
2) File - Save As - Support Asset - Morph Asset(s). (ss2)
3) Load the Dress to G9, dial Left Upper Arm - Bend: 45, Left Forearm - Bend: -10; Right Upper Arm - Bend: -45, Right Forearm - Bend: 10, to make a T-Pose. (ss3)
4) Select the Dress, set Resolution Level to Base, export to OBJ file. (ss4)
5) Load a G2F, import OBJ file, rig it to G2F with Transfer Utility. Then addd a Smoothing Modifier to it: Edit - Figure - Geometry - Add Smoothing Modifier, and Convert to SubD: Edit - Figure - Geometry - Convert to SubD. (ss5)
6) Transfer Morph Targets from G9's Dress to G2F's. (ss6)
7a) Enable dForce: select the Dress on G2F, Edit - Figure - Geometry - Add dForce Modifier: Dynamic Surface. Select the Dress on G9, Surface pane, slect all surfaces, Copy Select Surface(s), then paste them to the Dress on G2F. (ss7)
7b) Transfer dForce Weight: DS menu : Create - New dForce Modifier Weight Node to both Dresses. Alt + Shift + W, select Weight Node on G9's Dress, in Tool Settings pane, Copy Selected. Select Weight Node on G2F's Dress, Add Map and Paste Selected. (ss8 - 9).
Now everything on G9's Dress has been transferred to G2F's Dress. Test everything as needed, then save it as a Wearable Presets... or Figure Asset with your Vendor Name. (PS: The dForce properties on dynamic surfaces were not really well set on the original dress, better tweak it.)
Be noted that step 1) - 2) can permanently enable perfect conversion for any G9 - G2 case in the future. You can transfer everything from a G9's Wearable to the re-rigged one on G2F.
Thank you so much for this thorough explanation and guide. It works ((:
No problem ~ Glad that it helped.