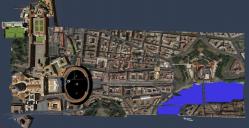
Carrara model of St Peter's Square and environs
 Yofiel
Posts: 204
Yofiel
Posts: 204
I hope to share this model publicly, I have put a month so far into optimizing various public-domain sources, mostly for Google Earth, for Carrara. When I started it was 500MB for about half the current size. Now the source file is 3MB with 48MB of external images so I am starting to fill in the remaining holes. I am seeking advice for the best way to share the data and for ideas on what would make it most useful. Here is a top view and draft render.
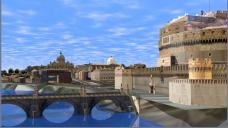
basilica.jpg
1769 x 911 - 267K

Capture.png
1194 x 677 - 1M
basilica2.jpg
1211 x 680 - 114K

basiclica3.jpg
1210 x 685 - 109K
Post edited by Yofiel on
Daz 3D is part of 
Connect
DAZ Productions, Inc.
7533 S Center View Ct #4664
West Jordan, UT 84084
Licensing Agreement | Terms of Service | Privacy Policy | EULA
© 2025 Daz Productions Inc. All Rights Reserved.
Comments
OMG that is awesome, however you choose to share it I wants
double that
:) I added a couple more images. I was planning to improve the bump maps, ground, and add more building models, but what I do from here on out increases the weight of the model. And when I do share it, I want to put it somewhere that it doesnt disappear.
looks great..
maybe sharecg.com would be the place to put it ;-)
You could also try http://tf3dm.com/
Wow, that looks great. Thank you.
Wow. But I also just visited your website and your Greek Carrara scenes are cool, too. http://www.yofiel.com/art/carrara/greece And the essays...
Thank you! SileneUK
Well thasnk you )
I did figure out how to make the domes properly curved without using alot of polygons. Also I added the white lines in St Peter's Square using a very deep stack of procedural shaders, because it was just impossible to make them from a texture map, being quite thin and >300ft in diameter. I do want to put a little more into improving model quality before publishing it.
I bookmarked your site as it looks interesting, prob a bit geeky for me but one day may study closer.
i play my music mostly on a synthesizer and drum machine with some music score generated midi mostly using Myriad's Melody Assistant.
I have to actually put notes on a stave to create stuff, or at least play it, piano rolls leave me scratching my head.
DAWs have always been confusing to me, I am too old school, have LMMS, Darkwave and a few others but it all leaves me baffled
Thank you for introducing yourselves, I hope to learn more about you )
I started splittig pictures of the statues into spearate o0bjects and putting them on little plaes. They have modifiers which cause them to rotate to face the camera. I am getting some white rings around the outside of the PNGs and I am trying various things to remove the border--changing the matte, changing the render mechanism, etc--so far I have the best results with no matte and rotating them to face the camera. If they are at an angle to the camea and the sun is on them, they look like bright white lines.
If the camera is higher or lower than the statues with free constraints, they tilt, no matter what settings I put ojn the XYZ modifier. So I enabled constraints and put a custom settings on each one so that I can move still them during design, but they are locked in the XY direction (Y is up/down in this model). So one has to be carefult o keep constraints on, or they all tilt and it is almost impossible to get them back to the right orientation.
For the statue shaders, I multiplied the very low resolution image (70x50 pixels was the best I could get) with a color gradient, then applied the same mechanism to the specular channel and added an inverted version of the image to the bump chanel. This made something shiny and 3D that is approximately the shape of a human figure and vastly better than the original picture, but I am sure it could be further improved.
So far I have made 32 of the 70 statues. Here is the original clip from the photo of one of the lowest resolution blobs, and the results in the shading room.
So far I have replaced about 150 of the 1,000 unique texture maps, due to errors in the source data from 3d Warehouse. Some were image substutions; some I applied procedural shaders; and some I added new pictures. The remain a signficant number which could definitely be enhanced.
For the new texture maps, I mostly googled for a high-res picture using the Google image search options to limit the sizes returned, then opened the best image I could find in Photoshop. First I selected the desired area and cropped, by selecting the rectangular marque area and then selecting 'image'->'crop' from the menu--which is the end of the obvious part.
Then I adjusted the result to a orthogonal proportions with the PhotoShop 'edit'->'transform'->'skew' command, dragging the skew corners until it was right and then pressing 'enter' to apply. This is very easy actually, except only if wishing to redo, the transform and 'enter' commands count as different steps in the undo list, so one has to remember to use 'ctrl-alt-z' twice to undo, rather than just 'ctrl-z'. I find generally it is better to unskew the horizontal and vertical axes with two separate skews.
Sometimes a 'edit'->'transform'->'perspective' command helps remove lens warp in the picture middle, but it also adds a curve to any straight lines, so I generally try to crop either to remove the warp (losing the corners), or leave the warp in, depending on the picture. I welcome advice on a better way to fix that.
That was relatively simple compared to creating transparent images, such as required for the statues. The first unnecessarily irritating obstacle is that, to make a transparent area in Photoshop, it won't let you delete background to transparency if the layer is locked. Even when you open a PNG, the base layer is locked and cant be unlocked by clicking the lock icon. So one either has to duplicate the base layer, and delete (or hide) the original layer...or, I finally discovered...one can simply drag the base layer's lock icon into the layer palette's garbage can.
Even though one can't unlock the base layer by clicking the lock icon, one can nonetheless drag the lock icon into the trashcan, for some reason I am sure Adobe will explain is a 'feature.' I know of no documentation on this 'feature.' If one doesn't know this 'feature' and inadvertedly clicks on the lock icon while dragging a layer to the trashcan, of course the layer doesn't delete, leaving one feeling at least puzzled if not aggravated. So if you were puzzled why putting a layer in the trashcan didnt work in the past, that's probably the reason why.
To delete, experts use the PhotoShop path tool, but I am left handed, so I prefer to use the amazing magic wand and touch up with an erasor--much to the scorn of others I am sure, but I have got quite good at it with practice.
Anyway, here is the complicated part. Photoshop also adds a white matte to the semitransparent pixels from aliasing at the edge of the opaque area when deleting background for transparency, and it's not possible to change the border matte color it uses. The resulting white ring is not obvious with the default Photoshop display settings, so what I do is darken the pixel checkerboard displayed for the transparent area, via the Photoshop preferences. But while not particularly obvious in Photoshop by default, and minimally visible even changing the preferences...when using the image in 3D, the white fringe otherwise causes a very obvious and undesirable halo ring around the figure; and then when using for bumps and specularity, it's even worse!
In older versions of Photoshop, the white matte on the semi-transparent aliased border was impossible to remove. Furthermore, even the 'save to web' command, which purportedly can set a matte color for PNGs, does not change the white matte background on the aliased edge--it only changes the matte on the fully transparent area, for whatever that is worth I have no idea. So, many people on the Web say it is impossible to remove the white ring.
But I did finally find, at least in PhotoShop version CS4, it is possible to remove the white matte very simply. A number of more complex solutions are proposed on corners of the Web, the best probably being to use the free 3rd-party Flaming Pear 'solidify' filters, which also adjust the matte color to the best for the image. However, the Flaming Pear method requires flattening the alpha channel, which is an extremely obtuse method inherited from ancient days, and still takes many steps to perform. So I simply removed the white matte by deselecting the image and choosing the menu option 'layer'->'matte'->'remove white matte' and saving a copy of the image, rather than saving for Web. This is at least possible in version CS4. It means a pixel or two on the border are semitransparent, but at the distances and sizes for this project, that makes no perceptible difference. So, probably a Photoshop expert would manually feather or otherwise filter the edges in some way, but for this purpose I found this simple above step sufficient.
In the attached screenshot, the lower one of these images shows the highest resolution photos I could find for the statues of St Peters colonnade with the background removed by deletion. The upper image shows the photo with the matte removed. If you look at the edges of the above picture, you will see how much darker they are, and it works really well in a bump channel. One could probalby improve it further by adjusting contrast for the bump and converting to a normal map, but for these low-resoluition images, removing the white border really did enough to improve them. The second image shows the resulting difference.the statue on the left did not have the white matte removed, and the other two did. All these statue pictures are from source images less than 90 pixels tall that had already been skewed to fit in rectilinear boxes.
To make the individual images I then used the square marquee with 'fixed size' to create identically sized tiles. That's so, in Carrara, I could duplicate the same plane, set to the right size ratio for the image set, for all the individual statues, rather than introduce further distortion from ratio stretch.
When using a 'fixed size' marque to crop an image in Photoshop, one needs to drag the mouse onto the image area and release it when the marquee is in the right position. If one needs to redo the selection, the only reliable way is to press 'ctrl-D' to deselect. Then when correct, one crops it and saves it as a copy (Photoshop displays an expclamation marks about preserving transparency in CS4, but they are wrong and can be ignored). Then what UI did was undo thrice with 'ctrl-alt-z,' press 'ctrl-D' to deselect, and repeat for the next one, which is simpler than reopening the file repeatedly.
So if you want to replace the stateus with your own picture tiles, that's the simplest way to do it I could find.
My last note today is about the import from 3D warehouse. Altogether I have imported about three dozen models, at import totaling about 2,500 master objects, 5,000 shaders, and 1,000 texture maps. I have eliminated about 1,500 master object duplications by replacing them with multiple instances of Carrara master objects, and reduced the number of shaders to about 500. For ease of transfer, all the texture-map images are in one directory. All the objects and shader are categorically named, and the instances organized hierarchically, but I have a little more work to make the naming consistent.
For transfer, I opened the models in 3D warehouse in a trial version of Sketchup Pro and exported them from there. The pro version of Sketchup is definitely not worth $500 to me, and my trial license is about to expire. But I think the only difference between the Pro and free version, as far as Carrara is concerned, is that the Pro version has FBX export. For some models the FBX export works much better than the only viable alternative if one wishes to preserve texture map data: the archaic 3DS format.
FBX VERSUS 3DS
I tried both FBX and 3Ds format for each model, to find out which would yield better results. I found FBX often better than 3DS format, because it preserves object hierarchy and groups more adjacent polygons of the same shading domain into one object. The 3DS format flattens the object hierarchy and splits objects into many more tiny little primitives. However in some cases, especially for older models, the 3DS format preserves shading domains better.
Both imports create multiple objects when one object exists with multiple instances.
So I have manually consolidated about 25% of the duplicate master objects, about 1,500 instances in total, to be instances of the same object. I found when there are less than 8 instances of a simple master object, it doesnt yield that much of a performance difference; but with more than 8 instances, I got significant improvements from replacing the individual identical objects with instances of one master object.
THE SHADER BUG
When importing, one encounters a bug in Carrara. This bug is that the texture maps are imported twice: once as a layer list for the object's global shader, with projection mapping to each shading domain...and again as separate shaders for each shading domain, in the list below the global shader. Immediately after import, if one deletes the topmost global shader, every single one of the lower shaders for the individual shading domains delete too. But after saving the file and changing directory for the images, the global shader gets detached from the shaders for the individual shading domains. Carrara then shades the entire object twice--once from the layers list in the global shader, and once again for each shading domain.
To fix this, after the individual shaders are detached from the global shader, one can delete the shading-domain shaders, and the global shader with its parametric mapping works properly. But if one does not delete the individual shaders from each shading domain, then while shading in shading-domain order over the global shader, the individual shading-domain shaders can cause various parts of the object to be shaded incorrectly and intrioduces some strange and bizarre artifacts.
My solution for this project was to delete the 4,500 individual shaders for each shading domain in every object. This substantially improved rendering time. Also, higher shaders in the global shader's layers list can contain nodes which set properties for all subsequent layers. In other projects, it might be better to keep the individual shaders for each shading domain instead. But with the number of shaders for this model, it made more sense to keep the layer lists in the global shader.
Here is a picture showing the result after the individual shaders are removed and the entire object is being shaded with parametric projections from a layers list in the global shader.
However note to this method: the importer does not add overrides for lower shaders when for example, one layer at the top of the layers list declares transparency, or reflection, or glow, whatever, and lower shaders in the list have no specific settings for that node type. So, if one shader at the top of the layers list declares a glow in the source model, then all the shading domains below it will typically glow too. One has to go in and add the shader nodes to susbsequent layers in the list and override it manually for all the subsequent shading domains, or reorder the list to put layers with more node settings at the end of the list.
With 1,000 unique texture maps, it still takes Carrara 5-10 minutes to load all the textures into 3D view on my machine (i7 with GTX 970), but it does load and render properly, even with 2,500 objects. Prior to the improvements noted above, even half the model did not load on my machine at all. When set to Gouraud shading in the 3D view, it loads and renders with about the same performance as Victoria 4.