Daz 3D is part of 
Connect
DAZ Productions, Inc.
7533 S Center View Ct #4664
West Jordan, UT 84084
Licensing Agreement | Terms of Service | Privacy Policy | EULA
© 2025 Daz Productions Inc. All Rights Reserved.
Comments
Um, no, it doesn't matter at all - I was just trying to be helpful. Sorry for that, won't happen again.
sorry to you - my post came out the wrong way .
bought some howie farkes in the sale.
using:
http://www.daz3d.com/classic-rolled-hair
and it's colors.
http://www.daz3d.com/lux-lucis
http://www.daz3d.com/interceptor-hover-bike
http://www.daz3d.com/helena-for-v4
for the eyes.
http://www.daz3d.com/victoria-4-skin-maps-high-res
http://www.daz3d.com/stoney-creek-sprucevale
i made the: beames, with veloute, the lights, with light spheres, where they hit the scene, and a light for the terminal in the bike.
three points of view:
I'm afraid the WIP will be just before the submission :-). The point is that I wasn't sure I'd have enough time to finish.
The project is a (very modest) tribute to Robert & Shana ParkeHarrison Architect's brother series
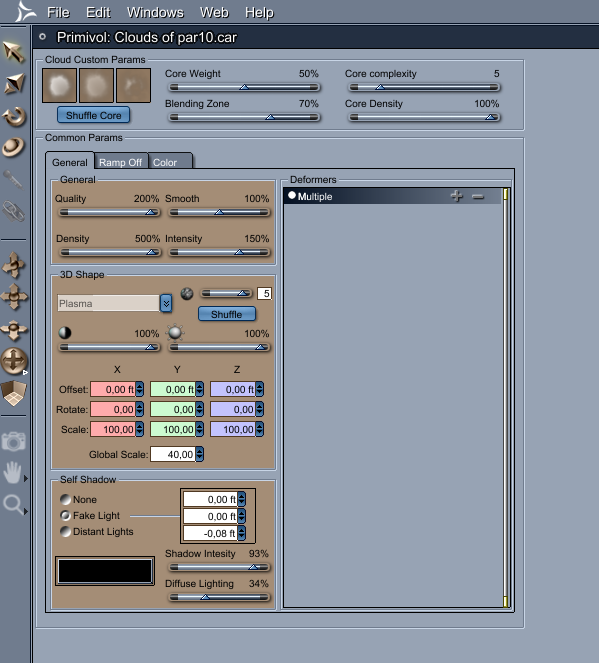
Customized Carrara primitives
Primivol clouds I used Primivol clouds instead of regular clouds because, first, I couldn't get regular clouds to be dense enough for my purpose and, secondly, well, it was my first opportunity to play with it. The settings are :
Simple terrain
Commercial content
Lorenzo Lorez http://www.daz3d.com/lorenzo-lorez
LoREZ Crow http://www.daz3d.com/lorez-crow
The Ladder Collection http://www.daz3d.com/the-ladder-collection
Customized mesh
In the infinite depth of my hard drive was a 3DS glider parachute (download a long time ago from … I just can't remember).
For the clouds contraction, I've removed the sail, just keeping the ropes.
For the bird contraction, I also cut the small sail, the handles, the harness straps.
Image before and after post
Post is done using GMIC Film emulation
Very nice work everybody!
My image is nearing completion, so here's another WIP.
I used a plane I picked up years ago at ShareCG. I need to see if I can find it again so that I can give proper credit and double check the usage rights if I can't find the original file on my computer. Anyway, this plane is very nice as it comes in a Carrara version, shaded and everything. I tried using the shaders as intended, but the reflective surfaces were going to make my render time way longer than I could spare. What I did was eliminate the reflections and worked on the Highlight and Shininess to get a metallic effect. Fortunately for me, the Carrara shaders included a two maps in the Shininess channel, multiplied together. They seemed to cancel each other out, so instead I copied the lighter and more detailed map to the Highlight channel and adjusted the brightness slider. I then put a simple numeric slider in Shininess channel and set to around 2%.
I rendered many different render passes for this scene to help with post production. I used PS and a an Object index pass and Layer Mask to create the motion blur on the prop. I also rendered diffuse, specular, glow, reflection, refraction, and volume primitive passes.
I rendered using the Skylight and just two lights. I did render a lower res version with a saved irradiance map, which I used to speed up light calculations.
If I have time tomorrow, I will render a fire/smoke particle emitter for the engine. To aid in compositing, I will eliminate everything in the scene except the plane. I will then add the emitter to the scene at behind the engine. I will apply a shadow catcher to the plane, not to catch shadows, but rather to act as a mask for the plane's geometry. I will render the scene with an alpha channel, render without GI, and adjust the lighting to keep it simple, but similar to the main scene. Once the image is rendered, I'll composite it with the final render.
thats a terrific image!! love the lateral thinking.
evil. lovely work as always, maybe the spec/shineyness on the cape needs to be reduced?? I'm convinced that she is going to stop that beast, spec or not.
Some wonderful WIPs and entries still coming in. Nice work Shlomi, Philemo, and EvilP. I finally stopped doodling and had a solid idea for my second entry. It is called Amelia's final ascent and involved a female pilot being carried upward by two angels. It was my best work, ever! If you haven't guessed yet based on my use of the past tense, I've had repeated C8.5 meltdowns, so there is no way to confirm or deny if it was good work or not. My angels were based on the Winter Queen special edition of Poser 6, but Carrara is choking when I try to pose the Poser 6 special edition figures. I think all of the copy/pastes of pevious runtime folders might be finally catching up to me. I have other winged items cluttering my content libraries but I am disappointed all the same.
I made the pilot jacket (vertex object rigged in Studio for use with G2F) and the hair style (Carrara dynamic on a hair cap) based on the Ameila Earhart character played by Amy Adams in Night at the Museum 2. I am using the contest notice as the WIP because it has the Ameila character. The intended render will still be Ameila carried toward heaven by two angels.
Well here is something i have been fiddling with tonight to bring Chickenman Back into the competition.
I will see what else I can do in it before time runs out.
EP, looks like the Fairchild C-123, link is:-
http://www.sharecg.com/v/28151/gallery/5/3D-Model/Fairchild-C-123-Carrara-6
Everyone, great work !!!!!!!!
Regards, Bunyip
was just thinking same...
Thank you to you both. If you like that kind of lateral thinking and if you have time, have a look in http://parkeharrison.com/architect-s-brother, it's worth it.
That be the one! Thanks!
Chickenman! Always a welcome character. Well done.
Here is my pilot character, intended to be a tribute to Ameilia Earhart.
- Rainbow - I made a simple rainbow with a vertex strip and made sure that the uvmap filled the uvbox. I then used a shader with a color gradient and then posted 4 points in the gradient box, one for each corner of the color wheel- and used a vertical gradient to drive the color gradient. I used bones so I could bend the rainbow.
- Pilot jacket - made in vertex modeler to fit the base G2F. Created separate shading domain for the collar so that a hair (fur) group could be added later. Then rigged in Studio using the transfer utility. After loading it in Carrara, I added the fur collar using dynamic hair.
- Figures' hair - made hair caps for Amelia and the angels, and used Carrara dynamic hair
- Other clothes - lots of credits including: boots for casual jeans, ballet shoes, corvidae dress, fairy wings. Edited the textures severely.
You don't know she's dead! She and Elvis could be on some south seas island with the Dharma Initiative living extended life spans!
Even though you are taking extreme liberties with the "facts," I'll give you the benefit of the doubt and chalk it up to artistic license. ;-)
Speaking of artistic, you have done a great job on this one!
Appreciate the nice thoughts, Evil.
Now for my second entry (actually my first idea), here is M4 as a clown juggling while riding a unicycle on a tightrope. I used the 3D paint tool to paint the clown makeup directly on M4's face. The hair is Carrara dynamic hair. The clown pants were modeled in Carrara but rigged in Studio using the transfer utility. If anyone wants to use Studio's transfer utility to rig clothing for M4, V4, etc. you first have to load M4 in Studio and use the Edit tools to change its weight status. If you forget, Studio will prompt you by telling you that M4 has the wrong weight when you to try to use the transfer utility for the clothing item.
Again diomede, a very nice execution and a really nice way to use the 3D paint tool.
I think this will be final for this one. I rendered a separate scene in Carrara with just the plane (with shadow catcher) and the particles. I hid the propeller. Once the scene was rendered, I composited it over the the original.
My plan was to render a layer with just the plane and the propeller spinning with a motion blur. I applied a shadow catcher to all the plane except the prop assembly and rendered. Unfortunately, I forgot to lower the default blend for the motion blur from 90%, and the props are barely visible.
What I did instead was to use the method I had used in my previous version, which was to use the Object Index pass to isolate the prop and apply the resulting gray scale image as a layer mask. I then used the oval select tool to draw a circle around the prop and then use a radial blur. I left the selection in place and then applied the radial blur to a copy of the original render below the layer mask.
I have been fiddling away again here is another look.
Still playing with the concept
wow, there's some wonderful work here, best ever I think,
chicken man love the concept , such a twist having your avatar as the hero,
diomede. the clown is excellent. the hair is superb, I was making an m4 clown this week for a book, and I think youve done much better than i
evil flame etc really improves the work (Ps, I am the butterfly, the thing underneath just started a pimple on my bottom and then grew into 'that' , so uncomfortable wjhen i sit down....)
philemo, thanks for sharing that work, amazing to see such minds in action
cheers :)
Pimple? That's strange, I would have guessed that was a Dingleberry! They're generally more squishy, and not as painful- although if it accompanies a case of 'roids, then all butts are off! I mean bets are off! ;-P
ha ha, that's why they call you 'evil'. I always wondered.
I'm loving the entries this month. Great job everyone.
ncamp
Last WIP
Chickenma'am!!!! Loving it.
EDIT: just noticed the numbering. Flying the steam plane should be #16.
Just over 18 hours from the time of this post remaining to get your WIPs and entries in, everyone.
Thanks I fixed it.
What is a man with out his girl?
Richer? ;-)