Blender Noobie having issues with morphs (shape keys). Please help?
I hope someone can give me some helpful pointers, but I'm running into an issue with the results of several of my morphs not meeting expectations. Before I try to waste my time with going too far forward, I hope someone can help me fix these early efforts.
I'm working on a dragon figure that I had purposefully tried to set morph targets (like spinal ridges, belly scales, etc) for a wide versatility by having each ridge individually controlled--with the intent of using Blender's Driver function to control multiple sets of mporphs in the way DAZ and Poser uses JCMs, and such multichanel controls.
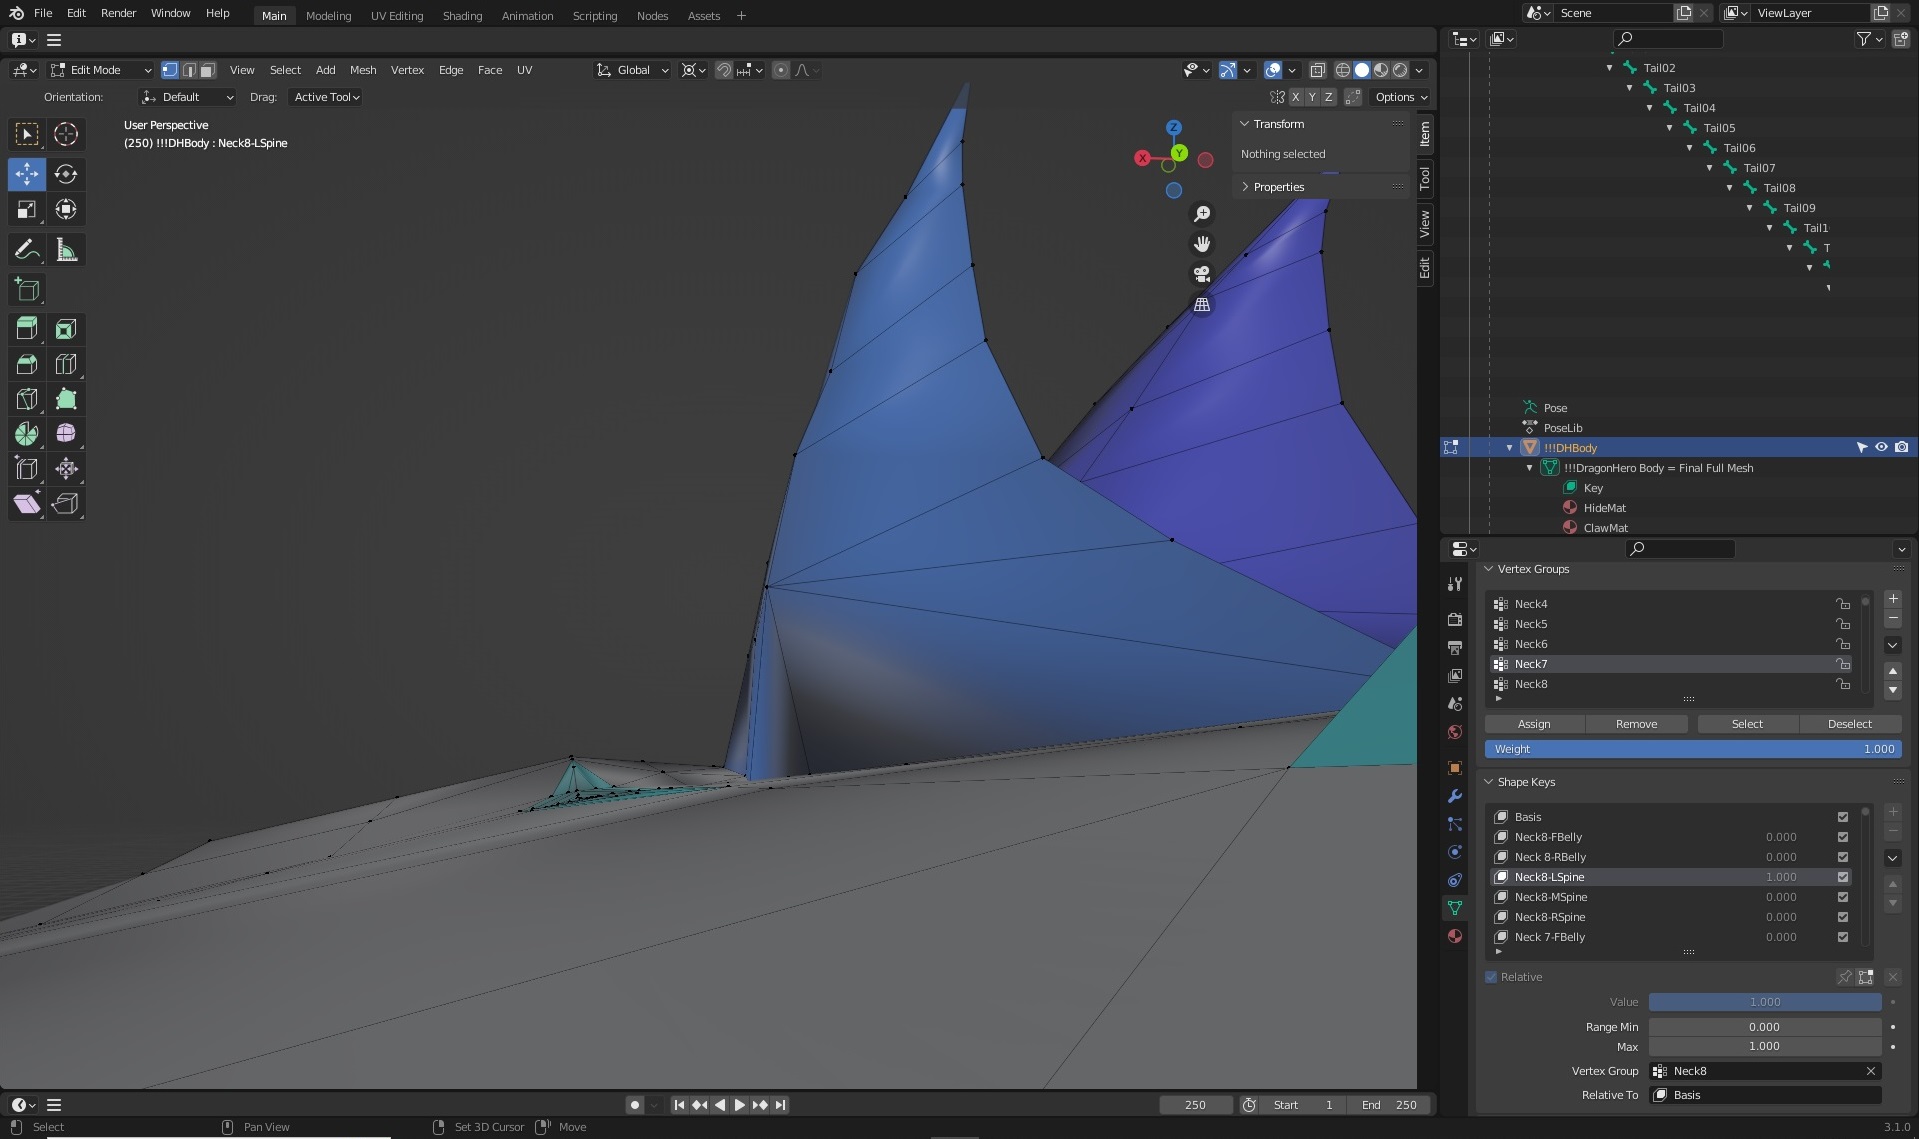
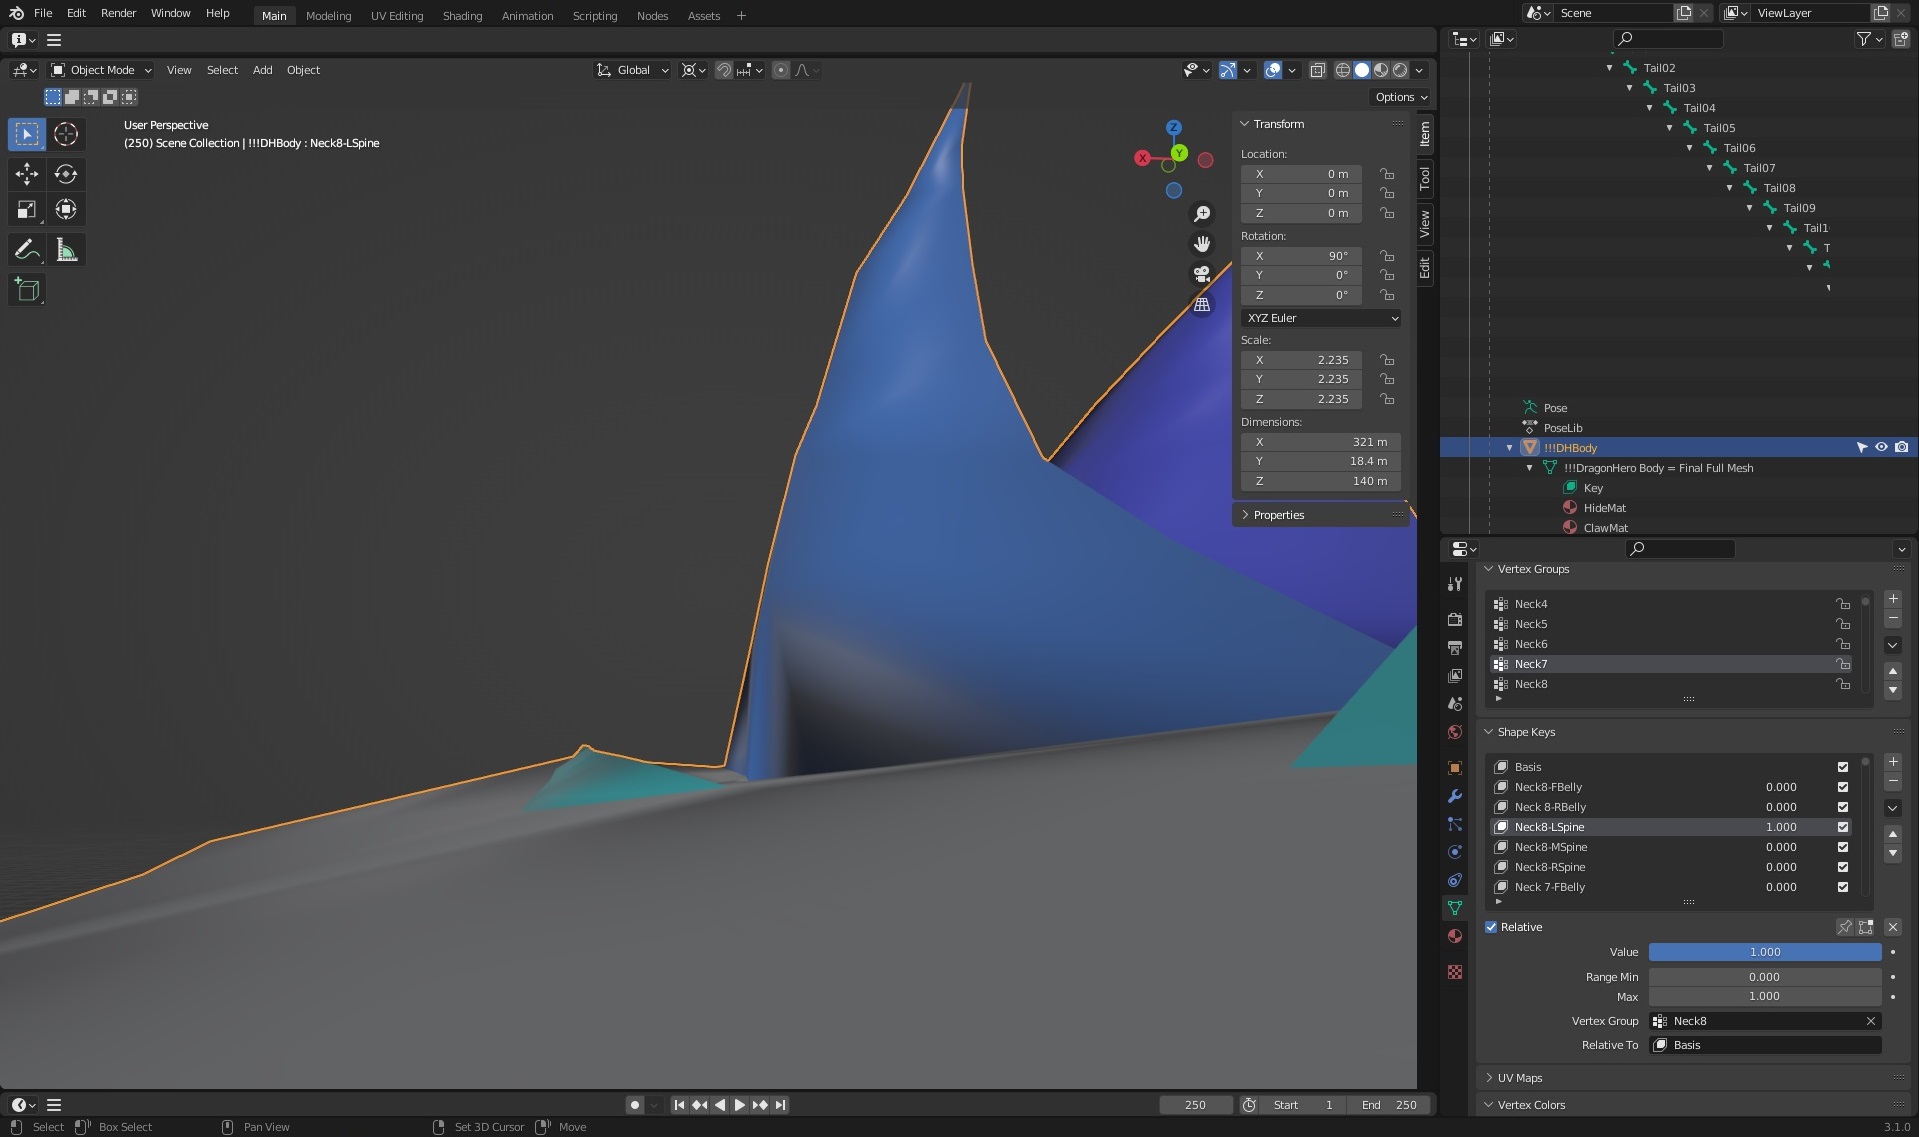
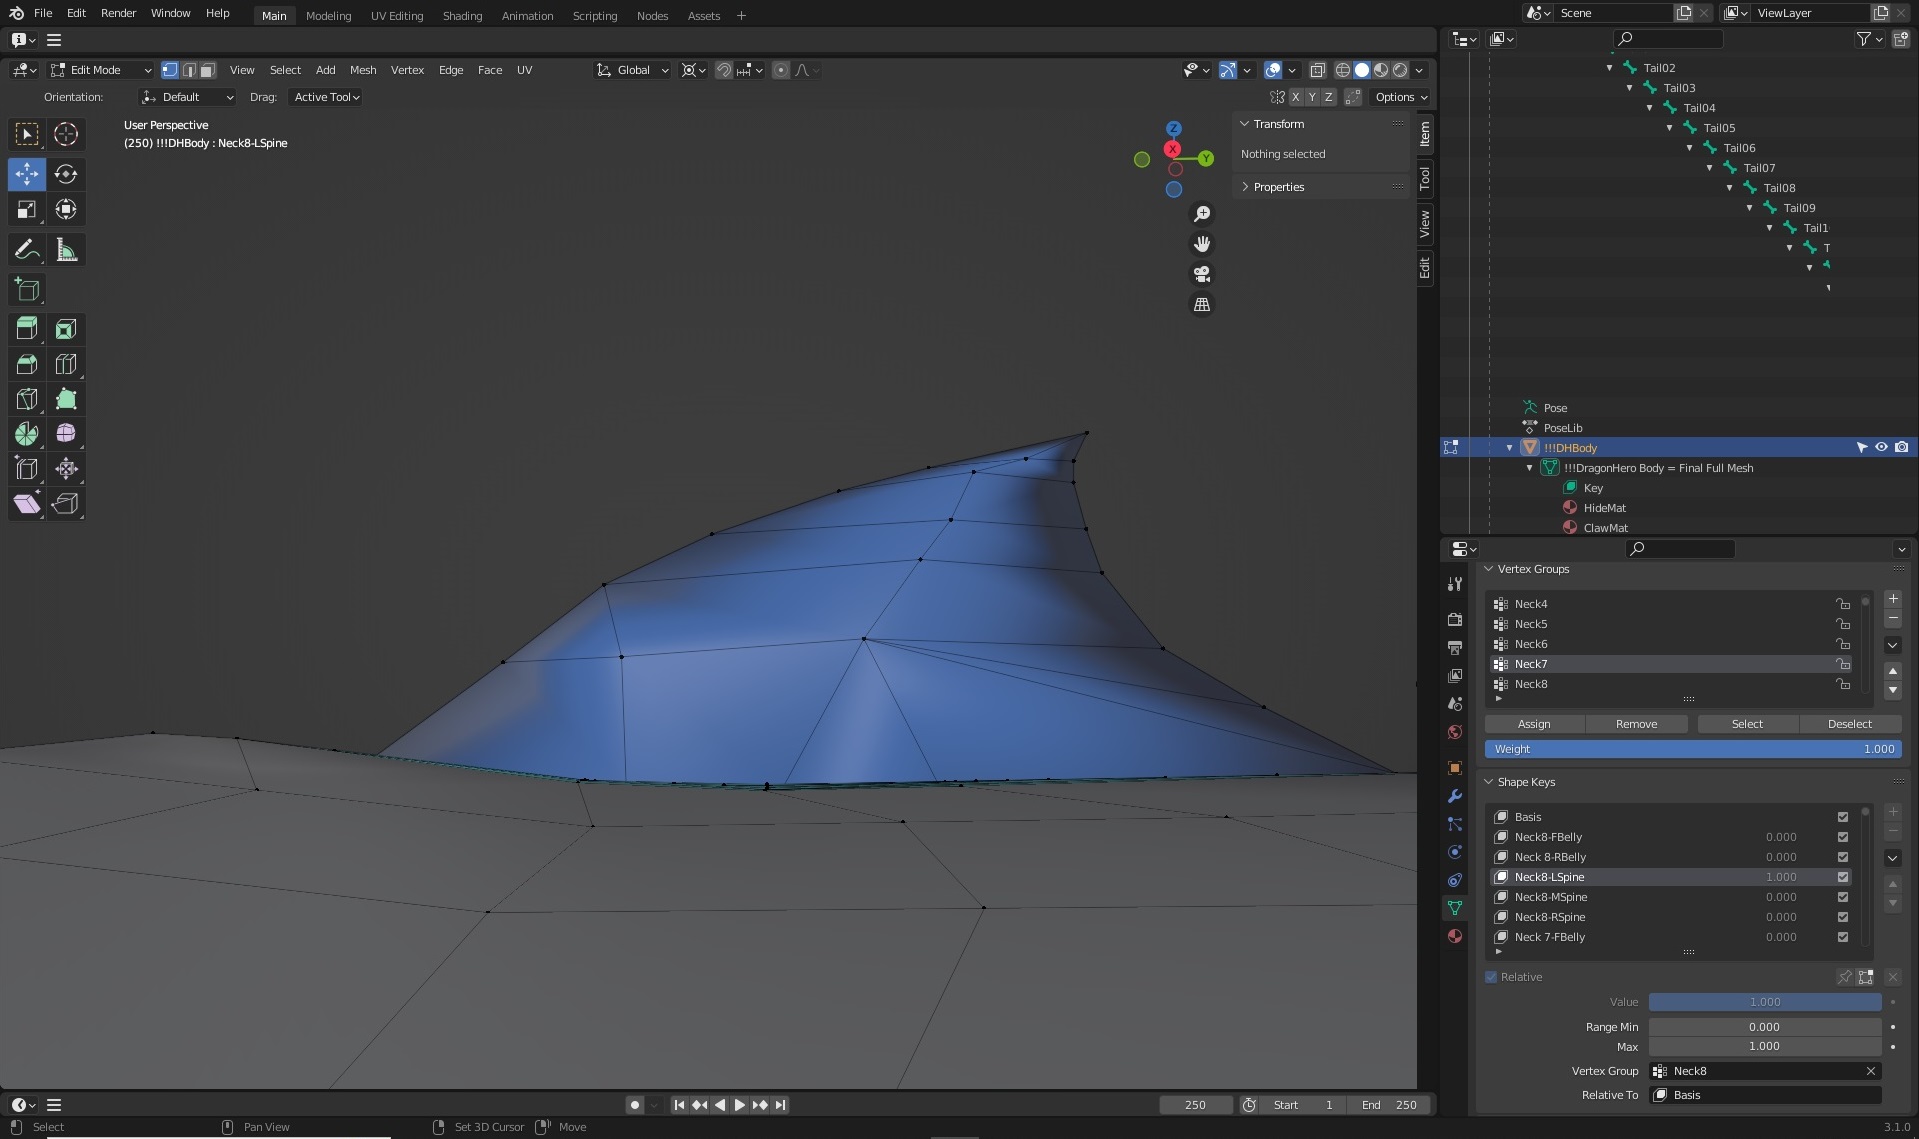
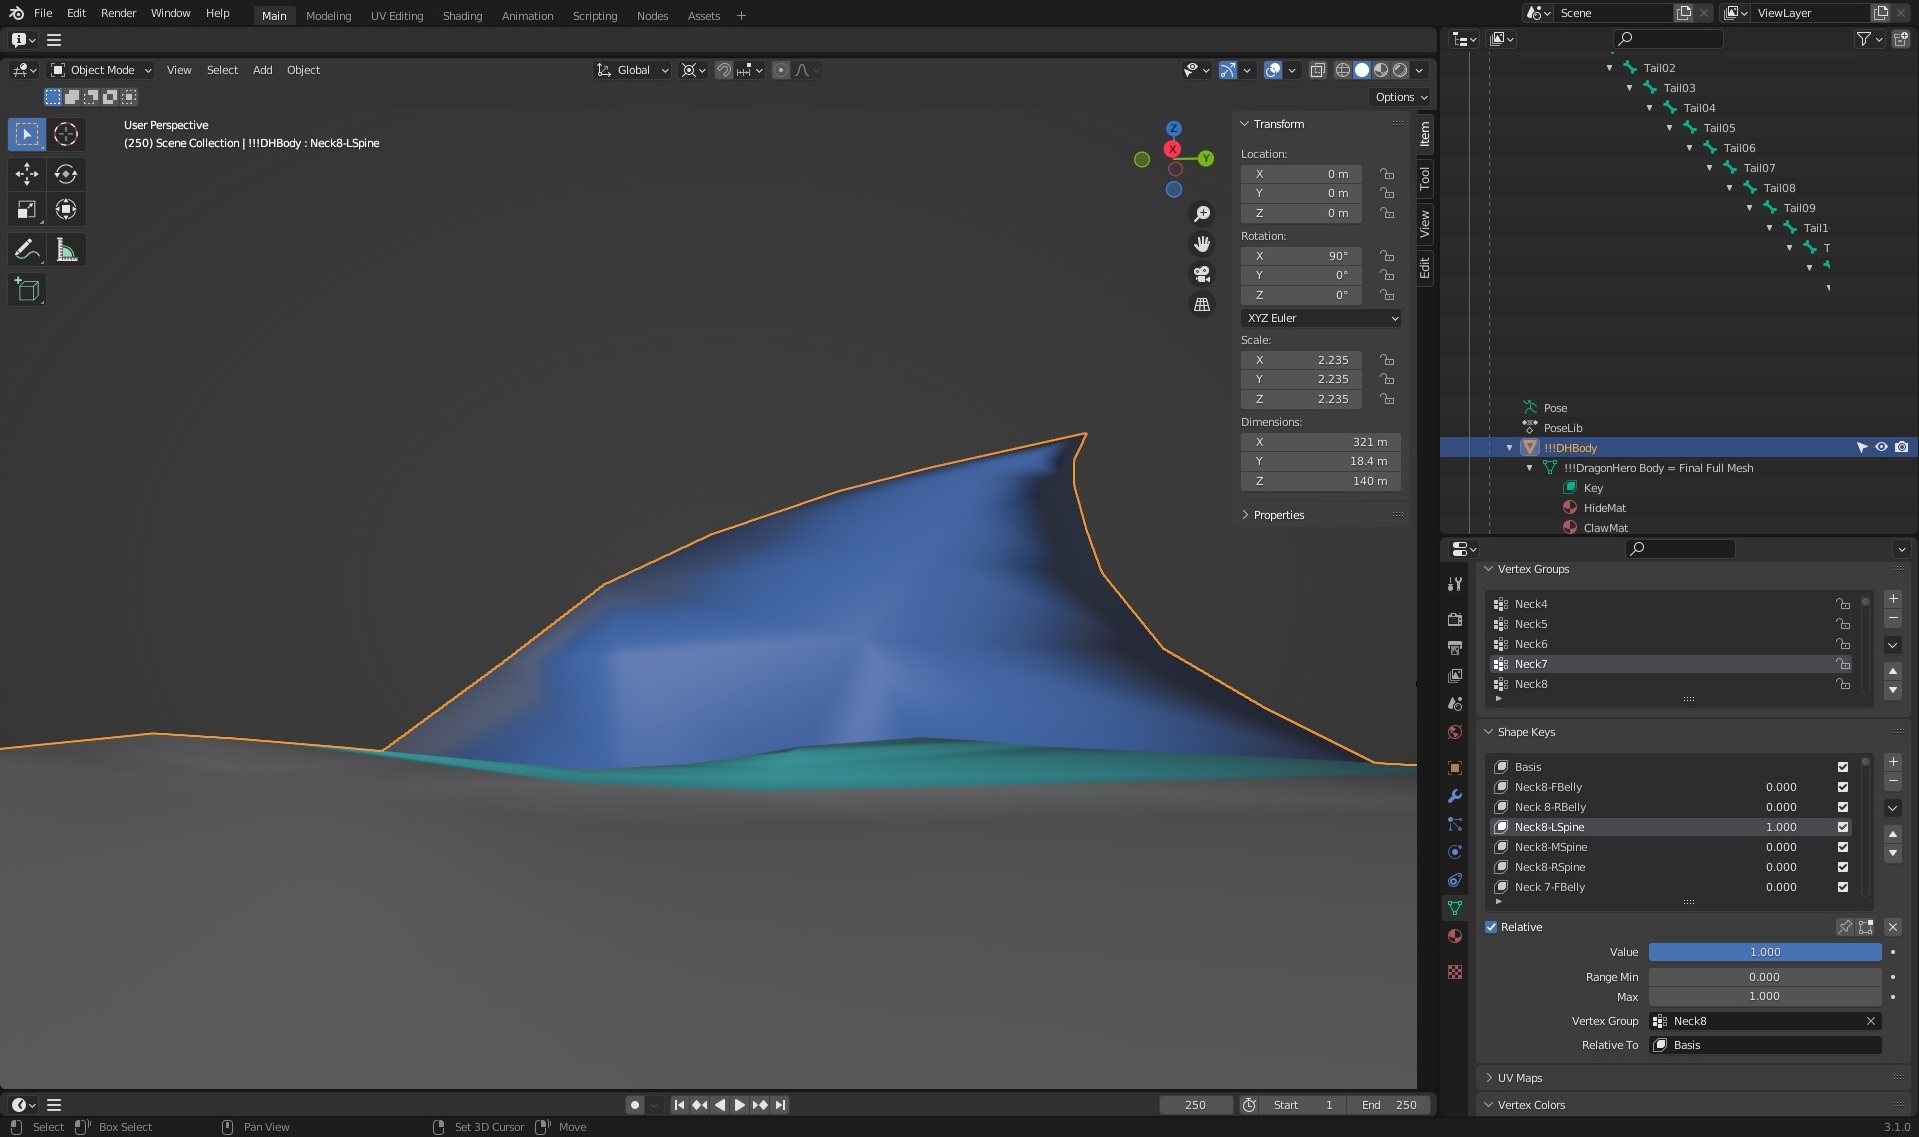
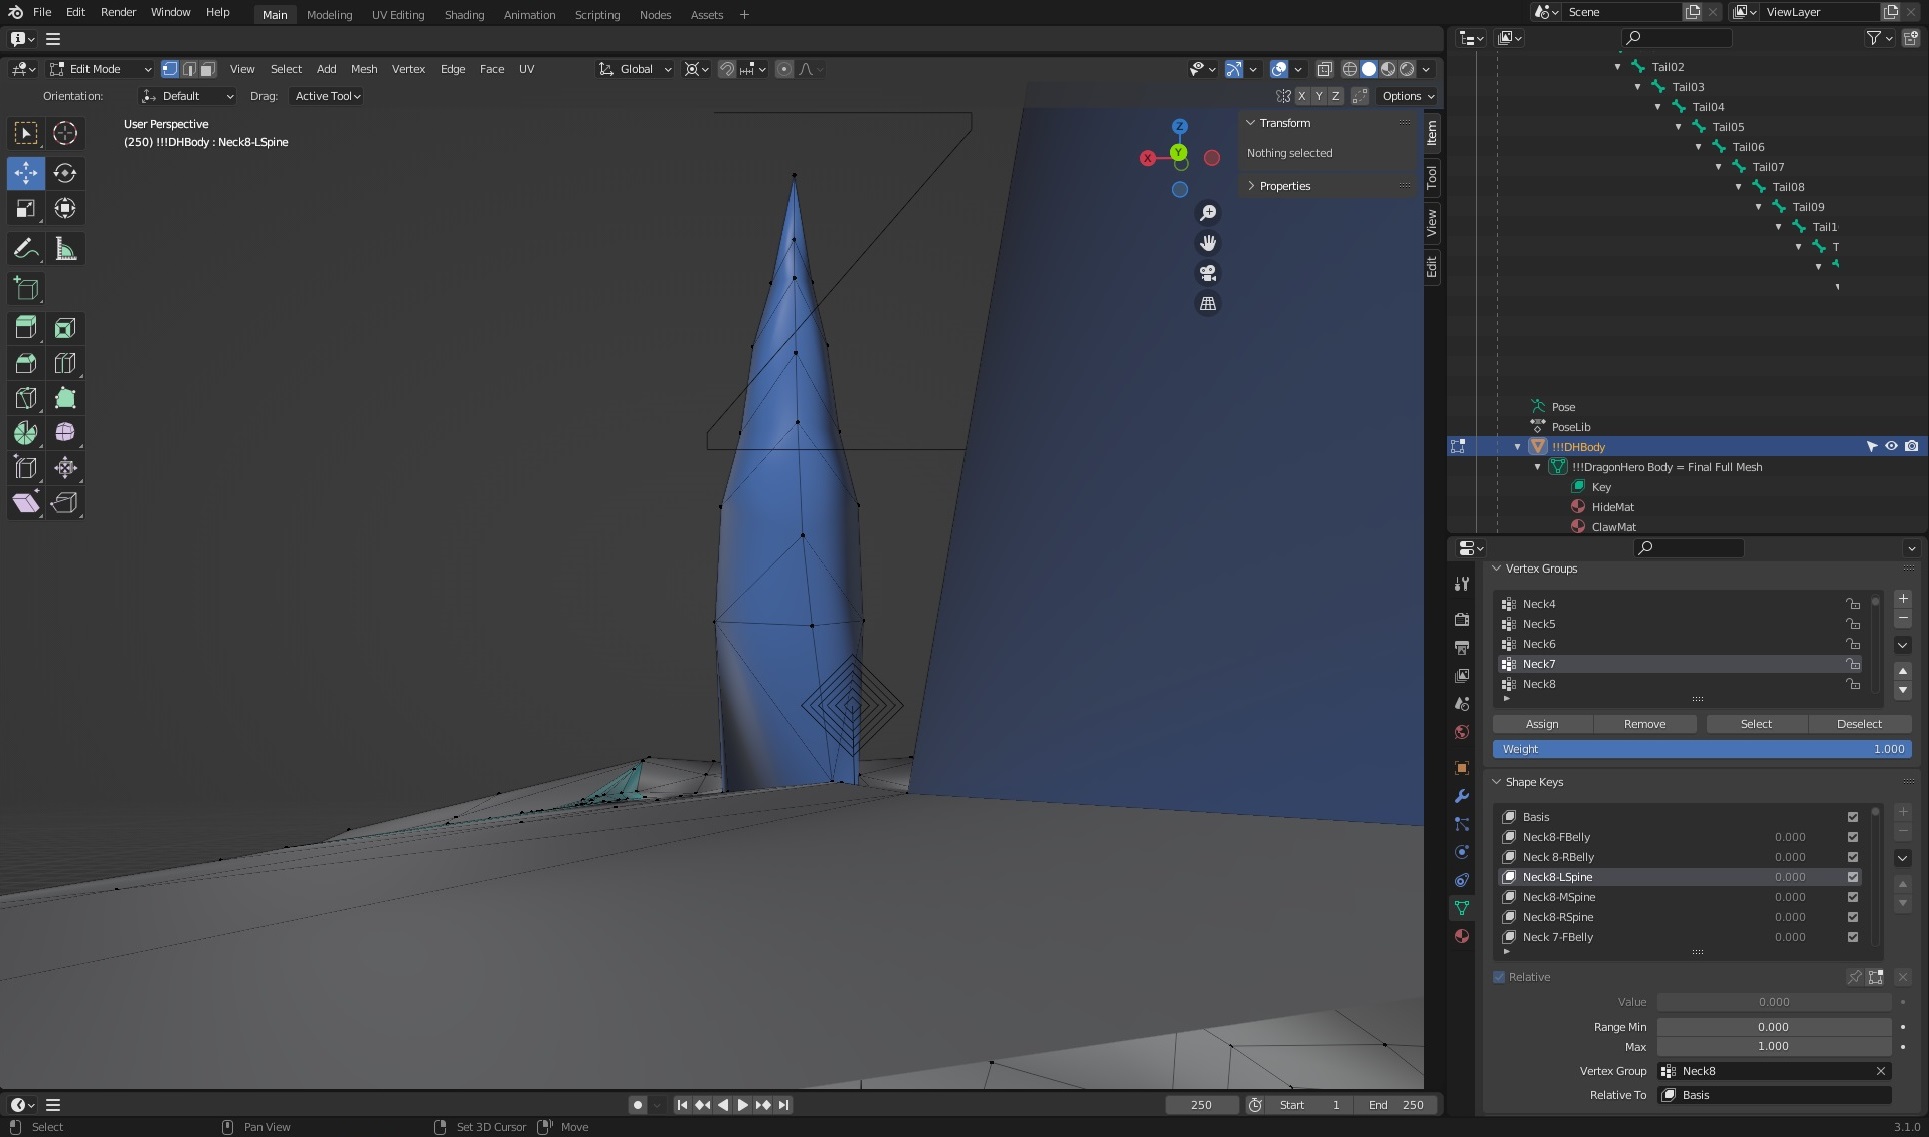
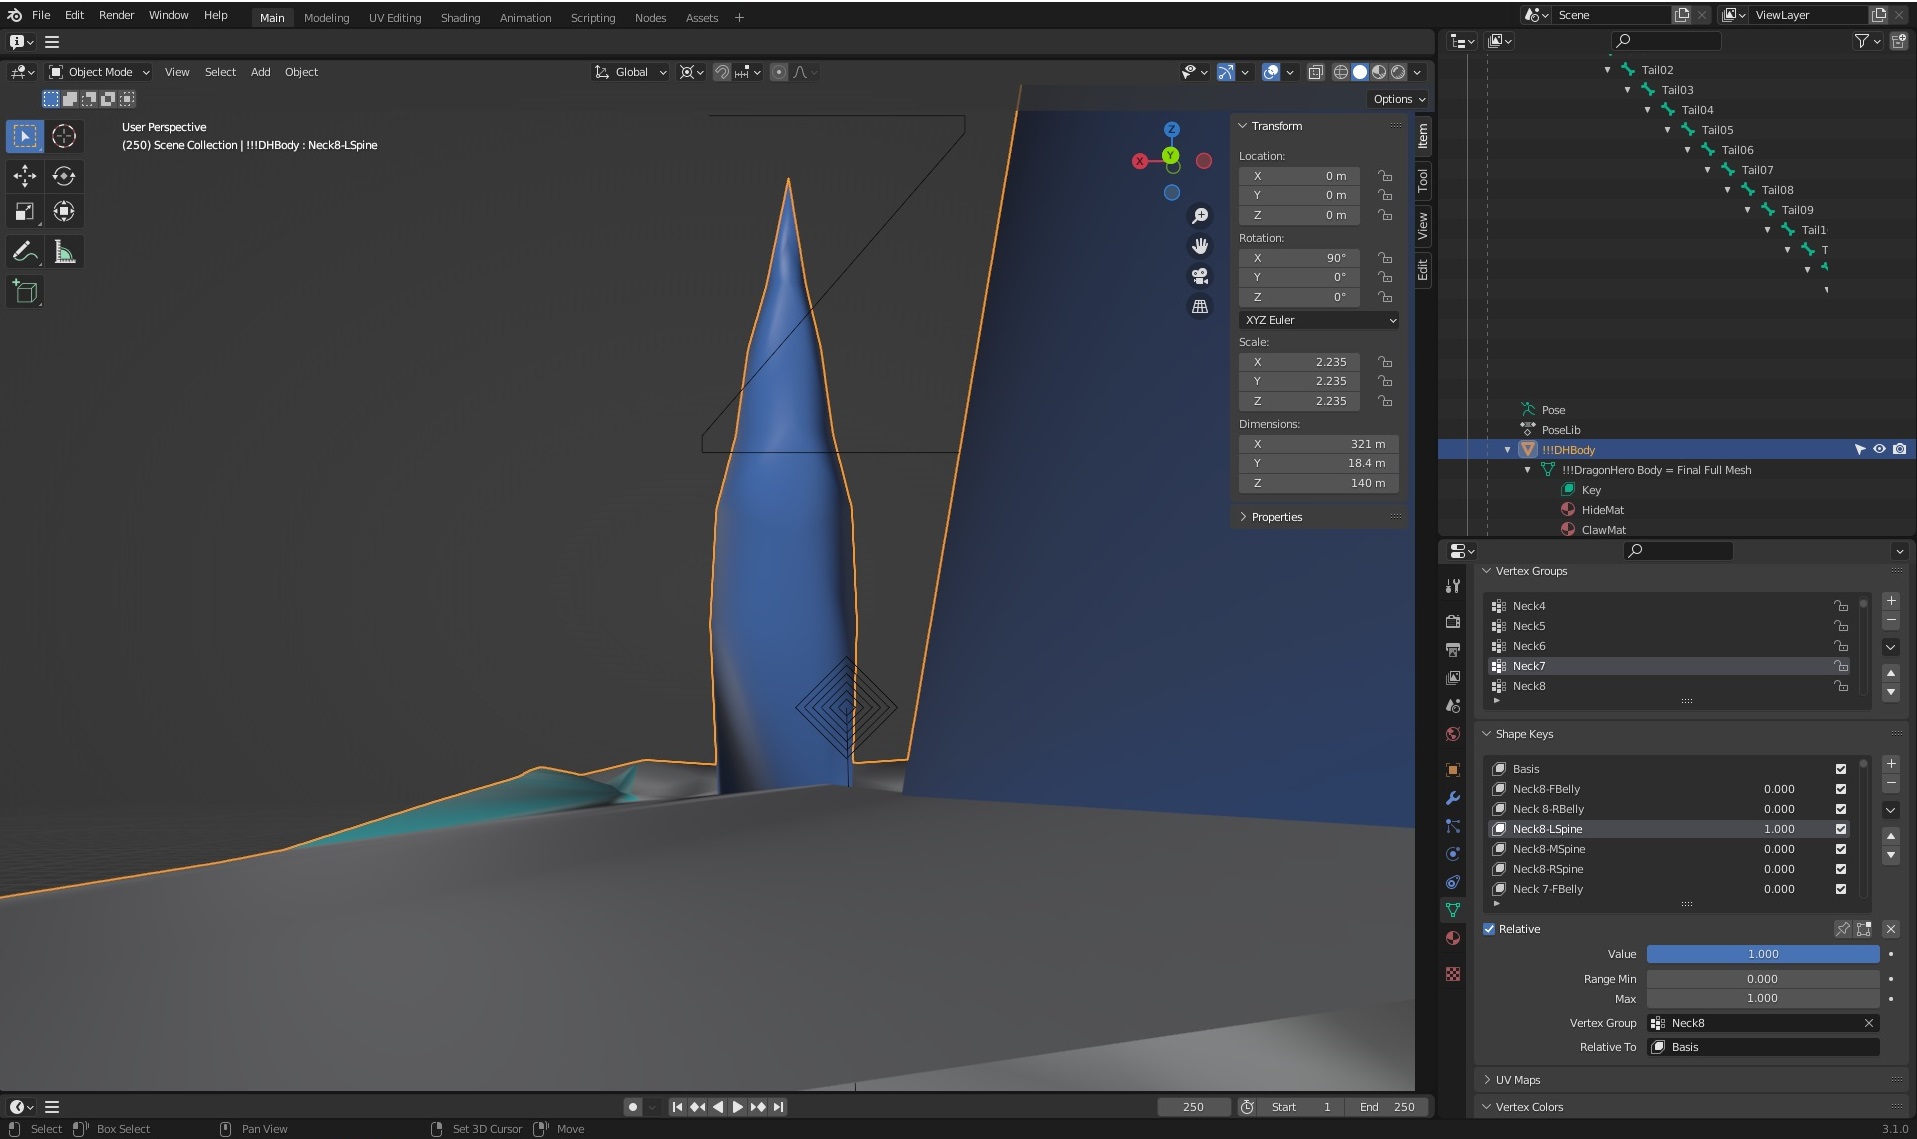
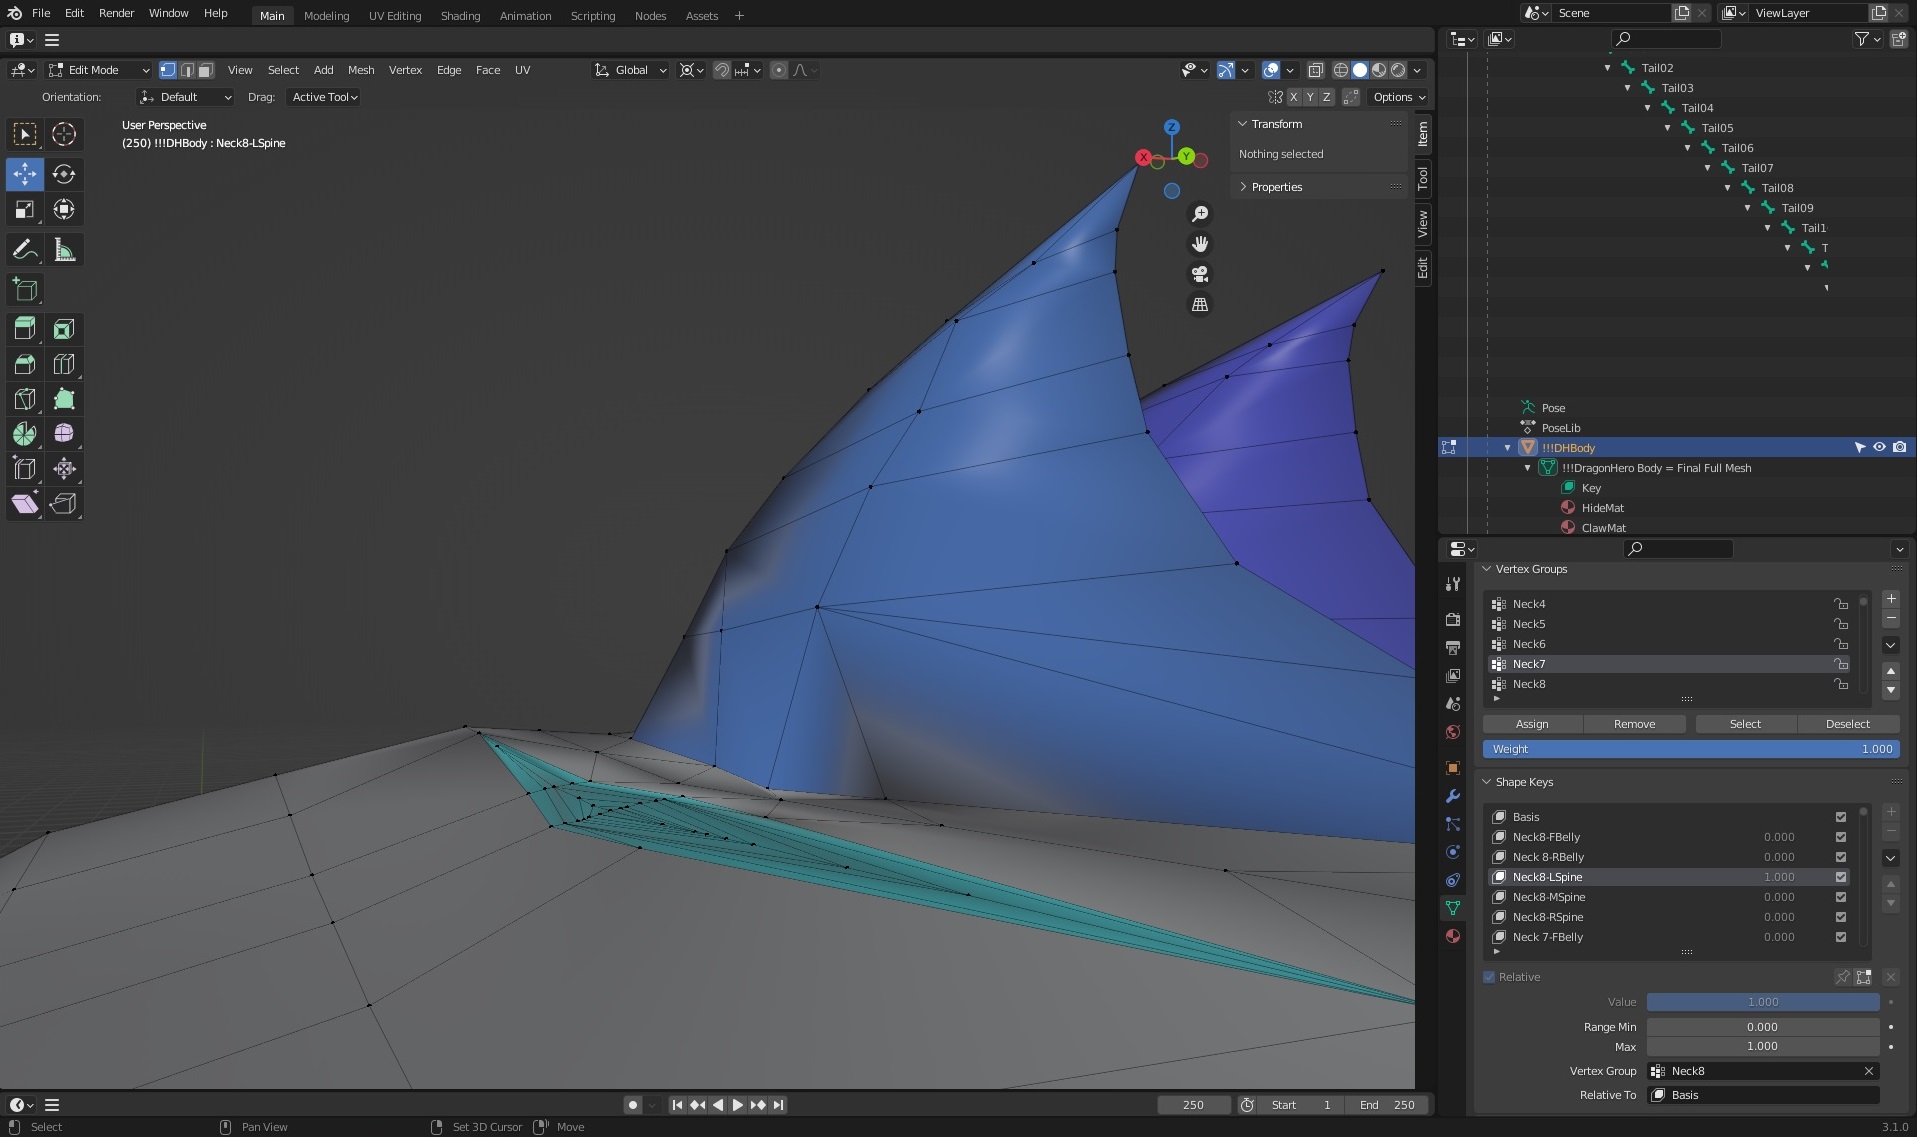
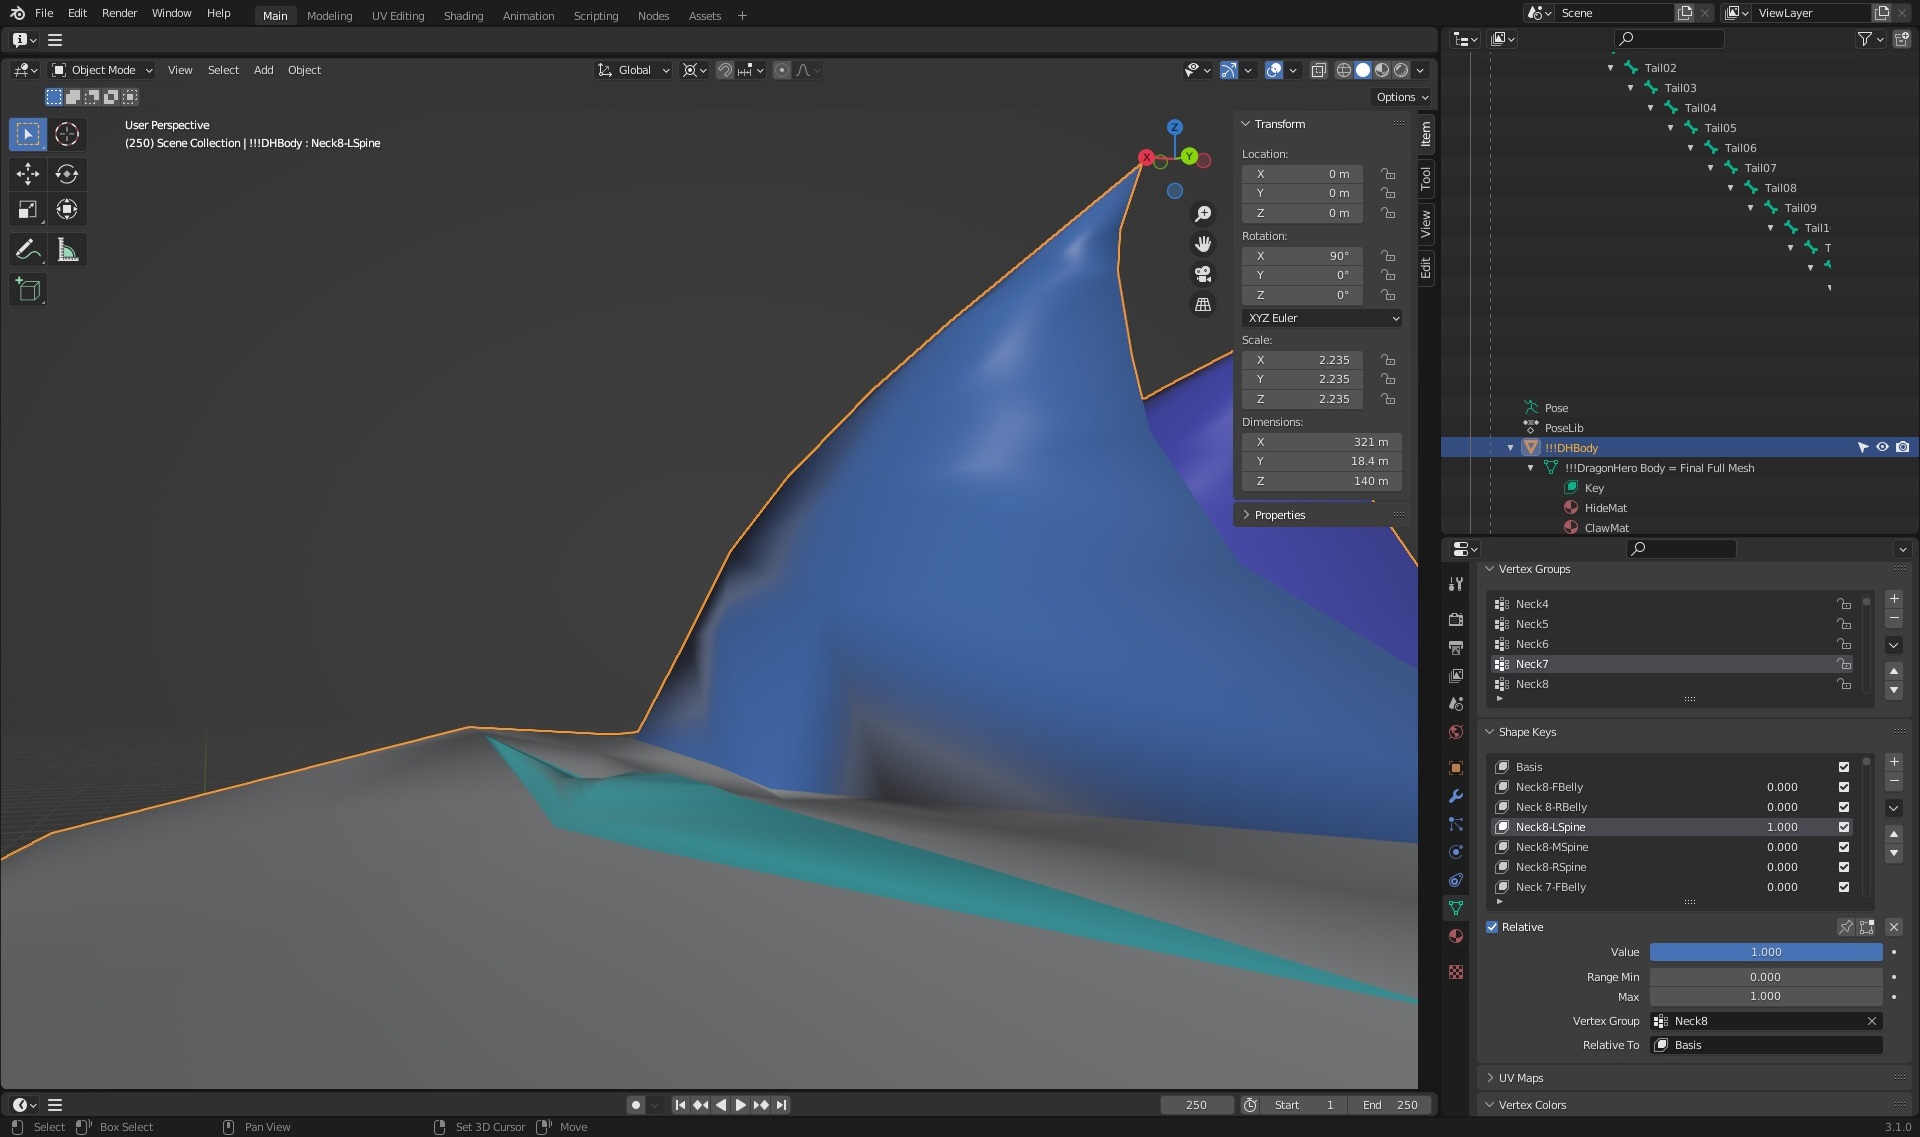
In the Edit mode of Blender, I created a series of Shape Keys (what Blender calls their "morph targets"), and confirmed the selected verticies for the spinal ridges were flat to the neck of the dragon' neck. However, when I went to test it in Object mode @ 1.0 value, the morphs were all well short of their target values. Furthermore, just simply increasing the value of the morphs aren't achieving the desireed result as the target zones are severely distorted when going >1.0.
Is it normal for Blender to simply not give us what we should be expecting, or am I simply doing something wrong by failing to set some unknown hidden control value somewhere (which I suspect this latter case is highly likely, given how "user-friendly" Blender's documentation tends to be)?
Thanks in advance to anyone who can help.


Comments
@Ryuu@AMcCF :
First, versioning is everything with 3D software -- What version of Blender are you using?
It could be something as simple as a new introduced bug in a newer version of Blender, or you might, as you suspect, be doing something incorrectly based on your understanding of how to use the software for this type of work.
Second, by comparing your images, I surmise that you might possibly have previous morphs mingling with newer morphs you are creating if you are not setting only one shape key active per morph creation, or you have vertex group data issues.
So, while in Edit Mode, you see a fresh canvas to create your new morph, but in reality, Object Mode shows the true state of the mesh-to-object, and you have unseen morph data being included/excluded in your current shape key data.
The tenets of working on shape key morphs is only one key active and set to 1.000 (which you seem to have done) working against a default (usually 'Basis' -- Also, being done). Secondary, would be working with specific vertex group data (again, which you seem to have done -- But, are you sure all vertices you are morphing in Edit Mode are truly included in the shape key data?).
Now, for a visual aid help solution to help you as you are creating your morphs -- Add one more 'click' to your work-flow; You see the line of parameters (mostly icons) above the 'Value' setting starting with the checkmark toggle 'Relative' -- Check the second box to the right (the square with four verts/lines with one vertex lit up). This is the 1-to-1 visual pairing for Edit/Object mode which will allow you to see correctly the true state of the object-to-mesh data presented to you in Edit Mode -- Without it, your mesh in E.M. appears as 'Basis' (default object shape) which can lead you to believe your new morph creations are without impurities. Also, double-check that your desired vertex displacement is encompassing all vertices in your active vertex group.
Give that a shot, and let us know if you are successful.
Personal Note: I never use vertex groups for base morphing -- I only employ them when needed for specific morph work such as inclusions/exclusions of mesh areas within already established morph targets for advanced morph work such as shape key joins/separations, symmetric to asymmetric work, and morph blending.
Hope this helps...
* EDIT: Since you are new to Blender -- Blender works differently then most 3D software when it comes to object/mesh data which usually trips newbies up (I know, been there/done that). Both Object/Edit Modes (and by extension, all modes) are independent of each other, but all supply the main mode (Object) which show the true state of the objects.
Why is this important? Because, for morph target work, anything you do to the raw mesh data state (Edit Mode) will be propagated to the default object data (shape) including, but not limited to scale, translation, displacement, and rotations (within the confines of morph target rules).
However, anything done in Object Mode does not propagate to morph target data.
So, in other words, you can do anything you want to the object in Object Mode such as rotation, translations, and scale. These will not affect the morph target transfer data to other software -- they are not recorded in the raw vertex delta data.
If, you are transferring morph data to 3D software such as Daz Studio, make sure you select 'Selection Only' (if multiple objects in scene), and 'Use Modifiers' (or some wording to that effect) which the Shape Keys use (but, make sure any modifiers in the modifier stack are inactive, or they will be included in the data as well), and of course, 'Keep Vertex Order' in your OBJ export settings. All other settings are superfluous, and not needed.
Sure. Version is 3.1.0. It's fairly new, but I think it's been around enough for most bugs to have been worked out. I've been working with it ever since it was released, and although I've not done anything with the morphs/shapekey before, it does seem to work identically to 3.0.0 and 2.90.
I tried to follow the advice that I saw from a tutorial--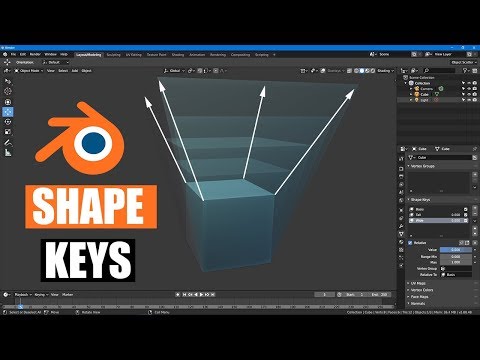 from MrTriPie on Youtube. I made sure that when I created the first set of morphs that the "Basis" was made, ensured the "Relative" was checked for the individual morphs--and all the slots have their appropriate "Vertex Group" filled in as well as "Relative To" is filled in with "Basis" .
So, my goal is to give the spinal ridges and belly scales each to have their own individual morph targets. With three rows for each body segment along the dragon's spine, there are slots for 204 total spinal ridges and 111 belly scales. So far, however, only morphs for the first row of 3 spinal ridges and 2 belly ridges have been made so far (all for Neck8). When I was working on each one, I was ensuring to move only the verticies related to the morph I was working on. At this moment, none of the other slots have any changes from "Basis" to create those morphs yet.
All my pictures in my post above are focused on the Neck8-Left Spinal Ridge. I also made sure to not move the viewport's position when switching between the Edit and Object modes, since the Object modes don't show the position of the verticies, so I had to take screen shots of several different angles to illustrate what is going on. The problem is definitely appearing with every morph, even the belly scales where the verticies on the dragon's throat on the edges of the lateral scales are only moving a small amount on the Z-axis.
So, after reading this paragraph, I played around to see if any of the other morphs that I have created were affecting the one I was focused on, but I'm not seeing anything. If there is another morph(s) that is causing this, they're not something I created.
Okay, so I clicked on that icon while in Object mode, and there is no change between them. But when I switched over to Edit mode and clicked on it, it IS toggling between the full value of the morph I created and the value that it seems to stop at in Object mode.
So, I just want to confirm my understanding, does this mean I should ensure that "Shape Key Edit Mode" icon is lit up when making my morphs? If so, that will be extremely helpful, indeed! Fortuntately, I actually recored the XYZ info for each of those morph verticies in Excel :D
It is one of my goals to build this guy and export and rig for DAZ, but I've been running into issues with that attempt, so that effort is currently on hiatus until I can figure out the fixes to rig him in Blender first (Weightmapping is the problem I'm having with DAZ).
Blender is giving me a very steep learning curve, but I DO recognize how supremely versitile and powerful Blender truly is, so I'm very eager to challenge to learn it!
Please let me know if setting that icon should fix this. And thank you very much for your advice!!
The only reason I can think of for this kind of behavior is if you have concurrent morphs, but it means you're using multiple morphs together. If you dial-in a single morph there's no way that it can be different from what you edited, apart scaling the object that will maintain the proportions. If you dial-in multiple morphs then it will be the sum of them for the vertices they have in common. Unless you defined vertex groups with different weights.
Anyway it is really hard in my opinion to catch the issue if you can't provide a test scene.
Big whoops!
Funny thing is, when I had started writing that this morning, it really looked like the answer was just that "Shape Key Edit Mode" setting that DaremoK3 pointed out.
However, as it turns out there WAS another influence causing the problems--those "Vertex Group" fields that I had filled in were causing the weight maps for those body segments to interfere.
Before responding to you, I had made some tests, took several screen shots, and had written up a report on what my results were--but before pressing the Post Comment button, I decided to work a little more to finish making the modifications to that left spinal ridge morph to compensate for the problem and to confirm my conclusions. However, when I started working on the belly scales on his throat, the values I needed to compensate weren't making any sense at all. While T/S that one, I accidently erased the "Vertex Group" field for that morph, and magically, it fixed the bloody thing!!
Fortunately, I DO believe in making frequent backups, so my efforts weren't entirely wasted, but this discovery was both frustrating and amusing, so I'm taking a break 'til tomorrow (maybe have some "stress relief" with a little Jack Daniels tonight--so, *cheers!* ). Although, I definitely think I'm finally on the right track, for once.
¡Muchos gracias!
PS: Trippy thing I discovered about that "Shape Key Edit" icon--it somehow seems to allow multiple morphs to be engaged at once while in both Edit, and Object, modes when it's lit up. But it does seem helpful while creating my morphs, so that's a big plus!
Okay, now that I have watched the video you linked I have a better understanding of how you are working.
Not a great teacher -- and he was only teaching from his perspective of how he likes to work in the simplest way more geared to animating shape keys. Not a bad thing, but I thought you were on my page of content creation for Daz Studio/Poser adding morph targets for end users to have choices while using your model.
So, I see he taught the weight paint method, but did not teach the vertex selection method (what I mainly use). Nor did he teach about the Edit Mode view pairing, or what any of the advanced options that are available in the drop-down triangle on the far right side.
I am glad you were able to glean what I was trying to tell you about the Edit Mode view toggle, and that it can help you with your MT's.
Looks like you are on your way now to accomplish your goals with your dragon, and I hope you post some images of your future progress and your finals.
I'll raise a shot to you tonight with my whiskey of choice, Fireball...
Thanks for the assist.
I think the body is pretty much finished, and I did some peliminary attempts at rigging over the last few months with some earlier versions. The figure is easy to rig in Blender--in DAZ Studio, not so much. FYI, this render below was an earlier attempt to pose in DS:
Not too shabby if I do say so even at this stage, but there were numerous issues in setting up rigging in both Blender and DAZ with this version that forced me to rework the figure and try again. So far, the new Blender rigging is much smoother. The DS rig is almost there, but I really need some means to copy the weight mapping from Blender to use in DS, otherwise, it's just too frustrating at this point.
Right now, as I explained above, I'm working on mostly cosmetic morphs for the spinal ridges and belly scales to make the body more versatile for creating different dragon characters with the same base body. The heads are interchangeable, for one. The head for my Jennifer character came from a very old product that's no longer around: Dragonfactory made by 3DMenagerie, aka Bloodsong.
After the morphs are done, the next big monster I have to tackle will be working on the wing membranes. I'm planning on doing cloth sims in both Blender and DAZ--and I don't know if I can pull it off.
I'm certain that DAZ will allow me to anchor the membranes to both the side of the body all the way down to the pelvis as well as to the inner-most finger of the wing--but I don't know if DAZ will allow a "negative stretch" for when the wing shoulder and forearm bones fold, I want the membrane to remain relatively taunt going from the body to the wing-fingers. As for Blender, I haven't any sort of clue as to how to do either the anchoring bit or "negative stretch" idea.
Okay, I know I said I'd do all my morphs, THEN try to tackle cloth sims.
But given just how many bloody morphs I have to create, taking frequent breaks in doing all that is a must! Fortunately, the belly scales were all easy and are done now. The spinal ridges will take much longer.
Of course, taking the opportunities during those breaks, I did look up some tutorials on cloth sims. And I found two very useful tutorials geared for basic level users, like myself, that have given me some very helpful instructions:
They gave me some inspiration, and my first forays into them showed me that cloth sims are both far easier and far harder than I expected! It's unbelievably VERY easy to make the cloth mesh and prep it for enveloping the figure. Despite the disaster of the immediately exploding mesh riding up the finger bones, my very first attempt was unbelievably close to what I was aiming for with how I wanted the elbow to slide up and down inside a sleave representing the wing's main sail. OTOH, it's much harder to tweak the settings to get them to look exactly how I want them to appear on the figure.
But just two days into playing with it made me feel I was mostly on the right track (assuming I don't try to animate it too much—just trying to stretch out the wings and pull them back to their fully furled position for now)
After doing a few more days playing with the cloth simulator, I found some more tutorials regarding creating multiple independent Hooks on the cloth that would seem to imply that I should be able to set a different Hook to relevant body segments in my figure. I had quite a few setbacks with tearing, mangled, and exploding meshes, but I feel I'm learning a shitton of stuff from doing.
So now, almost two weeks into this, I'm getting really close to what I'm wanting. Still some tweaks are needed, but beleive it or not, there's been so much progress:
The Pin set that I'm using.
The beginnings of the latest attempt to date...
Something odd seems to be happening at the wing's elbow that wasn't showing up in earlier efforts. It also seems to settle down as the simulation progresses...
...but this here is where the fingers begin to fail.
From here, it usually detonates and the membrane begins to ride up the length of the 3 interior finger bones. I had tried an earlier attempt at having all the finger bones of the wing hold the mesh, but that resulted in an utter disaster even worse than this, if you can beleive it! Thereafter, I followed some idead I got from other tutorials to anchor only those parts of the membrane at the ends of the fingers & along the outer edge...
As you can see, I'm still having issues with trying to get the Hook function working for me. The segments along the body are working great, but for some reason, I'm not able to get the anchoring of the mesh to the ends of the fingers or along edge of the outer finger just right yet.
So, my purpose for this thread is pretty much dealt with, and thank you both very much for your help, Daremok3 and Padone.
Looks like it's about time for a next NoobieNewbie Thread...
Impressive work, Ryuu.
I know you said you were going to do the wing membranes as cloth sim, but I failed to see the magnitude of your undertaking -- You picked a hard one for your first time out with Blender's cloth sim.
So, you picked another of my main 3D study and usage for over two decades, and cloth sims can be a fickle b's, especially in Blender, though, the newer algorithms play nicer than the 2.4 - 2.7 versions.
However, I cringe every time I see someone pushing 'solidified' (cubed) mesh during cloth sims in these new tutorials (the past several years) -- after B2.71 when I first made my first Blender Cloth Simulation (Marvelous Designer-ish) prototype -- I started working on it a year before the first commercial cloth sim addon was published, and then it has exploded from there with many addons (by faster/better coders than I) and tutorials available. At that time, there was only the free 'Cloth Sewing Springs' patch for B2.68 which I was working from with the default cloth sim, Blender API Python scripting, and tessellation algorithms/addons. I did add both a faux cloth edge function and a solidify function after cloth sewing welding, and simulation finals to go along with either Sub-d (for quadmesh) or trimesh with quad boundaries subdivisions.
You are working against the sim, and quadrupling the time-step against the cloth-cloth/cloth-collision interactions. You can work from single-sided flat mesh, and add solidify and sub-d modifiers after the sim. Also, you can now use the cloth sculpt brush to help along any fixes, or flat out just use instead. Though, I have not been working in Blender cloth sim since my B2.8x version with the dynamic UI templates -- I have played with the cloth sculpt some for my Daz Studio/Blender morphing bridge addon, but other than some testing, have limited usage so far (coding the DS side has been a little difficult).
Also, have you looked into vertex group pinning (though, my last usage B2.8x still only allowed one pinning group) along with 'empty'(s)? I remember a few tutorials back in the B2.5 - 2.8 series with cloth attachment simming for gaming.
I would also suggest looking into the Modelling Cloth addon by Rich Colburn -- I believe it is updated for B2.9, and might work in B3.x, but I only have used it in B2.79 -- It works as an independent cloth sim from Blender's default with pinning and cloth pulling.
Blender's cloth sim suffers (or did ? -- not sure about B3.x series) from two big shortcomings (IMO); 1. Mode switching kills (non-baked) simuation data (I don't bake - I work 'live' like all my other cloth sims), and 2. No native user interaction (such as cloth pull/pushing), and limited hook-empty work-flows have to be employed -- It can be achieved via 3rd party addons.
Sorry, for the diatribe -- So, if you are going for shapekey driven rig posing, I believe you can achieve what you are trying to do, but if you are going for straight animation, I think you have a hard road ahead with the membranes. I am not an animator, so I only use animation to drive the cloth sim for clothes creation and morph targets with posing. If you are shooting for animation, hopefully someone more knowledgeable with cloth sim animating in Blender will come along to give you better pointers.
Love your dragon, and I am rooting for you to succeed with this...
I agree with literally everything @DaremoK3 said... I think you are going to have a hard time finding good sim settings, since the ones that you find to work are going to be very, very far from the default ones. I've got two pieces of advice, if I may:
1) My man Pierrick Picault has some really good tutorials on how to accomplish things like this with just rigging. Check YouTube. You don't have to simulate everything.
2) Houdini is much, much better at this than Blender. You don't need hooks; you just tell it what vertices of your simulated mesh are constrained to the nearest vertex of another mesh, and it just works. I know, Houdini is not free and it's, well, Houdini, but I think the worst mistake you could make is to not use the best tool for every job.
I would honestly consider just rigging the webbed part of the wings... that's just never going to sim well in Blender.
Hi DaremoK & Mystery,
Thank you both for your comments. I'll definitely look into those things you mentioned.
Yes, I fully agree on how fickle Blender can be on those sim settings, and how insanely advanced a subject like Cloth Sims is for someone like me. That was why I had originally planned on just doing all those morphs first.
But there was something in all those tutorials that I watched which just made me want to give it a try, and the surprise I got from my initial results through following their advice instantly hooked me into fully pursuing it. I saw that I wasn't the first to pursue the idea of doing bat/dragon wings (seems to almost be like a Holy Grail pursuit for some of us ), both with just webbings between the fingers along with a sleeve around the elbow joint (that was an idea I had started out with, too), and other people who had chosen to use entirely enveloping meshes. I did discount the idea of just using webbing for the main sail, as my goal was to get the elbow to slide up and down within a sleeve just like real bat wings do. Several of my initial efforts did involve the stitching function, but I soon found that they didn't hold up very well once the bones begin to move, so I had given up on that idea and opted instead for a fully solid, enveloping, but closer-fitting, mesh, with just the fingertips poking through openings specially made for them. Many of the efforts by others posted on Blender discussion boards had left several clues for me to consider, try out, and got me much closer to what I needed than I could ever have imagined on my own.
Of course, most all the advancements and setbacks I had were due to the Cloth settings—as well as a handful of adjustments that needed to be made to the membrane mesh (poke-throughs, where the membrane was far too close to the wing bones, were a major cause of detonations, it seems). Rereading many of those lessons learned from other people helped me find what was going wrong there. Fortunately, I am quite aware of the need for frequent saves--right now, I have something like 80 files (most @ 390MB, with several at 780MB & 1+GB--and my Hard Drive will thank me for when I get around to cleaning up some of this!) saved from when I started playing with this on Nov 18!
And yes, I did remember to use the Hook function, as nearly all the tutorials I saw had made quite a lot of noise about them. The Hook in Blender is clearly similar to the Pin function that exists in DAZ Studio's Cloth Simulator, and I knew Blender had to have something like that, although it did take me quite a while before I could locate any tutorials on how to make Hook Objects follow the Armature/Bone movements of the wing fingers—which was the critical factor I needed to know how to do before ever seriously thinking about trying to make this work. I already knew DS had such an ability to have Pins follow figure bones, but it is way too early to think about trying to import this crap into DS because of the trouble I have in getting figures to rig in it.
However, I was evidently still doing something wrong with how I was doing the anchoring in Blender, as you can see from those screen shots in my last post. There are portions of the cloth still attached to the ends of the fingers, even as the rest of the skin was being shredded into confetti. LOL! Fortunately, after a bit more fiddling with pinning the Hooks over the last few tries, I finally succeeded with my first Cloth Sim the day after my last post! Whoot! :D
I can hardly believe it had only been a couple weeks since I started playing with Cloth Sims! TBH, I really still have NO idea of what I did to finally make it work--other than just paying lots of attention to those tutorials and advice from far more experienced folks, like you guys! Thank you so very much!!
There were clearly multiple issued I had to T/S, and I suspect the final problem was due to my pinning the cloth anchors only with the edge vertices of the mesh to the fingers rather than anchoring several faces around the finger joints, as I had evidently done along the body segments, where the results were far better right from the start. I had tried doing that much earlier in my efforts, but I did so by anchoring the mesh along ALL the finger bones rather than just to the end bones--evidently I mistakenly took it to extremes in both directions before eventually finding that happy middle ground.
And I'm still seeing quite a bit of glitchiness creep into the membrane mesh, especially as the dragon begins drawing the wings back in. But I made sure to save all the custom changes I had made to the Cloth Sim settings (in TWO .blend copies of the final work, AND in a handy Word Document, no less!) Right now, I think my mesh just needs a bit more refinement at this point.
So, while I needed a few days to render the images for showing off my acomplishment, I'm planning to give it another go, hopefully with a better mesh, and I'm definitely going to apply what I learned to this new one, and we'll see. Also, I'll look into the things you guys mentioned, as they'll probably help speed up the processing times--although exploding meshes very early in the sims before baking had generally told me I was on a wrong track, so I didn't waste too much time trying to take every single simulation to its conclusion.
In the meantime, I needed to take a few days to respond to your comments. I created some renders in DAZ from this first successful effort and have posted the results in the Gallery here and on my DevianArt account. And yes, I know Blender can do the same level of, if not superior, renders over DAZ (I've seen Sintel), but I'm far more experienced in DAZ and I've got zip in the way of making anything look decent in Blender--although I want to eventually learn how to do that, too. Here is a beauty shot of the dragon from my Gallery page:
And the animated .gif file I made from the Baking is posted at my DeviantArt account, with a far less taxing texture used.
(BTW, the issue with the dragon's hands poking through the floor in the .gif animation are entirely due to the way the dragon was created in Blender and imported into DAZ--there's really not a good floor-level default pose for the figure--and at the time, I was more concerned about getting the Cloth Sim to work with the wing bones than worrying about the rest of the dragon.... oops! Just so you know, for my future work, I've added a floor plane in the .blend file to give me a reference surface--I promise I'll do better with the next results!
  )
)
Cheers,
Ryuu