Problem importing my first 3D model into Daz
 cjfea
Posts: 246
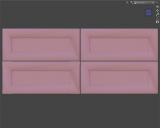
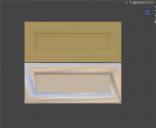
Hello. I’m creating my first 3D model in Blender – a set of cabinets. When I import my model into Daz there are dark smudgy dirty looking lines. I’ve attached images showing the drawer fronts with 3 textures: a pink base color, a rough oak wood texture, and a glossy metal texture. The dark line problem is gone with Iray textures with a Glossy Reflectivity of 0 and Glossy Roughness of 1 but extremely apparent with shiny textures. The dark smudgy lines appear on all parts of the cabinet – doors, cabinet outside frame, etc.
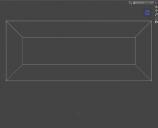
To create these drawer fronts I started with a cube in Object Mode, typed in the dimensions in inches, and then went to Object – Apply – Scale. In Edit Mode using Vertex Selection I selected the front of the cube and used 1) the Inset Faces tool to create the frame shape, 2) the Extrude Tool to inset the new face, 3) the Bevel Tool to bevel the outside of the frame (Width 2, Segments 2, Harden Normals), and 4) the Bevel Tool to bevel the inside of the frame (Width 1, Segments 1, Harden Normals). Next, I quickly UV mapped it with Smart UV Project (didn’t apply any Blender materials) to check how the bevel and inset would look with a texture applied in Daz. I exported it as a Wavefront Obj with “Selection Only Checked” and imported it into Daz. Also, attached are images of the wire frame, the exact Wavefront Obj export settings, and the Daz import settings. Does someone know what is causing this problem? Thanks!








Comments
That is smooth shading - since you hve modelled the item with sharp edges (no bevelling) you may need, in the Surfaces pane's Editor tab, to turn Smoothing off for the model's surface(s)
It looks like an issue with your vertex normals. I would re-open that OBJ inside Blender and double-check that vertex normals are pointing in the exact direction you want: Edit Mode, then click the Overlays options drop-down on the upper-right toolbar menu:
I agree with Richard that you probably need to fix the smoothing angle. Or you can model a high-poly model instead with beveled edges, that's what is common for realistic assets. Also because low-poly models will not render fine unless you also use the round corner radius.
you either need to bevel the edges or put in more poly, but as a quick fix do as Richard suggested with smoothing within DS. Even just beveling edges sometimes isn't enough and you just need to add in more poly.
A fast way to add bevel is to use the bevel modifier based on angle.
And for something like a cabinet, the default 30 degree should be fine, and I would set it to 2 segments and 2 mm.
What happens if you don't use the Harden Normals option on the bevel? Not really sure what you intend to achieve by using it if you want sharp edges.
From the Blender wiki - "When enabled, the per-vertex face normals of the bevel faces are adjusted to match the surrounding faces, and the normals of the surrounding faces are not affected -- so the effect is to keep the surrounding faces flat (if they were before), with the bevel faces shading smoothly into them"
Looks like you are seeing the bevel faces shading smoothly into the other faces, which doesn't appear to be what you want.
The purpose of bevel is to have a smooth edge, as very few items in the real world has hard edges, but at the same time keep well defined surfaces if you are smoothing the overall object, which you will usually do.
Attached is 3 cubes, all with smoothing. The one left default, middle default with hard edges and right with beveled edges.
Thanks for the suggestions! This is my fourth day learning modeling in Blender. (Don’t laugh too loud! :-) ) The problem was caused by selecting the Harden Normals option when using the Bevel Tool. Richard Haseltine’s suggestion temporally corrects the problem. I will remodel the cabinet tomorrow. Have a wonderful weekend. Bests everyone.
Normal Maps are very useful for tons of purposes but also for that.
If you use the same object as a lowpoly and highpoly, you can unwrap the lowpoly then bake the highpoly (this version you can add details, beveling, etc.) onto it. Sharp or beveled edges will be computed into normal map information, and once this image loaded in the proper Surface slot in DAZ, you'll have sharp edges in DAZ, identical to what you see in Blender. But without the need to use this beveling "solution" that adds extra geometry and ultimately (when many assets are loaded) slow down the whole scene.
Normal maps enable tons of details without unecessary extra vertices. It's good to learn modeling (b^-^)b. But a mandatory step in any modeling/sculpting workflow is : baking. You'll get the best results without unecessarily charging your final meshes.
It depends. Geometry takes much less space in the gpu than textures. So instead of multiple 8K textures with details you may want to use a HD mesh with vertex paint or procedural textures for example.