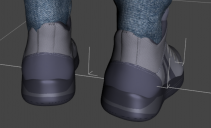
clipping jeans shoe

Hi,
Im using the shoes from back to school 2 set and super jeans from mega wardrobe for g8m. Currently the jeans and shoes a clipping, is there a way to make the jeans be inside of the sneakers? Thankful for help :)
test 4.png
1485 x 902 - 896K
Post edited by tn222eb on
Daz 3D is part of 
Connect
DAZ Productions, Inc.
224 S 200 W, Suite #250
Salt Lake City, UT 84101
Licensing Agreement | Terms of Service | Privacy Policy | EULA
© 2024 Daz Productions Inc. All Rights Reserved.
Comments
will glady take tips on fitting clotthes.
Redacted
inside wiuld be tricky, but inside or outrside could be handled with a dForm (probably using a weightmap to control its effect) or a Push Modifier (again weight-mapped), possibl;y (for inside) after hiding the lower parts of the jeans to simpl;ify the job.
For the later, first make sure the jeans are selected and then go to Tool>Geoemtry Editor. Right-click in the Viewport>Selection Mode>Marquee, switch the Viewport to one of the orthogoanl views (click the button at top-left that shows Persepctive View or the name of the current camera and pick Left, Right, Front, or Back) then just drag out a rectangle enclosing the bits of the jeans that will be wholly hidden. Right-click>Geometry Asignment>Create face group... and call it soemthing like Hidden. Now, select the Hip (or indeed, any other) bone of the jeane, switch to the Joint Editor tool, right-click>Create>Create Child Bone, call it Hidden. Finally, with the new bone selected and the Joint Editor active, in the Tool Setings pane click the Selection Group button and check the Hidden group you just created. Now you can hide or show that area of the jeans simply by making the bone invisible or visible (although we've added a bone it won't affect the way the jeans move as we haven't given it any influence).
Now that you have hidden the entirely superfluous areas, the parts that need to be at least semi-visible can be addressed. One way is to puse a Push Modifier, which has the benfit of moving the mesh in or out in the direction it faces (with a dForm it scales relative to a single point). Select the whole figure, insteead of a bone, and go to Edit>Figure>Geoemtry>Add Push Modifier. In the Parameters pane assign it a negative value, big enough (in cm) to get rid of everything you want hidden). Now we need to able to edit the weightmap for the modifier, to control what isa ffected and how much. Create>New Push Modifier Weight Node (thise isn't actually the weight map, which belongs to the modifier, it's a way to get at the weight map for editing). Activate the Node Weightmap Brush tool and in the tool Settings pane select Push Modifier and click Add Map. Right-click>Geometry Selection>Select All. Right-click>Weight Editiing>Fill selected and enter a value of 0 - this gives a blank canvas. Now you can use the mouse (or a tablet and pen) to paint the effect back in where needed, gradually puling the unwanted bits of the jeans into the opening of the shoes. How well this will work will depend on how obliging the geometry of the jeans is.
You can use a similar method with a dForm - add it from the Create menu, place the Base node in the middle of one leg (you would need a dForm for each leg, at least), scale the dForm itself down in X and Z to shrink the leg enough to fit inside the shoe top, then activate the node Weightmap Brush tool. You can select Influence Weights from the Avaialble maps in Tool Settings at once, you don't need an access node here, then fill the map with 0 and apint in as above.
thanks to both of you for the tips :)
There is a product call
Sorry. I think I just answered on the wrong thread.
The Mesh Grabber plugin is useful for things like this as well. Regular price is about $40 (US), but it has gone on sale a few times in the last year for about $20 (US).
There is a bundle that includes the two add-ins (rotations and morph editor). I have the rotations add-in but I rarely use that.
In my workflow, I find this most useful for the poke-throughs where either there isn't a clothing morph, or the morph doesn't move far enough or is not in the exact right place. I also use it for layering clothing from different sets, such as a leather jacket over a T-shirt. But it has a whole myriad of uses and I find it easier than using d-formers when I'm looking for something quick.
They make it for Windows and Mac. I put both links here since I don't know what you use.
Mesh Grabber (Win) | Daz 3D
Mesh Grabber (Mac) | Daz 3D