Face Transfer - should I wait?
Hello everyone!
I downloaded Daz3D less than a week ago by pure curiosity and now I'm wasting hours and hours a day playing with it. I don't have much background in anything 3D (apart from following a beginner's tutorial for Blender during the lockdown), but even so I'm already messing with morphing at this point. Fantastic (and easy to use) little piece of software.
But I digress.
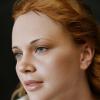
I've played around with the Face Transfer (free) and was impressed with the results, as long as you feed it with the right source picture (as in absolutely frontal, no expression - mouth closed, no smile, etc -, good resolution, good lighting, etc). OK, it's not a miraculous tool and I'm sure there are better (and pricier) things out there, but as I'm only an amateur with no will, time or desire of going pro, it's a nice toy. :-) And yes, I read around in the forums about it, people tend to not like it so much - I'm probably an easy guy to please. ;-)
Anyway, my question is: for someone that will not be using for anything besides having a little fun, 50 dollars is pricy (especially because my currency is heavily devaluated relative to the US dollar in the moment). Hence my question: how frequent are the "sales" for this plugin (the unlimited version) and what discount should I expect in a sale? As I said I'm in no hurry, but I'm considering my options (from not buying it at all to buying it full price, but with the "sale" as a midpoint).
Thanks!
Daz 3D is part of 
Connect
DAZ Productions, Inc.
224 S 200 W, Suite #250
Salt Lake City, UT 84101
Licensing Agreement | Terms of Service | Privacy Policy | EULA
© 2024 Daz Productions Inc. All Rights Reserved.
Comments
Well, it has been on sale at 60% off on four occasions in the last 6 months and down at 65% off once in a sale last June. I suggest you put it in your wishlist and keep your eyes open to spot the next time it goes on sale (I check my wishlist at least once a day to spot anything I want at a good price).
If nothing else, it may well go into a store-wide sale of 50% off or better during the March Madness sale period.
ETA: I recommend the "Daz Deals" browser add-on (find out about it HERE) to help you spot good deals - you can set it up to notify you if anything in your wishlist goes on sale, I believe. It also puts a price history on the store pages - this is where I got that previous sale date information from.
When evaluating the results, look at the face shape in profile and decide whether you are satisfied. That is where a lot of people have been disappoinnted. And, as MelanieL says, don't rush to buy at full price!
Thank you for your responses! I've bought it using my 40% welcome discount. :-) Well, yes, it's not perfect, but it's possible to get some good results combining a good source picture, some hard work, and patience. I did a small step-by-step of my process (so I'll not forget what I did when I need it). I'll post it here in case someone thinks it's useful:
1) The IDEAL photo to use:
- Is frontal, or as frontal as possible
- Have good resolution
- Have good, frontal, not excessive NEUTRAL (white) lighting, with as little shadows as possible
- The entire face should be visible (no hair over the face, forehead, eyes, etc)
- No glasses, no piercings
- No expression (closed mouth, no frowns, normally open eyes, no teeth)
2) You CAN "correct" a few of the things above in an image editor. For example:
- You can use the "clone" tool to remove any (small portion of) hair that's over the forehead or the side of the face. Try to keep the FORMAT of the face as it originally was (no excessive "carving" into the hair area)
- You can try to use the white balance or color correction tools to correct the color of the skin. The success will depend on how altered the photo is and how much of the original color remains.
- You can remove (again with the clone tool) any SMALL shadow areas, like for example shadows under the nose caused by a headlamp when the pic was taken. Again, be careful to NOT carve into the natural darker areas that separate the nose from the face, otherwise the Face Transfer will have a hard time finding the correct nose silhouette
- You can remove piercings also. Glasses, not so much
- If the photo had a slightly open mouth or even a slight smile, use the clone tool to CAREFULLY cover the white teeth with the same texture of the lips. This will avoid Face Transfer putting a white, teeth-like line at the edge of the lips. Don't worry about enlarging the lips A LITTLE, as you can use the "lips size" sliders to readjust it later
3) Once edited, save the picture at least in the same original resolution and in a lossless format (or at least in a JPG with zero compression)
4) Import it into Face Transfer. DON'T FORGET TO SAVE THE FACE after "reading" it.
5) Now it's time for the second part of the job. Go to the Shaping tab and:
- If you had painted the teeth with the lips texture, readjust the lips sizes to mimic the real one
- Take a look in the face and compare it with the original one, making SMALL adjustements as necessary
- If you have a profile picture of the same person, and if you're trying to emulate the person, turn your new character to one side and compare the features. The Face Transfer tool only sees the FRONTAL view of the person, so the nose's length, the jaw curve, etc, will probably be dofferent. Adjust as needed, but always go back to the front view to compare and see if you didn't exaggerate
- If you have a tool to remove the brows and have new brows to replace it, FIRST put the new brows on, adjust them as well as possible to the "painted" ones, and THEN remove the original ones from the skin. This can sometimes make a huge difference, as Face Transfer tend to put the colors a little to the reddish side, and the eyebrows end up red also.
6) After all this, take a look on the character and try to find any discrepancies to correct. Optionally, you can re-edit the skin (using the "Surfaces" tab to find them, editing them, and loading them back) to do small corrections, especially on the skin tones. Just remember that, if you're editing the face skin, you'll need to emulatre the color on the legs and arms, otherwise they will not match in the character.
And that's it. Depending on your source picture, the features of the person pictured, and the work you put on, you can end up with something very close to the original.