HDRI in Carrara, doing it wrong or right?
 CoolBreeze
Posts: 207
CoolBreeze
Posts: 207
Heya all,
Every time i've tried using HDRI its really eluded me as to what settings to use and how to get it to work in general. Even some of the paid tutorials out there and youtube freebies, seem to scratch the surface, give you the basics then tell ya to have fun!
So anyways, I thought I'd try my hand at it again, having been on another long hiatus from Carrara... I picked up a few new pieces (well, something i seem to be always doing but never have the chance to really sit down and do anything with Carrara) ...
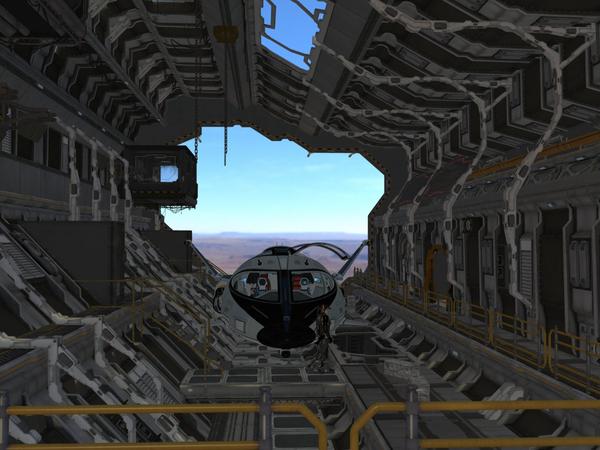
Scene Setup:
Ambient Light: Basic white 20%
Atmosphere: None
Background: HDRI - Serpentine Valley (freebie) , set intensity to 200%
Backdrop: None
Camera Depth of Field defaults - V4 Selected
Props:
V4 female (Nightworld Huntress and Complicated Eve clothing mix) - had her saved in my Objects from another project
Sci Fi Hanger
Shuttlestar
Added a single very low intensity yellowish distant light for some highlights on the V4, angled downwards slightly.
Rendering:
Full Raytracing
Gamma Correction 2.2
Antialiasing Good
Object Accuracy .5 Pixel
Shadow Accuracy .5 Pixel
Skylight: 1000%
Full Indirect Lighting
Light Through Transparency
Photon Count 10000
Lighting Quality Good
Accuracy 1 Pixel
Render time was about 14min on best quality on my rig (yeah, its a beast...)
So what am I doing right, and what am I doing wrong? Is this even worth posting?
Any hints, tips, or suggestions?
Thanks!
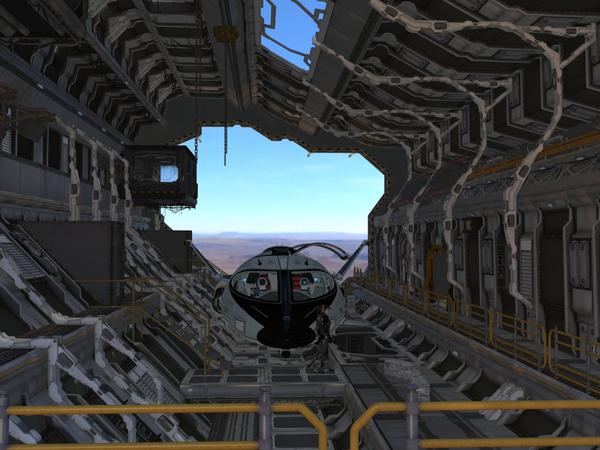
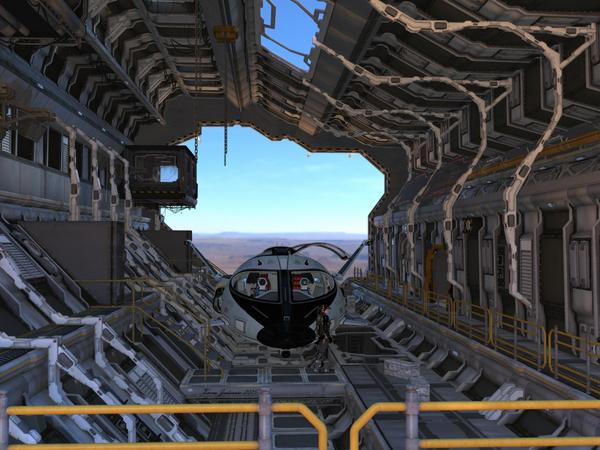
:edit: Added 2 more test renders - below the Assembly room screenshot, with toned down Skylight strength : 300% and 100% respectively...

Daz 3D is part of 
Connect
DAZ Productions, Inc.
7533 S Center View Ct #4664
West Jordan, UT 84084
Licensing Agreement | Terms of Service | Privacy Policy | EULA
© 2024 Daz Productions Inc. All Rights Reserved.
Comments
I don't know if it helps, but I've done quite a few renders with SIBLS sets.
1. Usually, there is a high definition map (JPG or PNG), and a medium resolution HDR map. When the camera is set, I create a new scene, copy/paste the camera in it, add the hires background to the scene and make a render at least the size of what I'm planning to do (or more, usually twice that size). After that, I use this render as a backdrop in the initial scene (thus bypassing the limitation of the medres HDR).
2. Most of the Sibl come with a Sun direction and color (You'll find it in the text file that is in the archive). This is something like:
[Light1]
LIGHTname = "Sun"
LIGHTcolor = 249,220,189
LIGHTmulti = 0.8000
LIGHTu = 0.252000
LIGHTv = 0.856000
I have (somewhere) an Excel file to convert UV to direction for a directional light (I'll try to find it) but it's usually quite easy to find the sun with a few renders and align the light in opposite direction of the camera).
From there, the light rig will be complete and you'll get highlights and shadows.
3. Ambient light doesn't work well with HDR lighting and gamma correction. You should set it to zero. For instance, if you look to the boxes in the lower right part of the render, the boxes and the ground below have the same lighting and it's not good. There should be some kind of ambient occlusion and there isn't...
3. Most of the time, full GI is superfluous when HDR lighting is on. You may try not to use it to speed up your render.
4. if you plan to use GI, you may find useful to add a glow channel to the shader of the lights below the handrail. Considering how the scene is done, it's pretty normal the hangar should be very dark, with your character in the shadow and some inside lights would help
Hope it helps
Looking pretty good to me! The one thing that I would do (as Philemo has also mentioned - in fact, all good advice from him!) is to kill the Ambient Light. This is a hangover from when computers were a lot slower and was a substitute for Indirect Lighting. As you are using Full Indirect, you don't need any Ambient Lighting and it will wash out your shadows.
Thanks both!
Philemo
Yeah I generally do "LDR" type IBL as well, meaning using a spherical camera to render out the initial empty scene with the sun angle, often 8000x4000 pixels png format, and us that as my "skydome" ... Then I build the scene, use Sunlight @100% with Realistic Atmosphere with the Ambient set to Sky 20%, and in the render settings use full Global Illumination and the Skylight set to 300% intensity. Thats always proven great results for me. I've gotten near photo-realistic results and at worst very high end CGI quality renders. This is from a bit of tutilage from Tim Payne a few years ago.
Ever since I started with Carrara 6.x many years ago, I've always gone the full GI route versus the faster faked methods. It does take longer yes, and in the case of my formerly 7yr old machine, alot longer. Thats always been my preferance tho.
Using HDR i'm finding is a whole different ballgame i'm finding.
I've also went in and found the materials that the Hanger lights are set to. Had to use a new shader, copy and paste the shared panel shader settings and add the texture to the glow channel. Thanks for the reminder, now we have lit hanger lights. Some of which provide some light around the immediate area.
PhilW
Ahh ok, I went back and set Ambient: Basic to 0% , kept the HDRI strength at 200% ...
Now, in the render settings, I've set my Skylight to 100% , and then tried 300% (borrowing from the normal routine i always used with the "LDR" Full GI setup...
Here's whare I have sofar... In addition I've added a second camera to the scene, one closer up to the character, to better see how the lights and shadows play in the scene...
Obviously the slightly brighter scenes are the Skylight set to 300% vs 100% ...
I'm still not sure if this is going in the proper direction yet or not...
I also piked up Lux for Carrara, but I've been wanting to learn the right way to use HDRI with Carrara's native render engine first before learning yet a whole new render engine (went with Lux since I choose a pair of Radeon R9 290X's instead of Geforce Titans)
Good results. I would be tempted to make the internal lights brighter by setting a multiplier on the glow channel and using the 0-10000% slider. You can try a few low resolution tests to get the balance right before doing your higher res final render. With Full GI on, you get the illumination effect from glowing surfaces as well as more conventional "lights" and it can often be the best way to light a scene (along with HDRIs which I find generally great!).
What?? Blasphemy !!! :) :) :) :)
FWIW, I agree with Philemo that it's normal that, under these conditions, the hangar would be dark. Although the purpose of the lights in a hangar bay is to make it NOT dark, so guys can work on the vehicles and see where they're walking and stuff. Which is why they install all those lights.
I'd suggest that you make a bunch of those lights as actual light sources, either spot or bulb lights. Personally I'd also add IES profiles to the lights, but you can save that for another time. And think about where people would walk and work, and make sure it all makes sense and the lights are doing what you want them to.
The other thing you might consider is working on those textures, so that you get more bounce light off the walls and floors. Part of the reason that the skylight isn't illuminating the hangar bay is because the textures aren't giving you enough bounce light. There should be a lot of blue sky light bouncing around to help illuminate things a bit.
EDIT: BTW, if you want an idea of what "look" you want to shoot for, I'd suggest you google something like "hangar bay", and select "Images", and you'll get pages and pages of images of hangar bays to give you an idea of what lighting you might want.
I'm just guessing here, but I would think some of the problem is that human eyes are really good at adjusting to light levels in these scenarios whereas cameras might need a little help. You can increase the brightness of the hdri in the assembly room under the scene tab to have it throw brighter light even still, but it will also wash out the hdri too, so there's a tradeoff inherent in that approach. If you were already kicking the skylight intensity up to 1000% and it's still not throwing enough light into the scene... hmm.... Honestly though I thought the first set of renders looked about right and things seemed nicely visible to me.
I suppose it depends upon your ultimate goal for the image. If your goal is, as you say, visibility, then yeah, do what you need to do to make it all visible.
However, if your goal is something different, then the lighting should support and enhance that goal. For example, if it's "realism", then you'd want to make it so it will satisfy what the viewer needs in order for him to believe it's real. Or if it's to tell a story, or impart a particular sense or emotion (for example, "drama"), then you'd want your lighting to support that.
Just a thought...
PhilW
Hanger Glow channels now set to 10000% as you suggested. Also did the Shuttlestar interior illumination glow channels to 10000% also.
JoeMamma2000
With the initial use of HDR for the background and primary illumination, I was striving more towards realism...
Stone Mason's Sci Fi Hanger - http://www.daz3d.com/sci-fi-hangar-19982 , presents its own unique set of challenges being cylindrical enclosure, open ended on both ends, and a small skylight or two...
Googling pics of hangers, majority of the typical small aircraft type hangers have the huge front sliding doors so most of the ambient daylight floods in...
Modern Day hangers:
http://www.airfields-freeman.com/IL/Haley_IL_05_hangar_int.jpg
http://th05.deviantart.net/fs70/PRE/i/2012/346/e/6/the_hangar_ii_by_rainmason-d5nuig7.png
http://images.huffingtonpost.com/2008-12-11-hangar3.jpg
http://oz-cover.com.au/wp-content/gallery/hangars/aircraft-hangar-24x15x4-8-gatton.jpg
http://secondwindairpark.com/2nd/images/pers hangars.jpg
http://www.avsim.com/pages/0311/PIS/open hangars at kmrb.jpg
http://www.simflight.com/wp-content/uploads/2011/10/Hangar-interior.jpg
http://www.ozetecture.org/wp-content/uploads/2012/09/Building-and-plane-together.jpg
http://www.boeingshanghai.com/Portals/0/2 767 -1.jpg
http://www.compliantsteel.com.au/media/6903/aircraft-hangar-8_Photo.jpg
http://candysdirt.com/wp-content/uploads/1620-Airpark-lane-Hangar.jpg
http://ndgt.biz/userfiles/swamp cooler desert cooler helicopter hangar army climate control.JPG
http://www.ironbuiltbuildings.com/downloads/images/aircraft-hangars-5.jpg
http://www.illuminexlighting.com/wp-content/uploads/2014/08/The_Spirit_of_Delta_Boeing_767-200.jpg
- http://www.illuminexlighting.com/led-and-commercial-induction-lighting-use-in-aircraft-hangars/
some sci-fi ones:
http://images.forwallpaper.com/files/images/3/3a9a/3a9a5eb8/145217/ship-space-space-hangar-terminal-transport.jpg
http://img3.wikia.nocookie.net/__cb20120928041920/starwars/images/7/7e/Glid_Station.png
http://th03.deviantart.net/fs71/PRE/f/2013/238/c/5/strike_vector_hangar_by_paooo-d6ju2xj.jpg
http://img1.wikia.nocookie.net/__cb20130131055637/starwars/images/f/f0/Theed_hangar_battle.png
http://www.blogcdn.com/www.joystiq.com/media/2013/03/starcitizen530.jpg
http://gamerinvestments.com/video-game-stocks/wp-content/uploads/2009/10/e1m4_spareparts_teslalab_hangar.jpg
http://img1.wikia.nocookie.net/__cb20131107222414/starwars/images/7/7f/SnowspeederLaunchBay-TCGtBoH.png
http://www.scifi-meshes.com/gallery/data//2/medium/Hangar_Bay.jpg
http://www.mognation.com/wp-content/uploads/2013/09/StarCitizen-Hangar-Module.jpg
http://o.aolcdn.com/hss/storage/adam/72790e1698070c3655a51c405765a1c6/asteroidhangar.jpg
http://i.ytimg.com/vi/bchxbjRLIzQ/maxresdefault.jpg
JoeMamma2000
Good points all around! I'll have to try a few spots or bulbs... and maybe a venture into IES lighting (i've got a ton from one of the light bulb brand sites, unfortunately the profiles didnt come with any thumbnails of which bulbs they're from). If you have any decent starting points on using IES, I'd be happy to hear them :)
I'm definately not a stranger to working in the materials room and tweaking the shader channels. 90% of the time i have to ramp up the Bump strength, and switch the Poser color in the Highlight channel to % mode.
With the Shuttlestar, I've already tweaked the exterior surface materials for a bump strength stronger than 4% (I usually go 10%), as well as added 1.5% reflection value from PhilW's own pages.
I'll have to take another "go" at the various wall and floor panel materials. Again generally, the Highlight channels will likely be using some tone of grey I'll have to switch to Percentage mode.
Jonstark
Your right... increasing the HDRI strength would further wash out the HDRI for use as a Background image in Carrara's "skydome". Its already lighter from setting it to 200% early on.
Most (all?) of the ambient lighting is coming from the Global Illumination: Sky Light (which we know is from whatever image or HDR we set in the Background = Carrara's internal Skydome), in which I've been playing with at 100%, 300%, 600%, and 900% values as you'll see in the attached images below in this post. The other source of Ambient light was from the Scene's Ambient: Basic 20% White, which I've reduced to 0% as per suggested above.
The funny thing is I thought my initial render seemed to look decent to me too, upon posting it and now looking at it. Its wierd if you know what I mean- especially having turned off the default Scene Ambeince, enabling the material Glow channels, then trying various levels of Skylight percentages. it's really changed the mood and tone of the scene. From something thats very lit, colorful and visible (even overly visible?), to something much darker and moodier.
The other caveat is with enabling Skylight and/or Background image, nomatter what setting you use, should you want or need to set a Scene Backgdrop image, it wreaks havoc... Why Carrara can't seem to have a setting whether or not Skylight & Background is excluded from affecting the Backdrop image is beyond me (would solve alot of headaches in certain situations since Backdrop image ties directly to the Camera frame).
JoeMamma2000
Your right about the different types of lighting conditions for different purposes. Almost always I have a particular mood or feel I'm aiming for when I begin a project, including a story to go with it. In this situation, my initial outset was to just try my hand at using and learning HDRI images in Carrara again. I tossed in a few new items I picked up the past week with the various site sales and this scene just sorta came about.
Hence, thats half the battle here, trying to understand HDRI better, and trying to make a render that really looks good from using HDRI (opposed to my standard Low Dynamic Range method of rendering out my own spherical skies to use with Carrara as Background / Carrara skydome + Sunlight + Full Global Illumination type setup). All this being within the scope of using Carrara's internal render engine instead of trying say LuxRender or the new LuxCore 2.0 (which I'll probably try once I get this image nailed.)
In irony, I Haven't tried using my own tried and true method on this scene to compare against...
Without furher adieu, here's the next set of renders. From top to bottom, the sole difference aside from enabling 10000% Glow channels in the hanger and shuttlestar interior; is the change in Skylight strength: 100% , 300%, 600%, 900%
Everything else is unchanged: Scene Ambience Basic White 0%, Background: HDRI: Serpentine Valley 200% Intensity, Full raytracing, Gamma Correction 2.2, Full Indirect Lighting (no interpolation)...
Edit / Addendum:
Jonstark
Just to reflect on something here, looking at before and after... I hadn't noticed before, but talk about quite the difference in the quality of "how evenly lit" and "brightness" between the very first image in this THREAD and the very last image of this POST . The very first image now looks something that I took into an image editing program and began some serious postwork and resulted with this current end image...
And thats what gets me right now - I've always tried to perfect the image right from the renderer instead of fixing it / tweaking it in postwork (I just never liked doing postwork, even corrective postwork). Weird eh?
Even using my image viewer program, tapping Home and End keys lets me cycle to the first and last images just like in this thread...
I think you're getting to something.
One last remark. When dealing with HDR lighting, if you want to increase light, you have the choice of increasing the skylight setting in the render room or the intensity in the HDR properties in the scene.
Why the difference ?
If you look at a photograph of a dark place with a bright exterior or think how a human eye would adjust to such a situation, if the interior could be seen, then the exterior would seem very very bright, almost white.
You can achieve that by increasing the HDR intensity.It will give you a much better contrast between the two environments, thus making the render more photo realistic.
Here is a quick example: Kind of cylinder with a floor and a box on it.
The settings are :
HDR intensity 200% Skylight 100%
HDR intensity 200% Skylight 500%
HDR intensity 1000% Skylight 100%
You can see the two last ones give the same lighting in the interior. The difference is only of what's perceived of the exterior.
I am liking where you are getting with this - both the middle two look best to me, depending on the mood you are trying to achieve (as Joe has pointed out). I think this image is also crying out for a bit of Depth of Field blurring of the rail in the foreground. Carrara has both fast and slow methods of rendering DoF, or you can use the depth channel in a multi-channel render and use that with lens blur in Photoshop (or similar). I don't think it needs much, but it would just enhance the photorealism.
Wow, you've got some beautiful results....nice colors and lighting....
You came a long way real quick... :) : )
You can get an IES viewer:- http://www.photometricviewer.com/
IES Generator / editor:- http://www.vertheim.com/ies-generator.html
They are small execution files, they are free, and do not install anything.
Steve, thanks for the links - that IES generator/editor is very cool!
Hmm, ok, well here's what I get with:
1st image: Skylight 100% , HDR @ 900%
2nd Image: HDR @ 1100% , Skylight 100% (tallying that I had HDR 200% + Skylight 900%)
3rd Image: HDR @ 1100%, Skylight 100%, with an image added to Backdrop
4th Image: HDR 1000% , Skylight disabled, Image added to Backdrop
What I get from the remaining scene past the hanger entrance is exactly what I had expected I'd get - the entire hdr image white-washed. The images you posted, the top image, the hdr is nearly black whilst the bottom image the hdr still shows and a bit on the dark side. I'm guesing you've used an incredibly dark or near black hdri image for that scene for it not to be white-washed at 1000% HDRi intensity setting...?
now, to drop in an image in the Backdrop image map slot, it too has been affected somewhat by the Skylight 100%... That would mean having to disable Skylight ...
Skylight does not affect the backdrop. If your HDRI background or your backdrop is looking washed out, it could be the effect of your gamma setting. Gamma correction deals with light in the scene correctly, but unfortunately does not deal with backgrounds or backdrops correctly, you may therefore need to "de-gamma" them in Photoshop (or whatever you use) for them to render correctly when using gamma in your renders. Or composite an image in afterwards.
Actually no. It just seems it does. Optical illusion
If you subtract one image from another (DOC15_1100b from Doc15-1100a), you see the backdrop part is pure black, meaning it's exactly the same.
Thanks man! I've only been using Carrara since 6.x when it came out in 2007 - 2008, and dabling with Daz Studio 1.4 for a while prior to switching to Carrara ;)
It saddens me to think I've been on mjor hiatus from rendering for 90% of 2014 (i've still been faithfully buying content, downloading, installing but thats about it), despite even having just got my newly built render rig up and going this past September... But thats just how 2014 went, including some lack of interest as well as not being home due to house renos, as well as lack of energy and creativity.
The other half being lack of interest, possibly stemming from having hit / reached a particular plateau in my rendering, knowing where its at and can't seem to be learning anything new to climb the next level in improving render quality. I'm at where I pretty much know what the end result of the image is going to look like before I start, and know when certain desired outcomes and expectations for a render will fail due to having reached those said limits and knowledge of my skill set... Sometimes gets downright annoying when I seem to both Hit and Miss the photorealism mark at the same time with the combination of scene elements used...
Tally it up and it leads to quite a drought in the creativity department and rendering pipeline, spanning for a past few years actually. And I've got tons of half started projects that could use revamping and redone with a fresh approach and technique. Likewise, having been using the same 7yr old machine the entire time, meant for some pretty long test renders and final wait times.
Here's probably the best from between 2011 - present, in no particular order:
- Wish You Were Here
- Tesla, Iron Knight
- Soldiers of Fortune
- Mandalorian Sunset ; Mandalorian Gentleman Vigilante
- Nikita & SB-20 "Zombie"
- Deena Tak
- Jacen Baurne , J.B V 2.0
- Outpost
- Agency Dossier: The Director ; Closeup
- Agency Dossier: Myyse
- Agency Dossier: Kimma
- Dreaming Wide Awake
- Havaar, Wookie Courtesean
Pretty much all of these I already had a story to tell, and created the character depicted withen them...
Save for "The Director" , which uses a single low intensity Tube light, the remaining 100% of the ambeint light is directly from the Room prop's Light panels (I had to copy the prop, and seperate the 2, so the glow panels were their own object with glow channel)...
Pretty much everything else I've used my "Low Dynamic Range" technique, rendering my own 8000x4000 pixel sky in carrara for use as the Background internal skydome, Realistic Sky + Sunlight, as well as ramped up Skylight + Full Indirect Lighting for a "faked" HDRI type of high end CGI render effect, and the occasional starry space image used in the Background image slot instead for some wilder sky effects. This is probably where Carrara might've benefitted from being able to create / export HDRi's , given alot of the "otherworldly / non-earth" type skies often enjoyed doing...
Tesla, consists of a single V4, that XCC-900 Fembot, and multiple blend mixer layers utilizing alpha transparencies to Carrara's fullest capability for the dense cyber cicuitry underneat the V4 High res carrara SSS skin set...
Not once did I ever take shortcuts to fake GI, or postwork the heck out of the render for corrective tweaking. What you see in those images (as well as everything else in my gallery) has been with the focus on getting the most and best quality out of Carrara's native render engine ;)
And did I ever mention I'm totally at home playing in Carrara's materials room? ;) Thats an entire sandbox in itself to experiment and monkey around in and coming up with fun shaders effects to save and possibly use some other time... I love finding new ways to layer shader effects.
The other half of the fun is putting the characters together, mixing and matching different outift pieces from my runtime, then using my own shaders to make them look like a whole new set
Just had a busy week with work, didn't mean to take such a long hiatus from finishing this project...
Ahh yeah, thanks for the correction there, your totally right about the Gamma setting messes with the use of a Backdrop image, been finding that out the hard way. I've got Corel Photoshop, I can try and see if I can De-gamma whatever image I choose to use...
In addition, the few times the HDRI proves suitable for use as the background image, Gamma also affects it... Argh ...
I wish there was a way to toggle in Carrara whether or not Gamma affects Background and Backdrop...
Now I just need to finish this particular render, mainly being the choice of Backdrop image...
Also, in the few spare minutes here and there I've been experimenting loading and using HDRI's to other projects I hadn't quite finished yet to check out the difference and hopefully improvements.... Suffice to say... I've still got a long ways to go in understanding HDRI's in Carrara ... And this is trying both the 300%-1000% HDRI intensity and the Skylight intensity (either/or)... Its proving hit and miss. I'll have to post those images here to learn where I'm going wrong in those...
It is odd to me that you are having such difficulty with HDRIs, I generally find that I can load and run them at 100% intensity and sky light and it looks pretty good, then tweak as required. But yes, the ability to control the gamma of backgrounds and backdrops would be a useful enhancement.
I've rendered out a landscape at 8000 x 4000 with a spherical camera, and inserted it as a background (where it looks quite decent). But do I need to generate a .hdr file to use it as an hdri? If so, how do I do that?
You can think of an HDRI as an image with built-in lighting information, the extended dynamic range allows you to use it to mimic a real world environment including the lighting. A low dynamic range image (256 levels such as a JPG or PNG etc) can look great as a background but using it as a lighting source - which you can do - will tend to look flat and uninteresting on its own.
There are two ways around this - one is to use your existing panoramic image, but to add lights to act as sunlight or other light sources in your scene. The other is to generate an HDRI, but unfortunately Carrara cannot do that natively. There is a way - you need to generate a series of images at different "exposures" and you need to have your lights visible in the render, so set something like the glow or lens flare so that your lights are visible in the render. By adjusting intensities to halve the brightness at each step, you can generate a series of say 5 levels. Photoshop then has a tool (other software may be able to do something similar) which takes those different exposures and combines them into a single HDRI image. You will need to enter some data as if you had taken the images with a camera, and if there are inconsistencies between your images, it either may not look quite right, or it may even fail to compile the HDRI. But it is possible!
But unless you have a real reason to do so, using a normal image together with strategically placed lights will probably be the easier and more flexible solution.
For the longer explanation, see Phils' post. The short answer is, yes, it can act as an IBL, but won't be as nuanced as an HDRI. By the way, the Skylight option will also treat the other options under Background as IBLs as well, such as a color gradient or even a plain color. The Skylight treats the Realistic Sky as an IBL. You can even use the Realistic Sky and the Background together to effect the lighting.
This uses a simple spherical render as an IBL:
For a simple test, that's kind of gorgeous Evil. I love the Vanguard, such a beautiful spacecraft, and I wish I owned one in real life. Love the lights you've attached and the light effects for the 'headlights'. Nice little render, and I actually think it demonstrates that just using a normal spherical render as a lighting source can be quite effective, don't always need all the lighting info of an hdri.
Thanks Jon! If you liked that...
This little test animation uses a night version of that scene rendered with a spherical camera and placed in the Scene's Background slot. I used the Vanguard and one of the Dystopia City blocks for the foreground structure and lit to match the spherical render. I didn't use the Skylight, so no IBL effect.
https://www.youtube.com/watch?v=QN6E8ji3oHA
I like it because it shows that you can still get a nice 3D effect using a 2D background if you plan your shot accordingly.
Thanks Phil and EP. I had the sunlight and realistic sky enabled when I did the render, and they were baked into the image. Sounds like if I do the same thing for a bunch of different light intensities, I can get Photoshop to do its jiggery pokery. I'll give it a go, then see how the hdri'd version compares to the straight background in a render.
The scene I rendered with the city was the same way- I used a sunlight (except for the night version) and a realistic sky. I faked the GI though.
I'll post more when I get home but yeah,IBL is what I've been using or in other words "Low Dynamic Range" self rendered image maps with spherical camera is what I've been using up until now. Just scroll up a few posts I've linked to my D.A gallery , all the outdoor renders utilize that technique, with full Global Illumination, realistic sky and sunlight settings. Granted it takes longer for test and final renders but I do like the results.
That being said I've been wanting to expand my horizons to us g HDRI (hence the thread title)...
The other thing with rendering your own panoramic IBL sky I'd you can go into the sky lab and set your atmospheric options even atmosphere color. Likewise take that same image and further make adjustmen's in a photo shop type program...
In Evilproducer's example he added dyspopian city blocks. Lovely render BTW!
One tip: when rendering your own IBL 8000x4000 , and whether your using sunlight + full Global Illumination or distant light and sky light, you can get nice results with keeping the sunlight / distant light at 100%, the intensity of background image at 100%, and ramp up the skylight to a out 300% or however much needed. The background image used with skylight will provide decent or sufficient ambient t light for the scene...