Two Tricks Required to Use Ivy Generator in Bryce 5.5
 CTippetts
Posts: 162
I realize the Ivy Generator has been out and available to use for almost 7 years now, but I just heard about recently through these forums and got all excited. I decided it's a wonderful idea. I decided to try it, and found it's also a wonderful tool. You can't beat the price, too.
Before going on, first, go to this thread:
http://www.daz3d.com/forums/viewreply/265323/
and/or follow that posts' link to here:
http://www.youtube.com/watch?v=KFGWjd9kAcs
Mr. Brinnen does a wonderful job of showing you how to use the Ivy Generator. I don't want to have to type everything in this post that he covers there. All I'm here to do is to show Bryce 5.5 users two tricks they are going to need in order to even come close to doing what Mr. Brinnen demonstrates so easily in Bryce 7.1.
His tutorial shows you where to get Ivy Generator, as well as how to use it. If you can't get it, you don't need any of this information. Go find something else to do.
For the purpose of this demonstration, I decided to use one of the most difficult to deal with "primitives" in Bryce ... the Metaballs. If you look at a metaball's footprint, or Bounding Box, you'll see that it's twice as big as the metaball appears on your screen. I probably could have chosen easier to use primitives, but in reality, I was demonstrating this to myself, and thought I'd share with you other Bryce 5.5 users. [insert sound of chirping crickets here]
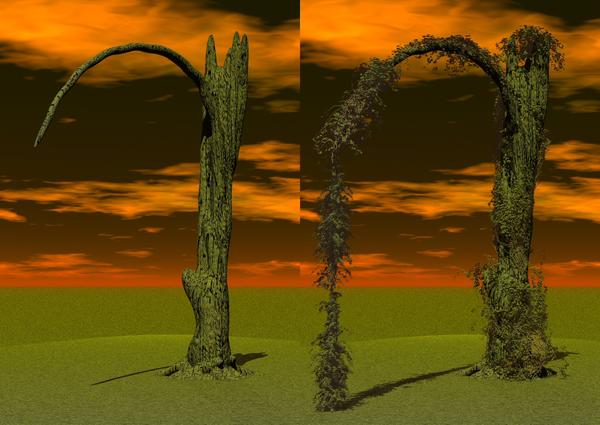
The forest is alive. Well, most of it. Fact is; some of it is dead. I thought it would be great to add a dead tree to a woodland scene, and have Ivy pulling it to the ground, as it happens out in the real world.
So, for the purpose of this demonstration, I threw together a metaball tree trunk, with it's only remaining branch being pulled toward the ground. You can see what I came up with in the left half of my render image below. The right half shows the same thing after it has its Ivy.
There are two problems with using Ivy Generator in Bryce 5.5.
First, when you get to the point in Mr. Brinnen's tutorial where you turn your object into a mesh, you'll find that function does not exist in 5.5. The little "C" button does not appear. You must have a mesh, or you can't export your object as an OBJ file for Ivy Generator to use.
The trick to overcome this is to put a mesh in place of the object you want to export. You can do this as follows:
1) Select the object you want to export. It can be a group or a single object, but, when you go to export, if you have a bunch of objects selected that aren't in a single group, this isn't going to work. Group them first.
2) Duplicate your object or group. Your original object will remain where it was, and do not move the new copy. Let them coexist in the same space. It's a Zen thing.
3) Go to the top of the edit pallet, and to the right you'll see a double arrow icon. You can see this in the other image I added to this post. The cursor in that image is pointing to it. That is used to convert any object into another type of object. Left-click it, hold the mouse button down, and move over to the rock icon. Then release the mouse button. Presto, all the pieces of your duplicate object are turned into rocks roughly the shape of your object. Now you have a mesh that can be exported.
What's that you say? The "Export Object" choice on the File menu is still greyed out and inactive? Well, that's how it is in Bryce 5.5. However there is still a way to export your object as an OBJ file. So here is trick number two:
1) Click the "E" next to your object, (or use the top drop-down menus to choose "Objects", "Edit Object...", or simply press CTRL-E). The Edit Mesh dialog that comes up is not really important, we're not going to edit the object. Don't do anything with it.
2) Use your keyboard and press CTRL-D. This will bring up a File Save dialog. We just bypassed that greyed out Export Object item on the File Menu.
3) Navigate to the place on your system you want to save the exported object, and give it an appropriate name. The name it will have up will be something about a rock. You can use that name if you want, but I try to be more descriptive.
4) Use the drop-down menu next to the File Type field to change the file type you are saving to "Wavefront OBJ Files (*.obj)".
5) Click the Save button. Your object is now saved and ready to use in Ivy Generator.
6) Close the Edit Mesh dialog.
You can now safely delete the rock version of your object. You do not need nor want it there.
From here out, follow the rest of Mr. Brinnen's tutorial.
Due to the size of my tree, I had to make several patches of Ivy. When I first set Ivy Generator going on it, I had thousands of Ivy branches before it was even halfway up the trunk, and the base was WAY too thick with Ivy. So I used six patches of Ivy in scattered places around the trunk, one on the top, and two on the hanging branch. Nine total on the trunk and branch.
Since I wanted a vine of Ivy hanging off the branch, I made a super thin cylinder going from the ground to just above the tip of the hanging branch. I then turned that into a rock, exported the rock to an OBJ, and fed it to Ivy Generator for two more patches of Ivy. I then deleted the rock that was a cylinder. It doesn't belong in the scene, and has served its purpose.
I ended up with quite a mess of Ivy. It tripled the render time.
By the way, when doing this, pay close attention to what Mr. Brinnen has to say about changing the material texture after you have your Ivy imported into Bryce.
Having said that, while rendering after forgetting to edit the material, I realized the Ivy Generator could be hijacked to use to make blossoms in an spring Apple tree, because that's something what the Ivy looks like before you fix the texture. Might even be useful to add a layer of snow to the tops of branches in trees through a different editing of the material. You can delete the Ivy vine branches leaving just the leaves behind as either blossoms, or snow, or fire, or a flock of birds, or ...


