Tiling Terrains
 CTippetts
Posts: 162
Years ago I looked at a tutorial here about tiling terrains, using the Tile North, Tile South, etc. items in the bottom of the Fractal drop-down in the terrain editor. I've looked over the Bryce tutorials that remain on this site, and the ones linked to by Horo and chohole, and it's not there. Also looked at several other sites, including bryce-tutorials.info, docs.daz3d.com, and even went to tutorial index.com. A Google search doesn't find it, either.
In that absent tutorial, there was one particular number I am missing ... the distance between tiles, center to center.
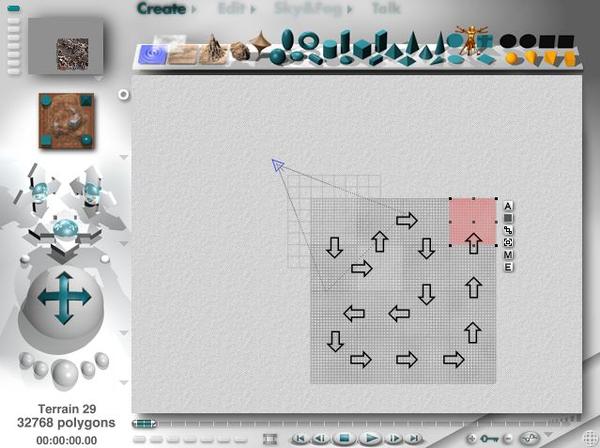
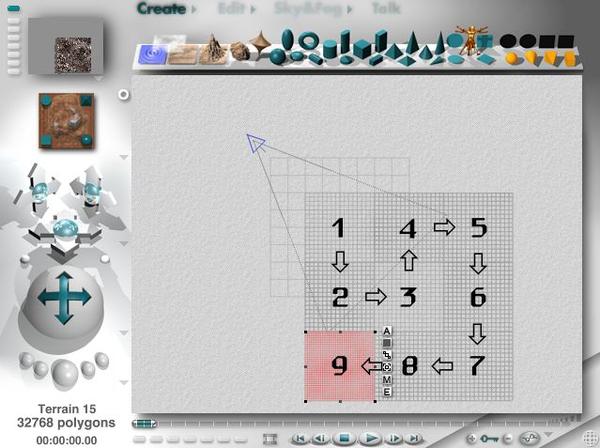
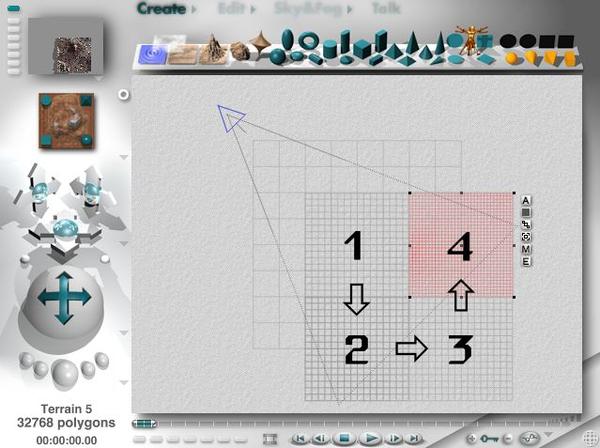
I found another tutorial on tiling terrains about a year ago, and, once again, I can no longer find that one, either. However, when I found that one, though I failed to write down credits, (author, URL, etc.), I did copy the text to a .TXT file, and saved the images. Of those images, the three I attached here are the absolutely most important ... the order of tiling. Trust me ... the order described in these images is the only way it works right. I learned that the hard way ... a few times.
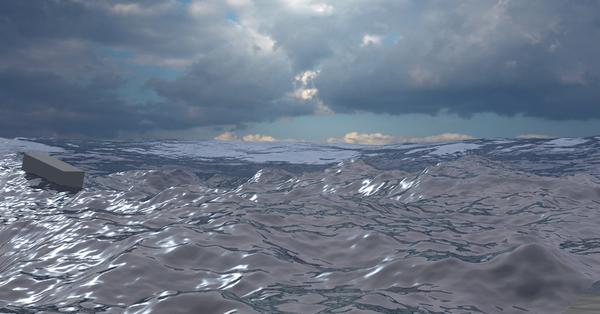
However, that tutorial did not have that magic number I need. The default size for terrains is 81.92 Bryce units. However, you can't simply place the terrains 81.92 Bryce Units apart. There will be a gap. Currently I have the last image below set at 81.74 BU apart. I can still see the seam where the four terrain tiles in the foreground meet. (There's also a fifth, non-tiled, and stretched out terrain beyond those before the 2D Face I used for clouds. Don't be distracted by that.) I suppose I should mention that I'm stuck with Bryce 5.5 for now, until I have better circumstances. It could be that the reason I can't find that info is; it was fixed in version 7. Couldn't know.
Is 81.74 BU the correct number, and the best I can do? when I move them .01 one direction or the other, the seam is more evident. I could have sworn that I had at least one successful tiled terrain image done in the past, based on that first tutorial I mentioned, where no seam was evident anywhere. I can't "seam" to recreate that.
Of course this is a WIP. That block you see cresting a wave is just a place holder for the Ark I've yet to build. By the way, when I go to build the Ark, what's a Cubit? (Just kidding ... that's an old Bill Cosby joke.)





Comments
Here are two tiling videos by Horo on YouTube.
Tiling objects
Tiling pictures
Hope they're what you're looking for.
@CTippetts - there is a two-part video Tiling Terrains on our Bryce Mentoring DVD and since I had recorded it exclusively for the DVD, it is not on YT. Tiling Objects and Tiling Pictures as GussNemo kindly mentions are no help for terrains (but do not forget to watch them anyway, may be helpful for another project).
However, what you're looking for is the frame on north and east of each terrain that prevents you from aligning it with snap to grid. If you keep the terrain at its original size of 81.92 BU when tiling (and you should, because it makes life much easier), you can copy/paste the terrain and - assuming you're tiling north when looking from above, hold down the Shift key and hit the up arrow key 8 times. This will move the terrain 8 times 10.24 BU.
Now you have that darn frame on the north of the terrain so you have to compensate for that by holding down the Alt key and hit the down arrow twice and your terrains are seamlessly aligned. The seam is 0.16 BU and with the Alt key, each arrow key hit moves the terrain by 0.08 BU. By the way, without holding down any key, the arrow key moves the terrain by 5.12 BU.
When you tile sideways, remember the seam at the east side of the terrain when aligning. As your picture shows, you already know that you have to tile in a path, always use an adjacent border. Once you have the terrains together, group them, then scale the whole mess as you wish.
Do not forget to disable the three random options before you start tiling. It is tedious to enter the drop down menu trice to disable all random options. Just hold down the Shift key and click on any of the three and all three get disabled (or enabled). Disabling the options makes Bryce take the same seed to generate the terrain. Otherwise, the seed changes each time and your terrains will not tile.
@GussNemo - Thanks for those links. Pretty much any tutorial by Horo is golden information.
@Horo - Golden information! I added your words to that TXT file I mentioned. I have not tried it, yet, but it makes so much sense, I'm sure it will work.
In the meantime, I decided to calm the sea, and ease the weather. Though the tile seams are still visible, I realized, for water like this, no one would really notice unless they knew to look for them.
It's kind of funny, but, as it sits now, I'm amazed at how the transition from the long, stretched out terrain, (that's beyond the four tiled terrains), seems to blend in with the tiled ones better than the tiled ones blend in with each other. One of those "luck that worked" things I saw discussed in another thread.
Now that I have your wonderful information, I'll redo this again.
Just out of curiosity, and totally unrelated, (perhaps should be a thread of its own), you mentor a lot of people here. Your answers, of course, are always accurate. What is worse for you to deal with; an intermediate user with a seemingly noob question, (like mine), or a noob with a question they shouldn't have until they are at least intermediate?
Oops.
@GussNemo - You were right. The video on Tiling Objects discusses everything about terrain spacing, which was my question.
@Horo - You must have forgotten how much information your poured into that video of Tiling Objects. Wonderfully done! I also like how you keep the Mac users in mind, though demonstrating on Windows. I use Windows myself, but, it adds so much more professionalism into your video, and makes your authority on the subject more pronounced. It's true that the video doesn't mention the use of contiguous fractal terrains, and I'm sure that you probably covered that on the DVD, but it has almost all of the spacing information you provided above. THANK YOU!
There is neither bad nor worse as far as Bryce questions are concerned, only good or better. Sometimes I misunderstand a question and give an unusable reply: there are no stupid questions, only stupid answers. I've got so many hints and tips from others and my way to thank them is to do the same and help out. The best thing Bryce offers is its community.
Ah yes, I just watched that objects video. I forgot that I covered the frame for the image tiles. So I was unjust to GussNemo. I apologise.