New Instance Randomizer Shader Plugin
 Sparrowhawke3D
Posts: 102
Sparrowhawke3D
Posts: 102
I’ve created a new plugin called the Instance Randomizer. You can download it for free from my website with all versions for Windows and Macintosh support for Carrara 8/8.5 only.
The plugin name might sound a bit confusing but that is what it does. You can use it to randomly change the colours and texture and turn details on or off in the alpha channel over any large number of repeated objects.
Big thanks to PhilW who came up with this shader concept and did the beta testing.
Originally we’d hoped it would work with Replicated objects but I haven’t been able to find a way to do that. Real instances in the scene list have a unique index to identify them but objects that are created with the Surface Replicator do not. You can however add a number of duplicates of the same object to the replicator’s list and get more variety using the Instance Randomizer or convert them into ‘real instances’.
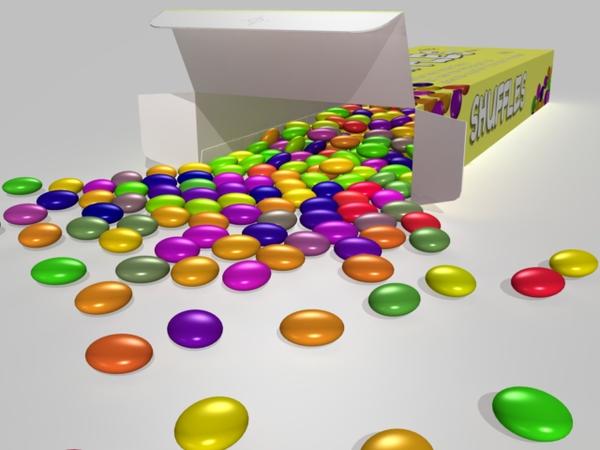
This example illustrates what it can do - every sweet shares the same Master Shader in which a colour gradient is driven by the Instance Randomizer. I used Bullet physics to spill the sweets out of their packet.
Daz 3D is part of 
Connect
DAZ Productions, Inc.
7533 S Center View Ct #4664
West Jordan, UT 84084
Licensing Agreement | Terms of Service | Privacy Policy | EULA
© 2024 Daz Productions Inc. All Rights Reserved.
Comments
fantastic, thanks for that, great you are d eveloping stuff still, downloading now :)
cheers!
I really appreciate all your plugins and this one will also save time to us!
Thank you Jeremy !
Just to add my sincere thanks and appreciation to Jeremy / Sparrowhawke for creating this plugin. It is something that I have wanted for a long time and he has been great about making it and taking on board my suggestions. It really is a most useful addition in Carrara's armoury. Here are a couple of examples of using it. In each case there is just one shader on the main object which incorporates one or more examples of the Instance Randomizer doing its thing.
Can you publish your settings?
I arrive at some results but it would be nice to arrive at yours.
Thank you!
Many thanks good man
But how to use it, what is it? modifier? where can I find it?
Sorry to bother you, I extracted all files in the extensions folder but did not find anything in Carrara.
The Instance Randomizer is a shader which it returns a value. You can use it with a mixer operator or colour gradient to randomly select colours or textures. After you duplicate an object that uses the shader each duplicate will have different values. With a multi-layer shader you could use it in boolean mode to turn a layer on or off, or turn up a layer from nothing to full.
Don't forget to download the instruction manual.
This is what a simple colour gradient shader will look like.
Excellent plugin!!!
Thanks for supporting the community.
I have put up a demo video on my YouTube channel which talks you though using the Instance Randomizer and has some examples of its use, I hope people find it a useful starter on how to get started with it. But it is very versatile - try using it in other shader channels, use it in either value mode or Boolean mode to control a mix between different shaders, etc. Have fun!
http://youtu.be/ryh6bU8vC4Y
I think the name is perfect. Wow... thank you Sparrowhawke! Fantastic! Thanks PhilW!
Superb tutorial!
If you don't have anything to make, you can make the same thing for the other plugins… :-)
Thanks PhilW!
great time saver thank you both works beautifully for the mac Sparrowhawke and PhilW!
Let me know if I have something wrong here, but it seems to me that you could use the shader on objects and duplicate those objects, group them and the randomizer should randomize the colors within the group. You should in theory be able to stick that group in a replicator and the randomized group would be replicated, with the caveat that the only randomization is in the original group and not in any replicated groups. Does that sound about right? I bring this up because if you make a plant such as grass, you could use the shader and randomize the colors of a small patch of duplicated grass, group it and then replicate it to add easy variation in the grass color.
Yes that sounds correct, you would get variations within the group but each group would be the same (unless you created several groups with different duplicated instances in each). It really is a very useful tool to add variations to the use of multiple instances. Some may remember my "Avatar character in a cinema" image that was done for a Carrara Challenge a couple of months ago - the background figures in the audience had an earlier version of the Instance Randomizer applied to give different colored tops, hair, etc.
Feel free to ask any questions and to post your own examples in this thread.
Great job, Sparrowhawke. Thank you for this and your other plugins. And thanks for the tutorial, PhilW.
Just adding my thanks for yet another awesome plugin sparrowhawke - and also philw for the tutorial.
Very much appreciated.
Thank you for another great plugin, Sparrowhawke and an excellent explanation, PhillW:)
Your timing couldn't have been better to help me set up a variegated forest!
OK I love the effect you got on the Smarties, but can you use shaders/plugnins like as a tinting layer in the Texture Room tree when you have a texture map?
I have another set of shaders for skin that are deep tan and other odd skin colours as well under my shaders tab. And these look good for what I want to add for other items that also have texture maps.
Is this possible or am I hallucinating again. I tried to research the big manual for an item explaining adding shaders in a tree where there is a texture map, but haven't had any luck.
I can see it would easy enough to use them when there are only colours and/or other shaders in the tree.
This is a new area for me, till now I've stuck to basic texture mapping and if I wanted to change an appearance, eg of skin, I modified the texture map in PhotoShop. I want to learn more about usng shaders other than just transparency etc.
Thanks...these look great and look forward to adding them to my product library. I have to be out, if any of you UK/EU lot are going to answer, back in a few hours. Any help gratefully appreciated.
xx :) Silene
You can start here, this video shows how to tint Vicky's lips, using a MULTIPLY operator and a color :
http://carraracafe.com/tutorials/glowing-lips-in-carrara/
**edit, it doesn't actually show how to add the MULTIPLY operator, so in case anyone doesn't know - click on the texture map shader in the tree to bring up the shader dialog, click OPERATOR --> MULTIPLY
But except in very subtle use, I think you may find this to be too flat for overall skin because you start to lose details (it looks like someone has been painted or dipped in a color, rather than a natural skin effect.... Not that people haven't been doing this in Poser (et al) for years....
To get better effects might take a more complex shader, where (possibly) you create a MIXER in the color channel, and possibly use your Spec map (black & white) to drive two different colors, I've used a peach with coffee, and also a like a light lemon with 80% dark chocolate.... Hahaha sorry for the color names.
I'll try to build a screen grab...
Right, like make some more use of the spec map as the controller for a gradient, instead of a simple color in the second source of the multiplier. If you don't have a spec map, try the bump map.
What this does is to use the white to black gray scale of the map to determine the color found for that given value within your gradient, so that you can have subtle differences (or even drastic) in hues according to an already prepared map.
In the image below, I first shown on the left where to find the Multiply function, under Operators. On the right I did a screen capture as I was Ctrl Dragging the spec map from the Highlight channel into the source of the color gradient which, for this example, I've left at it's default blue. So you hold down the Ctrl (Cmd) key then click and drag. This will copy what you've clicked to where you release the button, if you release in a valid location.
No way. You win! ;)
You can start here, this video shows how to tint Vicky's lips, using a MULTIPLY operator and a color :
http://carraracafe.com/tutorials/glowing-lips-in-carrara/
**edit, it doesn't actually show how to add the MULTIPLY operator, so in case anyone doesn't know - click on the texture map shader in the tree to bring up the shader dialog, click OPERATOR --> MULTIPLY
But except in very subtle use, I think you may find this to be too flat for overall skin because you start to lose details (it looks like someone has been painted or dipped in a color, rather than a natural skin effect.... Not that people haven't been doing this in Poser (et al) for years....
To get better effects might take a more complex shader, where (possibly) you create a MIXER in the color channel, and possibly use your Spec map (black & white) to drive two different colors, I've used a peach with coffee, and also a like a light lemon with 80% dark chocolate.... Hahaha sorry for the color names.
I'll try to build a screen grab...
Good colour description to me! Am working with different people from far north in Europe to Africa...it's the lighter tones that are the hardest to get right without looking "dipped" as you say in too much cover up makeup!
Thanks very much when you have time...no rush. Am still building my early Orkney man!
x :) Silene
OK I got it...I can do that with a colour, but I have all these other skin shaders and thought I could put THEM in the tree and multiply. As Holly said, you don't get a multiply look that preserves the skin of the texture map which I only wanted to tint to a nice tan, but NOT that even like you just got spray painted. Now i do have a green man I have to work with as well, so can do this for him. Sort of a green Neanderthal, but that's on hold, have to work on the man from the north right now!
Thanks, Dart, Holly and all for replying.
x :) Silene
My pleasure.
Not sure how familiar you might be with such things, so here's a tip to help:
As you get to know the map you're using, how close to black and white it gets, where the gray lands in the areas you really want to focus on most, etc., you may tweak the color gradient to get the effects you want.
After you get into this sort of thing, you may even enjoy making new copies of such maps, and tweaking them in an image editor to get your gradients mixed just the way you want them to appear.
I didn't use a Darts cool gradient idea for my Bikini Car Wash picture. I used the exact same textures for the two female models. I used a very, very light tan color to darken the skin on the asian model. The wet look was by using a special wet skin image map in the Highlight channel. The water droplets on the bathing suits were little replicated spheres with a custom water shader.
I appreciate what Sparrowhawke's new Instance Randomizer can do, but when I want to create a crowd using Predatron's Lorenzo/Loretta's Lowrez figures, it doesn't work. The lowrez figures are duplicated using the surface replicator, but when I try using the Instance Randomizer to change the clothes colors of each figure, the plugin does work. I thought it would work on duplicated figures, and isn't what the surface replicator does, duplicate figures and props?
A replicated object is not duplicated. If you read the original post again you will see why it doesn't work on replicated objects.
Oh, I guess I read the original post a bit too fast :red:
It is probably the main limitation of the plugin right now that it does not work directly with replicated objects, only duplicated, and unfortunately you can't duplicate figures. I know that Sparrowhawke would include this if at all possible - maybe Version 2?!
In the meantime, it is possible to use by "freezing" the figure, that is turning it into a static object rather than a figure (so make sure you are finished posing!). The way I would do that is to Export to OBJ, making sure you select Export with Morphs and Skinning to preserve the morphs and pose you have set up, and then re-Import that. You can now apply the Instance Randomizer to that.
On Silene's original issue, which I think was allocating different skin colours to different Instances, you could use the Mixer operator with a different skin texture in each "side" of the mixer and use the Instance Randomizer as the control. You would need to use "frozen" figures as above, but that will give you skin variations between the two sets of skins.
No need to stop at two! If you need a lot of such variations (with skin or anything else), you can create a tree structure - use a top level Mixer channel to mix between two sides, each of which contain its own Mixer channel, with three Instance Randomizers controlling each of the mix amounts. So if you have four skin textures - call them A, B, C and D - then you have two lower level Mixers, one between A and B, and one between C and D, and then the top level mixer controls the mix between A/B and C/D. Using Instance Randomizers set to Value mode will give you smooth tonal blends, a different one randomly selected on each instance, or set to Boolean will select one OR the other.
As I said - a very flexible tool!
PhilW said:
I have a bit of breathing space now on this newer book cover, so will look into it.
Phil, do you cover this in your IS tuts? Can you point me to the chapter/disc/number so I can dive in there quicker?
Thanks for the help and good on you and Sparrowhawke for continuing to develop new tools for Carrarians, newbies and advanced pros alike! More please!
xx :) Silene