Tutorial: Tetrahedron Gem
 useroperator
Posts: 247
Requires: Hexagon (but general instructions may apply to other modeling programs)
==
This is going to be a short text tutorial. This is so simple and should be easy enough to follow that it doesn't really need a video/slideshow tutorial.
===
Step 1.
Go to the 3D primitives tab and create a Tetrahedron of appropriate size. Left click on the object to make sure it is selected.
Step 2.
Switch to 'select points' mode by pressing F4. Press Ctrl+A to 'select all'. All your points will now be selected.
Step 3.
This is the step that makes the magic happen and determines how your gem will ultimately turn out.
With the points still selected, Go to the 'surface modeling' tab and select 'chamfer'.
There is no 'right' chamfer setting, but there are some guidelines to keep in mind. The chamfer 'range' should be kept at a value of 2. You can experiment with other range values, but 2 seems to be a sweet spot as higher values smooth too much, and lower values end up too primitive and blocky.
The chamfer 'radius' can be almost whatever you want, but I would suggest this value to be somewhere between 1 and 3, and probably best to be closer to 1 than to 3.
You can experiment with this to produce different results. validate/apply the chamfer settings when you are ready, either through the menu or by pressing the 'enter' key.
Step 4.
In the properties panel, set the Smoothing level to 2, you can experiment with other smoothing levels, but 2 is what we will use. You can also experiment with the different smoothing algorithms, but the default smoothing levels from the properties panel are recommended.
After you've validated the smoothing level, go to the 'dynamic geometry' panel. Your model will be listed here. There will be a tiny lightning bolt icon beside the listing. Clicking that will remove dynamic geometry manipulation and will show you all of the actual faces your final model will have.
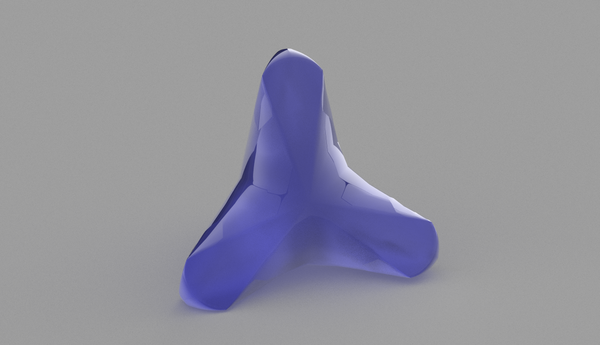
Your unique gem is now finished and ready for render.
Play around, see what you can come up with. You can use this method as a base, then manipulate the lines on your own to produce something more complex.
===
Since I want your renders to look good, I'm including a custom bonus high quality HDRI file for the skylab IBL in Bryce.
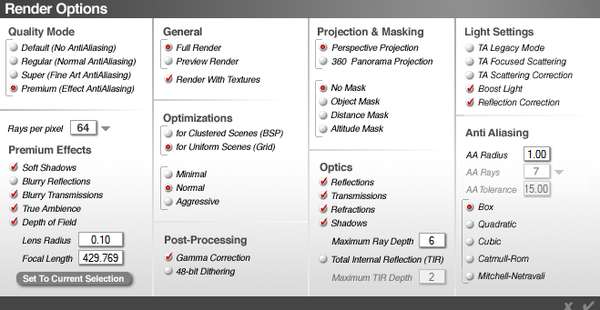
I won't be covering HDR usage in depth, but it's as easy as loading the file in the IBL section of the Skylab and then disabiling the sun/moon lighting. You don't need any other lighting in the scene but the HDR file. I've included a screenshot of recommended render settings for rendering with the HDR in Bryce.
Don't forget to set the depth of field properly by setting it to the current selection (which will set the focus to the object that is already selected in the scene). Also, the Total Internal Reflection (TIR) render setting is something you may want to play around with.
HDR File Download: http://www.mediafire.com/download/tuuqr7lnytq599c/HDRgem.zip
Note: This tutorial and any creation or byproduct derived from it shall not be used for commercial purposes or monetary gain, unless permission from the author is given.



Comments
Thanks for the tutorial. It will be interesting to see if it works with Wings 3D
Looks great. Looking at your settings it seems you failed to enable Scattering Correction. Scattering Correction is essential for accuracy, without it, TA calculates all wrong.
I tested it in wings3d and couldn't fully reproduce it. But I'm not well versed in wings3d at all. If wings3d can chamfer selected points with range/radius settings, then that should work fine. The real issue will be the smoothing in hexagon vs wings3d....I'm not sure wings3d has the same type of smoothing options, which may not give the same type of profile that hexagon does.
I'm not really seeing any noticeable difference with it enabled.
User,
In the particular example above, the Scattering Correction might not be making a big difference, partially due to the fact that this surface is already highly reflective. But as a general rule, Scattering Correction is essential to create the look of fully diffused (fully matte) surfaces. I have included two renders of the same sphere for comparison.
TA is a weird thing, and using it to its best effect is tricky and not at all straight forward. I will explain
Image 1:
There is no specularity nor reflection on this surface. The only slider I've used is the diffuse channel.
Unless told otherwise, Bryce 7 will default to Focused Scattering. So even though you haven't necessarily selected Focused Scattering in your render settings, unless you purposefully assign Scattering Correction, you will render with Focused Scattering by default.
Focused Scattering is the name given for the legacy scattering mode of Bryce 6 and earlier, so that some degree of backward compatibility would be possible. The incorrect scattering of Bryce 6 and earlier was extremely distracting to me, because it caused surfaces to adopt a sort of specular sheen that is unnatural. Surfaces appear "wet" to my eye.
Notice if you will the way the horizon line is actually visible on the sphere. You can see where the white ground plane and the blue sky meet. You can also see how the shadow the sphere casts onto the ground is reflected back up onto the sphere with a rather sharp edge.
From a technical standpoint, what is happening is that the rays are not fired in all directions with the same intensity. Unfortunately, most of the rays are fired along "preferred" angles. This leads to rather sharp inter-reflections as well as other inaccuracies. This was a cheat used to create brighter looking renders with fewer rays per pixel. True Ambience in this mode is mostly lies.
Image 2:
Scattering Correction is enabled. For all practical purposes, this is what a fully diffuse (matte) surface should look like to my mind's eye.
From my experience there are three settings which are essential for 99% of TA renders: Scattering Correction/ Boost Light/ and Reflection Correction. Each of these are specified "fixes" to TA introduced with Bryce 7 for more accuracy (less bias).
Fun Fun!!
It is quite easy to create a similar object in Wings3d.
1) Create a Tetrahedron (in clear area with nothing selected right click and select Tetrahedron)
2) Create the "Legs" of the gem
A) Go into entire Object mode and select the Tetrahedron
B) Switch to Vertex mode and right click select Bevel
C) Bevel points as much as desired
D) You are now in Face mode. With the 4 faces selected right click and select Extrude
E) Extrude "legs" to desired distance
F) Once at desired distance use either Scale Uniform (for a flatter end after smoothing) or Collapse (for a more rounded end
after smoothing)
3) Smooth Gem (I did just a regular Smooth twice on mine but you can also try Doo Sabin Subdivision)
I have attached a screen shot of the finished model in Wings. I hope to render it in Bryce when I have a chance. If you are going for a more faceted appearance in Bryce you can always unsmooth the mesh after you import it.
what you're looking for in the best results is triangular and trapezoidal shaped faces for a more refined look and refractive qualities. but you can get the general shape in wings as well.
Thanks for the tut, user and Dangerlad for posting the steps in Wings! Been busy this weekend with GIMP stuff but hopefully will have all that taken care of soon and I'll post my results.
Thank you, Rashad for the information on TA/Scattering Correction!
Thank you....I am going to try this out Trish
Thanks for both tuts. And than you Rashad for that information. I'm going to give both programs a try.
Thanks Rashad for the info about Scattering Correction.
I don't have Hexagon and did not succeed in Wings 3D following user's tutorial. (I only saw your comments today.)
Anyway I posted 2 gem renders in the "Render" thread.
Thanks Dangerlad for Wings 3D tutorial