How to adjust Dimensions To Backdrop?

See attachment, I tried to use a 2D png picture as background(backdrop) instead of loading a duf environment, so I need to adjust the display size of this background to let the girl suit with it. I tried many adjustments as shown in attachment, but they all doesn't work, the background still keeping that size, don't know how those adjustments works.
So, how to adjust Dimensions To Backdrop? How to adjust aspect ratio? And layered editor? I just want adjust the background picture display size.
Thanks.
BBB.jpg
1434 x 839 - 245K
Daz 3D is part of 
Connect
DAZ Productions, Inc.
224 S 200 W, Suite #250
Salt Lake City, UT 84101
Licensing Agreement | Terms of Service | Privacy Policy | EULA
© 2024 Daz Productions Inc. All Rights Reserved.
Comments
Which are you wanting to chnage - the image size or the render size?
If you are trying to get the figure to match the background then use a camera, not perspective, and zoom or move it in and out, up and down and tilt it, whatever gets it to fit.
I want to enlarge the building so that the girl size is suitable for the building, but when rendering, I still need the girl to be the main character in the image, that means the building should be enlarged and just shown partial in the image.
When I change the render size, the backdrop building always fully shown in the image, that is not what I want.
As I said Zoom and move the camera.
These renders in this post and the next one all use the same image in the background.
https://www.daz3d.com/forums/discussion/comment/2538376/#Comment_2538376
It would be simplest to just render without any backdrop, save the render as PNG of Tiff, and plunk the cropped photo in behind in your image editor.
Another alternative is to create a large plane primitive in your scene: Create > New Primitive, choose Plane and Accept. Don't worry about the size for now.
Select the plane in your scene and, under the Parameters tab, rotate it 90 degrees on the X-axis so that it is vertical. You can also Translate it back along the Z-axis so it is positioned behind your figure.
It is important to set the dimensions of the plane to correspond to the aspect ratio of your background image, to avoid distortion. Check the dimensions of your image (outside of DAZ Studio) by right-clicking on it, selecting Properties from the popup window,then opening the Details tab and it will show the dimensions of the image in width x height. Divide the width by the height (units don't matter). The result is the amount by which you need to adjust the scale of the plane on the X-axis under the Parameters tab with the plane selected, in order to use your image without distorting. (For example, if your image is 900 pixels wide by 600 pixels high, then 900/600 = 1.5. You would then adjust the X Scale parameter of your plane 1.5 times or to 150%)
Now you are ready to load your image as a surface on the plane that you just created. With the plane still selected in your scene, open the Surfaces tab and select the plane there. Under the Diffuse Color, click the little triangle to the left and choose Browse. Navigate to the location of your image on your hard drive, select the image and click Open. The image should now appear on the surface of your plane.
The big advantage to this approach is that you now have a background that can be moved forward or back, up or down or from side to side using the Translation tools under the Parameters tab. You can also Rotate the plane if desired to correspond to different camera angles. You can also Scale the plane to make it larger or smaller, although you should only use the universal Scale parameter, not the individual x, y, or z scales, as the latter will screw up your image aspect ratio and distort the image.
Thank you very much SixDs, your description is very detailed, I followed step by step and finally got exactly what I want ! It is really free for any adjustment.
@Richard, thank you, you bring a good idea, I wonder why I didn't think about that way...
@Fishtales, thank you, I saw your wonderful pictures, they look nice, but they seems all in a same backdrop with no difference, brings me a feeling like a fixed photo service point that take photos for different people in a scenic spot :-) , but I will try that carmer zoom effect later.
There is almost always more than one way in DAZ Studio to achieve your objectives, function. Glad I could help.
There is one more thing that I would mention relative to using photographs as backgrounds or backdrops. The original images, being photographs, were obviously shot with a certain lighting. In your case the structure was apparently photographed in full sunlight, sometime around midday with the sun high in the sky facing the building (judging by the shadows). In order to avoid your figure appearing "disconnected' from the environment, it is important to try and recreate that lighting for your figure as well. It can be tricky, but trial and error, combined with a good sense of the nature of the image lighting and its direction, can improve the integration. Lastly, you may want to look into creating a separate ground for the character to stand on to complete your illusion, if you haven't done so already. That will allow you to use your lighting, not only to create appropriate shadows on your figure, but to have your figure cast a shadow onto the ground.
Thank you again SixDs, yes, yesterday after roughly made that scene, I began to add shadow, and found there is a shortage of DAZ3D, the shadow does not appear in normal view window unless use iray viewer or rendering, so it is difficult for a slow computer to adjust the shadow direction in a quick way, am I right or I missed something?
I think DAZ should add a 'dot line' shadow for a quick view purpose, what do you think?
All right, I got another trouble, the shadow.
As shown in attachment, if put the foot plane under the body, it shows shadow correctly, but I don't want that plane to be shown ( and don't want its big shadow also), then no matter I selected the 'visiable in render' - off, or chose the opacity to zero, the shadow runs away.
If no any plane in the scene, the shadow binding with body, but I need that backdrop plane, so once I added back plane, the shadow is just like this.
How can I keep the shadow with body and hide the foot plane?
You need the Scripts>utilities>Create Advanced Iray Node Properties script from your Content Library - run that with the plane selected and then in the Parameters pane turn on Matte.
Try changing the Ground Mode under Environment to Manual rather than Auto and see if that works.
Thank you Richard, and thank you Fishtales, I tried both of your ideas.
As shown below, Fishtales, your idea successfully left the shadow with body on the ground, but the ground covered everything that underground in backdrop, how to let those underground scene appeared as sama as what you did in your forest picture? Or I have to finish the last step in Photoshop?
Richard, your idea also successfully hiden the foot plane and left the shadow on, unfortunetly the hiden foot plane was not transparent, it generated a hole and can not see the backdrop through the hole, it also generated a big shadow of the plane. No doubt it can be used in Photoshop, but is it possible to let the backdrop can be seen through the hole, and no plane shadow?
Remove the plane as you wont need it now that you are using the ground from the Environment which is now your shadow catcher.
The hole as you call it is the wat the Matte Plane works. It catches the shadow at lets what is below it show through. It looks like you have nothing below it to show so it is showing the checker pattern of the background.
This will explain the Matte Plane.
I used two Matte Planes in this image where the background is an HDRI and only the figure is geometry. Scroll down and I have also posted an image showing the planes.
https://www.daz3d.com/forums/discussion/comment/2827886/#Comment_2827886
Thank you Fishtales, but I'm not fully understand your opinion, 'remove the foot plane'? for your idea or for Richard's idea?
In my attachments Above, the 1st one is for your idea only, it has no foot plane there, the ground is the shadow catcher, but, the ground cut everything that under it, so the backdrop can not display fully after rendering.
The 2nd one is for Richard's idea only (didn't turn the ground mode to manual), iray Matte mode, in this case if I remove the foot plane, the shadow was gone. And in this case, please look at my rendering angle, ideally it will appear the backdrop, not the checker pattern, but it didn't, that's the question I faced.
So go to your picture, the lady and chair, why you using iray Matte and it can appears the chair back(backdrop)? That's what I want, but in my case it seems can not show anything through the 'hole'...
@Fishtales, see, even I add a red plane as your chair back, it can not appear after rendering. How you let the backdrop appeared? Did you do your job only by DAZ3D, or finally assembled them in Photoshop?
The reason you are seeing the checker pattern is because there is nothing there for Iray to render. If you saved that as a .png and took it into Photoshop that would show as being transparent. You need something behind the Matte object for it to show through.
The bench is part of the HDRI used in the Environment Dome and doesn't exist as geometry.
This one uses my own image as a Background, Noggin's Crow and Squirrels by AM. I also used four Matte objects to try and get them to look as if they are in the image and not sitting in top :) One under the Crow, two under the squirrels and one on the twig so that the squirrel looks as if it is holding on to it.
2018-01-26 18:09:44.941 Total Rendering Time: 41 minutes 3.94 seconds
Click on image for full size.
Yes, I understood that I 'need something behind the Matte object for it to show through', but I thought the red plane and the backdrop are the thing to show through, am I right? Why they didn't show up in my last attachment?
Perhaps it is because they are below the floor? Try selecting everything in the Scene Tab and use Ctrl/D on the keyboard to drop everything to the floor.
No, drop to floor doesn't work. Maybe we are using different version DAZ3D?
For example, I used the latest 4.10.0.123, when I opened the iray matte, I didn't have what you said 'in the Surface Tab and apply the Iray Uber Base' in your lady and bench post, I only drag the 'Create Advanced Iray Node Properties' on the plane, and turn on the matte, that's it.
I use both the latest Studio and the Beta.
Ok, Fishtales, if possible, could you please use my attached .duf to render a picture which can show the underneath red plane and backdrop vertical plane?
Or if the duf can not be downloaded, you can just simply creat a people with one plane under her foot, the 2nd red plane under the 1st plane for 20, and the 3rd orange one to be vertical as show in my picture?
I really want to find out what's wrong in my progress, but if it is not convenience for you, then please forget my requesition.
Thank you very much!
It is as I said. The red plane is way below the floor, you don't need the Matte Plane and the reason there is no floor showing is that there is nothing there to render. The back plane with the image on it has the bottom bit below the floor so it wont show in the render. You need something on the floor to render but you wont get it the way you are doing it unless you add an image to a plane as the floor but then it wont match with the background. The only way to do what you want is to delete the planes and add the background image by going to the menu Window/Environment/Type/Background and choose your background image. This isn't ideal as you then have to zoom and move the camera and also move the figure until you get the render you want but that will depend on the background image and if the camera that took it is facing in the same direction as you want the render camera to look.
Now I understand, it go back to my topic question, the background can not be adjusted if I want to put people and shadow with it.
Otherwise I have to use Photoshop to re-unit them, or just use a fixed background as what you did in those forest pictures.
Ok, Fishtales, thank you for spending a lot of time on my problem, I really appreciate your kind help!
Hey, function. I don't know if you are still around, or not - I just saw your message from several days ago, unfortunately.
There are a couple of things that need to be understood about what you are trying to achieve, just so we're both "on the same page". Firstly, since you are using the Iray render engine, that renderer is specifically designed to emulate real world lighting and lights, and the properties of various materials in the real world, in order to produce more realistic renders. Whenever you attempt to do something that doesn't conform to something that would exist in the real world it becomes like trying to put a square peg in a round hole. It may be possible, but it involves forcing Iray to do something it isn't designed to do, thus the difficulties.
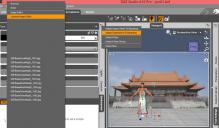
If we look at your background image of the temple, we can see that, even though it is a perfectly flat image projected onto a flat vertical plane, it contains a depiction of a background that has both vertical elements (i.e. the facade of the temple) and horizontal elements (i.e. the paving stones of the plaza). While it is possible to position your human figure so that she appears to be standing in the plaza in front of the temple, of course she is not. She is standing on empty space in front of a vertical backdrop. With only those two elements in your scene, Iray is only going to cast a shadow of your figure, depending upon the angle of your light, on the only other thing in the scene that a shadow could fall upon - the vertical backdrop plane. Unfortunately, that will destroy the illusion, creating an image that looks exactly like what it is: a girl standing in front of a billboard and casting a shadow on it.
So, how can you create the illusion that the girl is in a three dimensional world where the plaza and the temple actually exist? That's the tricky part, and what Fishtales was trying to help you solve. How can you force Iray to do something unnatural when it is specifically designed to do the opposite. Postwork in an application such as Photoshop, as you mention, is always one option. Compositing different renders with different elements in them in something like Photoshop as Richard suggested is another. Trying to shoehorn a solution into DAZ Studio/Iray obviously is going to require some voodoo.
In order to have Iray cast a proper shadow of the girl onto the plaza paving stones, while preventing any part of that shadow intersecting the steps or the temple itself, which are supposed to be some distance away, is the dilemna (because the backdrop is actually not some distance away, it is quite close to your figure). I believe that the logical solution is, along the lines of what Fishtales was talking about, to create a ground plane. Not an invisible or hidden ground plane, but a visible one that can blend seamlessly into the vertical backdrop. Easier said than done, but do-able, and in fact is a technique that has been in use a long time in using images as backdrops and foregrounds to produce credible renders.
So, how do we do that? There are many solutions that have been devised over the years that combine a horizontal ground plane with some sort of vertical backdrop. Most of the differences are with the vertical element. There are spheres, hemispheres, planes curved horizontally, planes curved vertically, - you name it. One of the keys to success in using such environments is ensuring the images are designed to display properly on those surfaces, without distortion and with a seamless intersection of the ground and backdrop.
In the case of the temple image that you wish to use as a backdrop, the problem is the limited amount of space on that image devoted to the plaza, owing to the relatively low camera angle. Attempting to use that small portion of the image as a ground plane beneath the girl, despite the fact that she is relatively close to the backdrop, is not going to work - there isn't enough useable image for the purpose, unfortunately. So, short of postwork, I would recommend rethinking how you frame your shot. Instead of attempting to show the girl from head to toe in the foreground, you might consider positioning her so that her feet are not showing in the render. How much you show or do not show is up to you, but by eliminating her feet somewhere above the ankles would eliminate the need to worry about her shadow on the ground, as that shadow would be foreshortened by the light being high in the sky. So you wouldn't see it with the shot framed in that way.
Hi SixDs, thanks for come back and made a clear solution on this shadow and 2D picture issue, it brings me an important knowledge to understand what is possible and what is impossible.
I was still thinking about this shadow in recent days, and found 2 ideas to solve the problem, however, they all need Photoshop which was what I tried to avoid previously.
Option 1, as the picture shown in above floor 8, the temple and girl, to add a shadow, it can be rendered seperately, the 1st time just render the temple picture after it was appropriately rotated, hide the girl; the 2nd time hide the temple, render the girl with her shadow on groundfloor, save both rendering pictures and assemble them in PS.
Option 2, adjust the temple pictuer in PS' drawing shift function, let it rotate as a 3D picture, save it and apply to be the backdrop for the DAZ scene, the backdrop in DAZ can not be rotated but can be enlarged (Environment > backdrop > Layered Image Editor), I normally enlarged the scale to 200%, and moved the picture to the appropriate position, then adjust the girl and render, this moment the shadow was under girl's feet since DAZ's backdrop would not affect shadow (however the backplane would affect shadow).
That's all my finding recently.
Finally, thank you again SixDs, for your kindly reply and let me know how.
This is the most amazing solution to a problem I've had for a long time. Using sky domes seems to eat up a ton of memory, making renders take much longer, but using the backdrop feature more often than not creates perspective problems and distortion. I just wanted to say thank you. I was concerned that the plane would block the light coming from outside the windows, but I was surprised to learn it doesn't block light at all! And if you want to adjust the brightness of the outdoor image, just adjust the luminance. Add depth of field to the camera and this ends up being both the best looking and the most flexible solution for interiors. Thanks again!