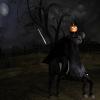
hi does anyone now how to render bright scene like this
 lasagnaman
Posts: 1,001
lasagnaman
Posts: 1,001
in The Commons
i been trying to get it to look like this pic where its very bright also , i want it in iray but bright like this pic her hair is shiny and realistic , can someone help me with that too thanks so much
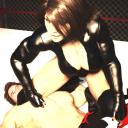
arisha_destroys_him_by_efudeea-db5j5vb.jpeg
894 x 894 - 109K
Daz 3D is part of 
Connect
DAZ Productions, Inc.
7533 S Center View Ct #4664
West Jordan, UT 84084
Licensing Agreement | Terms of Service | Privacy Policy | EULA
© 2025 Daz Productions Inc. All Rights Reserved.
Comments
If you want it bright either increase the lumen output of your lights or modify the tone mapping settings (Render Settings>Editor>Tonemapping) Change the Film Iso to something like 800 and change the Shutter speed to something like 60.
hi how do i do that can you walk me through that thanks
For extreme lighting like that you might want to play with the "Tone Mapping" settings : Crush Blacks, Burn Highlights and Gamma.
"Crush Blacks" will darken the shadowed areas and bring them closer to Black at higher settings
"Burn Highlights" will brighten up the highlights and bring them closer to White at higher settings
"Gamma" sets the overall contrast ratio and brightness of the image. (in my honest opinion the default setting is too high, I always set mine to 1.00 now) Higher settings will make the image look "washed out"
"Saturation" increases the strength of the colors at values above 1.00, and desaturates them at settings bellow. (A setting of 0.00 will render a greyscale image)
Basically what JamesJab said, but I wouldn't try rendering it so bright; I'd be tempted to try and get that look in post.
I'd second that. The problem with rending something with all the image blasted out is that there's no place to fall back to if the effect is too extreme, so if you completely lose all skin detail or color accuracy and decide you need it afterwards, it means you have to re-render the entire thing. In real photography, most professional photographers attempt to keep their original image exposed in such a way that you've still got some lattitude to make it brighter or darker in post. So light to get the effects that you want... or better yet, render it in layers using Iray canvases... and then put everything together in photoshop or the gimp where you can fix a world of issues at the slide of a couple of tabs.
Thanks for those tips
Indeed but even the most professional of professional camera's can't handle more then around 14.5 EV between light and dark, and that is not enough to handle the EV's in mmost natural environment, so a photo is either a compromise or you invest time and effort in HDR fotography in which the compromise is made during the tone mapping step which give optimal control. BTW, monitors and printers also have gamma issues, especially in dark blue's and blacks.....
Greets, Artisan
True, though HDR is becoming increasingly more common, to the point where it's being used in phone cameras. The point still stands, however, that while it's generally possible to coax a bit more detail out of an underexposed area, there's a point at which overexposure wipes out everything irretrievably.
I second that...fire up Gimp or PS and you'll have a ton more control over the final image than tweaking lights during the render. It's better to start with a nice render with good detail and lighting and then tweak that manually to get the exact look you want. You can tweak levels and use filters and on and on.
Just sayin...
Do you all think the responses helped the OP, considering that "increasing the lumen output or modify the tone mapping settings (Render Settings>Editor>Tonemapping) Change the Film Iso to something like 800 and change the Shutter speed to something like 60." wasn't simple enough?
Considering that his immediate response was to ask for a walk through? Iray settings aren't exactly intuitive, and while JamesJab offered good advice, it's hard to rattle off numbers that will work consistantly for every lighting situation. Postwork, on the other hand, gives a lot more control and it's something that anyone using DS should become familiar with anyway. After all, even Pixar post grades their animation to get the ideal contrast and color rather than try to nail it in the render stage... on which subject, has anyone else seen the amazing Pixar ROYGBIV video ?
There's simple....and then there's quality....
Thank you. I tried both ways and liked the film iso adjustment and shutter speed advice the best.. I'm an absolute noob.
Love esther