(Script)Apply dual lobe features to pre lobe G3 skins
 lain105_eckomars
Posts: 95
While I (not so patiently) await NGS3, I still want to play with the fancy new dual lobe feature! So I hacked together a little script to retrofit G3 figures with some of the shader lessons and tech of G8. Enjoy!
https://www.sharecg.com/v/88538/view/8/Script/Ekm-Dual-Lobe-ify-G3
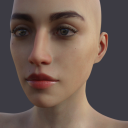

ceri lobe.png
500 x 500 - 305K
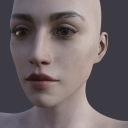

ceri stock.png
500 x 500 - 269K


Comments
Thank you very much!
Be patient my friend... ;)
http://as-dimension-z.deviantart.com/art/Final-Touch-686865120
so excited! hope it gets out of QA soon :D :D :D
what exactly is "dual lobe" and how can it help my characters look better?
Here's a render I did using this script on Gwennili's skin. This is a G8F with Gwennili's morphs moved over as well:
I also used it here on a test render, but got these weird speckles on the skin. Seems like the new lobe shaders and certain light setups don't play well:
@thatguy I am not the best person to give a technical explanation. In the new figures, they use dual lobe instead of glossy to get that soft skin shine. But its more flexible that glossy and is also New and Fancy. That’s all I got :P
And @Llynara to try and reduce spots/sparkles/fireflies, lower the translucency. That’s where the bulk of them seem to come from with my renders (followed by thin wall/sss stuff). I find the farther away I am from the figure, the more I can get away with turning down those pretty touchable skin settings (but the tradeoff is that the skin will appear lighter when you adjust translucency)
I also uploaded a new version with some tweaks. The old version took bump and applied it to dual lobe reflectivity. The new version applies glossy layered weight to dual lobe weight. But don’t worry, the old version of the script is still there, a zip nested inside the new one.
This was a silly hack I put together largely to pass time, so YMMV by a great deal lol
They are so lovely, thanks for showing them off! The issue speckles will... be a learning curve/growing pain, i think >.<
Thank you so much for the tips and the update. Really loving the script, and can't wait to see NGS 3. Happy to hear Dimension-Z is working on a new one!
Thanks Iain105!! I uploaded your new version and will give it a try. Is that the old version in "ekm_lobe-ify_bump_to_reflect.zip"?
If you follow Dimension on deviant art you can see all his fancy in progress pics. So cool looking
and yes the one called bump to reflect is the older version. I like the newer version but you use whatever you want, of course! The new version will give you glossy settings that are truer to the skin artist original design, based on my (limited) understanding of iray shaders.
I don't know anything about SSS other than I see it in the surfaces tab. So when you say "Adjusting the transmitted colors (SSS) will help. " what type of adjustments do you mean? Some characters I have show several sliders with many different colors input into them and I have no clue how to adjust them to make a better skin result. Thankies.
So, I apologize because that's a badly written sentence. Translucency and transmitted are two different groups of settings that do similar things and both have SSS settings (sub surface scattering). I've now fixed it to be clearer. I hope. The more worried I get about making mistakes when writing things in public the worse mistakes I make…
I can try to explain more if you'd like :)
Ok, I get the difference now.
I went to sharecg to dl the script again and it has the same files inside but here is a zip within the zip. Which files are new, and which files are the old ones? Not sure which ones to extract now. Sorry to be stupid, but I know nothing about this type of thing and am having trouble following along.. Thanks.....again.
originally i copied the bump map to the dual lobe specular reflectivity, but decided after more tests i actually prefer the glossy layered weight copied to dial load specular _weight_ instead of reflectivity
so the nested zip is the old version (hence the confusing "bump to reflect" name). i wanted to keep it around in case people preferred bump to reflect but also wanted to treat the glossy weight to dual lobe weight as the "real" version also i am bad at designing products :P
Wonderful - thanks for sharing this!
LOL I was wondering the same thing myself and kept looking at the model's ears (ear-lobes) I thought it was some kind of morph or tweaked rigging
heh I was doing the same thing, wondered what dual lobe ears would look like
i threw together a script that copies the g3 shaping to the g8 shaping settings. I made it because making transfer morphs is work and im lazy… so my solution was to spend days writing a script. shhhhh
so, if you have VYK Bessie you can load her up, select her and base G8, then copy bessie's settings to g8. this is my most complex script to date, so if anyone is interested in giving this a shot before i upload it to shareCG/post on the forums, shoot me a pm
:D
I have a couple days yet for a render to finish but I have the head, body, and expression morph packs for G3F & G38 it you want me to test the script. What does the script do? Save a G3F character preset of current G3F character and then load that preset to current G8F?
Or is it actually transferring morphs that G8F doesn't have from current G3F set of applied morphs?
The skin definitely looks better with this script! But...Does anyone know how to get rid of the white spots?
i sometimes had that issue, but only with iray preview in the viewport. i got it to go away by randomly zooming the camera in and out/panning around. which... is not very helpful. As @Llynara mentioned, she had issues with some lights not playing well with dual lobe. maybe try another lighting set up? also, try adjusting translucency and see where that gets you, or just turn off dual lobe, go back to glossy, but keep the other settings
the script doesn't make a morph, nor does it save a preset. basically, i have lots of cool characters whose shaping are just the DO morph packs. rather then do the whole morph creation work flow, the script takes the dial settings from the DO morph packs only of one figure and copies those values to the new figure. it occurs to me i should write a tiny readme to explain how to use it... i will do that tonight and pm you a link
OK, that's what I thought it was. I can test that easy enough.
I got those spots on the render I posted earlier, but can't reproduce the issue on other renders I've used this script in. It's got to be something about the new shaders and certain light sets/configurations. I did a test render here and didn't have any problems. Same character, most of the same lights, different HDR (which is why it looks a little odd, two completely different sets.) I'm not sure if it's the HDR or lights that are producing the issue or some weird combo of both. Need to test more.
The spots and flecks are annoying @Llynara. will be looking out for your further testing to see what's causing it.
I am still rendering but will test your script as soon as it finishes.
One thing I did do is save the Genesis 8 Female surfaces as shader presets so I could apply them to previous figures. However it also saved the textures and so I had to load with <Shift>-LMB & Ignore Textures. Is there a way to save a surface as a shader preset without the textures being saved too?
Are you saving each surface on g8 as a shader, then applying each one? Or are you saving a material preset?
If you are saving a shader preset, then the attached image shows an example of where some image are. they are scattered all over (which is part of why I opted to make a script, since I didn't want to save tons of presets and hunt down image maps each time)
lots of preset saving dialogues have this style of window- a tree of checkboxes- that let you customize the file.
Ah, thanks! I ignored those check boxes but unchecking images will solve the problem.
I'm getting them on about 60% of the renders I try now. I've had to revert to turning off Dual-Lobe and reducing the translucency dramatically. The problem is that I render a series of images in a story line so I can't have the skin looking dark and specular in one image and a different skin tone in the next - the effect of reducing translucency really is quite dramatic for the skin tone. This is a real pity because my first impressions were really positive in that I now had a more effective way to control specularity which was, in my opinion, much needed.