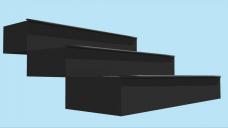
Holes without using boolean
can anyone tutor me  on how to cut holes in these steps that I made in the modeling room. like the ones in this photo while working in the modeling room without using the boolean tool, or inside the assembly room, there was an old thread about this awhile back about making holes using the alpha channel to do this as well, I can no longer find that particular thread...
Thanks


steps.jpg
1280 x 720 - 29K


steps with holes.jpg
519 x 342 - 93K


Comments
Several options. Not claiming that these are the best, but here are 2.
- Geometry - divide the panels so that each hole is in a square. Can use the extract along to divide the panels into sufficient squares. Where you want a hole, extrude once holding the shift key. This will extrude the square inside the same plane as the hole. Add 2 vertexes to each side of the interior extrude. Now the interior square has 12 vertexes. Connect the 2nd side vertex to the far outside corner to maintain outer quads. You can now shape the 12 interior vertexes similar to a circle. Delete the 12-sided circle. You now have a hole. For a sense of depth, you can extrude the 12-sided circle inward once before deleting. Repeat for each hole.
- Shader - using an image editor with the uvmap, or using the 3d paint tool, paint black circles where you want the hole and everything else white that you want solid. Apply the map in the alpha channel. Note that this method will make the steps by the hole look paper thin.
I'll follow up with some screenshots later today.
Here is an example of the geometry method for a very quick low poly stairs with triangle sides and a flat side panel. For the final, you'd want beveled edges, etc., but this is just to illustrate making the holes in a square panel. I will also show the uvmap just because it is needed in the shader method.
Here is the mesh and the uvmap. The polygons are all quads. The triangle sides are quads because the side meeting the edge is split with a fourth vertex. Also note that each step is three polygons wide. That might be unnecessary but will make it easier to alternate the sides that have holes.
To start the hole, select the polygon where you want it. Hold the shift key and extrude once to get an interior square.
Add two vertexes to each side of the interior square.
Connect the 2nd vertex of each side to the outer corner. The interior square now has 12 vertexes and the new lines preserve quads.
Shape the interior polygon like a circle. Then select the interior polygon, hold the control key, and extrude inside for a sense of depth.
Optionally rotate the circle to preserve good shapes for the quads.
Delete the interior circle to make the hole.
Repeat for the side polygon that looks like a triangle (but is actually a quad).
Select
Use shift and extrude at same time
Shape like a square
Add two vertexes to each side
Connect 2nd vertex to outer corner and shape like a circle.
Delete inner circle
Now that there are holes, I revised the uvmap and did a test render with a checkers pattern shader.
.
To use the shader, I used the uvmap from prior tutorial.
In the uv editor room, I selected the polygon where the next hole goes to see where on the uvmap it corresponds. I noted that it is the 3rd square on the right. Export the uvmap from the display tab and choose a high quality map size.
I opened the uvmap in my image editor.
I drew a black circle where I wanted the hole (third rectangle on the right). I colored the rest of the map white and I saved that revised uvmap under a new name.
I loaded the revised map in the alpha channel of the staircase model.
I did a test render.
Note - if the uvmaps are clean (no overlaps, etc.), you can use Carrara's 3D paint tools to paint the holes directly on the model. Just choose the alpha channel when painting.
Thanks, getting ready to give it try...
Those are awesome detailed steps Diomede!
I think there was a discussion in the Modeling Objects in Carrara thread...maybe try here:
https://www.daz3d.com/forums/discussion/comment/1988401/#Comment_1988401
and look through a few pages, there might be something there that can help.
I found this video this morning, which I could easily reproduce in Carrara:
Merci Diomede,
le step by step c'est trop bien ;-)
Diomede's described exactly the technique I would used (and so much better than I would describe it.)
If you want to make lots of holes (e.g. a perforated grid), just remember you need 2 x the number of holes + 1 squares in each direction.
But do pay attention to the size and position of the depth extrusion on your UV map. Depending on how you're going to texture it, it might not matter. But then again it might (look carefully at Diomede's blue grid render) Texturing with 3DPaint or substance Painter will also make sure there are no visible seams in the render.
Great tutorial, Diomede and excellent info from the others.
Unfortunately I'm not too familiar with Carrara's vertex room but I tried this method in Hexagon.
1 Begin with an open cylinder - my example is one face high and has twelve sides.
2 Add thickness then view from above.
3 In Hexagon it is easy to read the vertex co-ordinates (on right hand of screen). It also helps that the co-ordinates are in coloured boxes corresponding to the gizmo's colours.
4 Read the outermost co-ordinates' values for each side of the square you will make and copy them to the other vertices. (I hope the attached picture will show clearly what I'm trying to say!)
5 The nice thing is that quads are preserved.
nice step by step Diomede
Cool examples Diomede. I'll add a link to Modeling Objects in Carrara - Q&A - Come One and All ASAP! I was going to mention much the same but I'd not thought about your cirle idea. HaaHaa... you can stub your toe on an Alpha faux hole but not a 3D hole which you might get your foot caught in. :)
Here is how I would do this:
- create an 'oval' the size you want the hole. Place and orientation doesn't matter. Make it 16 sides ('definition' in the upper right panel) (it works with other values).
- Select the oval and the polygon you want to cut a hole in. Click one of the vertices of the polygon while holding <ctrl> and <alt>. The vertice must turn yellow (you must be using the 'move' tool).
- Menu edit / Align. The oval must now be in the middle of the polygon.
- Delete the polygon.
- Select the edges of the polygon you just deleted and the oval.
- Menu construct / Loft.
- optional: rotate the oval slightly to make the created edges cleaner. You may also delete (scissors) some of these edges.
- use dynamic extrusion while holding <ctrl> key to push the oval inside.
Additonal steps:
- crease the circles (only the circles, not the edges linking them).
- activate subdivision/smooth (middle right panel).
- optional: select the outer circle (on the polygon) and make a small fillet on it (set the range to 1 or 2).
- create a new shading domain for the inside of the hole and set a black shader on it (only black color, no highlight, shininess, reflection ...) .
This of course works also on the sides polygons (triangles).
Hope this helps.
Carrara has some really useful features, some less used than others....
Shape layers,. in the shader room,.
You can "draw" a rectangle/square,. or a Polyline shape,. or a circle/oval,. Directly onto your model in the shader preview window.
each time you do that,. Carrara creates a "Shape Layer" under your existing colour/texture map "multichannel shader".
if you make each shape layer's colour into a Multichannel shader, then you'll have an Alpha channel,. which you can adjust to make the layer see through.
easy, fast.
No modeling required.
Hope it helps :)
I didn't know we could do that. Thanks !
Phenomenal step-by-step instructions, Diomede!
If you ever write a book in this style, let me know - I'll buy it right away!
I am not as sharp as the folks above.
I know you said you did not want to assemble , but when I need holes I use the Spline modeler using " Combine as Compound"
This took about a minute. It is two seperate spline models front and side, I would add the top tread , then I would group in assemble duplicate.
Just be sure to set surface fidelity to 500 percent to keep circles smooth.
8068