Having Trouble with first Carrara project
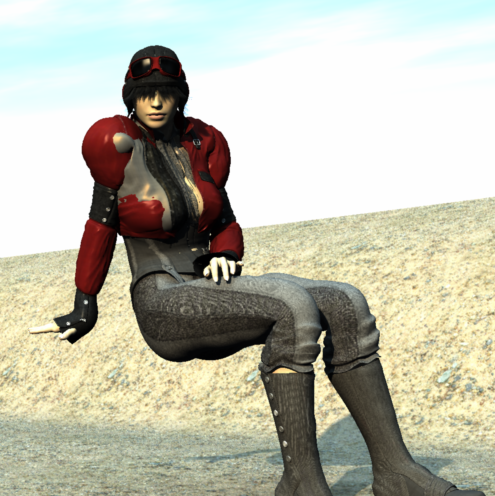
This is my first go at Carrara and I have worked out a lot of things but have hit a brick wall trying to pose V4 and get the clothes looking right.
Is there a way to pose V4 without using the translation tools that I haven't found yet also how can I stop all that poke through that I am getting.
I am using 8.5pro on a windows 7 machine, amd 8core with 16gig of ram
Thanks.


Doc1.png
495 x 496 - 311K


Comments
HI Bluemoon :)
The first thing I'm noticing are the shoulders which look kind of strange, but perhaps that's just the way that outfit is.
then the chest, which looks a bit big,. I think there's room for some reduction there, to eliminate poke through.
the shaders also look a bit shiny, ...try lowering the Highlight , and/or the shininess.
For most Clothing items where you have poke through, there are a couple of standard options,..
1,/ Check the clothing item for any adjustment morphs.
2./ Hide the underlying figure part, if possible.
3,. Use a magnet deformer to Push or pull the mesh to adjust for poke-through
In Carrara 8 pro, you have the option of editing the Vertex model, in the modeller, in animation mode, ...or directly in the Scene.
this can allow you to select a Morph area,. and add a new morph target, which you can adjust to fix the poke through.
One tip,..
In Carrara, if you have a figure or object in the scene, and you drag it from the instance list on the right, into your My Objects, in the browser,.. Carrara will save the object at the position it was in.
So,. If you create a new scene, and drag that saved object back in, it'll be in the same position it was when you saved it..
You can also use the same method to save any component of a scene,.. such as the (fake GI) lighting group from that scene,.
it should be easy for you to select the objects you're working on, and Group them, then drag that whole group to the browser, so that you can work in a new simplified scene, faster,.. and then,.. drag it into your main scene once you've worked through the posing, poke-through, and shader issues.
lastly,.. using a Beta version, for any work which you aren't prepared to mess up. isn't something I'd normally do.
Use the Carrara 8 official release. :)
Hope it helps :)
Thanks 3DAGE, with your help I was able to work out some of the things I have been doing wrong.
I can't post the results here yet as project is a wip for the New Users Contest, but if anyone wants to have a look http://www.daz3d.com/forums/viewreply/171856/.
Would love some feedback if people have the time.
Thanks.
Very nicely done Bluemoon :)
I agree with Szark, moving the camera slightly,.. to get a better composition,. would be a good idea.
One more thought,.. is the V4 shaders,.
Since these are designed for use in Poser,. they come with the Diffuse map, Multiplied with a Pale green colour. (which works in posers shader engine) but it's actually creating a false "colourised" version of the original texture maps.
In carrara, this Multiplied green colour, can make V4 look quite sickly.
Carrara doesn't need that Multiplied colour,. so, you can simply move the texture map up a level and overwrite the Multiplier, so its a straight texture map.. and it'll look and render as the original designer intended.
Maybe also change the render settings for Anti-alias to 0.5, and the shadow accuracy to 2,.
It'll take a bit longer to render,. but will look a bit less grainy.
Love the dirty wheels,. nice job :)
Thank you, I was wondering why Vicky had a green tinge to her, will look into that.
I can't take credit for the dirty wheels, they are part of the texture maps that come with the model, all I did was to take a bit of the shine off them. %-P
Some pics and info, to help you in adjusting the shaders..
Once you've got your V4 shader tree open,. you'll see the diffuse channel is a multiplier, with the texture map, and a pale green colour.
Select the texture map channel, and drag 'n' drop it onto the Multiplier channel above it. (see pic 1 )
This will change the diffuse channel to just the texture map.
Do that for all the other shaders in the figure,. (Some won't need that change) and you're good to go.
You can save all of those shaders for the figure, as a "Global" shader,. by dragging the Multi-coloured ball, at the top of the shader list, and dropping it into your "My Shaders" foldr in the Carrara Browser.
Then you can reload that, and apply it to a figure, by dragging it from the browser, onto the Multicoloured ball at the top of the shader tree for your figure.
Also,..
In Carrara,. if you hold your cursor over the name of the Texture maps, you'll see a Yellow Pop-Up box, which gives you the full locations of the image. (see pic 2)
This is helpful when you're loading maps which have not loaded, in the shader,. like the Bump, or Specular maps for a figure,.
As long as you have one map, then you can find out where the other maps for that item are located.
Thanks for the great info 3DAGE, I will have a go at saving the shaders for V4 today and try out experimenting with shaders on some primitives.
Here is the finished render I have been working on, also did a postworked version of it but don't think I can post that one till the end of the month as it is my entry in the competition.
Looking good so far :)
I just noticed that I didn't answer all of your question.
Yes,. You can click on a hand and drag it,. or you can "SHIFT + Click" to select both hands, or feet,.. and move then at the same time.
You can use the Rotate tool which gives you a Sphere gizmo which you can use to rotate parts of the figure in any direction.
there's also a Universal tool,. which is a Mix of the Three axis "Move Tool", and the spherical "Rotate Tool".
In Carrara,. you can also create a "helper rig" or animation rig, which is a set of "Target Helper Objects" which you can place at the Hands, Feet, Hip, Head etc,.. and then use IK tracking to have those body parts, follow the movement of those Target helpers,
so, instead of moving the figure parts, you move the helper objects and the figure follows them.
Also,..
When you're working in a scene,. It's useful to use the Directors Camera,. to allow you to move things around without changing your main Camera1
Using the Split View or Quad view will also allow you to move objects around in your scene more easily,. when you look from the Top, Left, Front and Camera views, it's easy to select a figure or prop,. and move it.
A good friend of mine often describes my renders as zombie or undead like! :-) I was used to looking at the Carrara default and couldn't figure out what he meant.
Now...he still sees the zombie look even after I have removed the green multiplier! In fact, the extra red glow in the image that became my new avatar looks "normal" to him. So I have to question either his monitor or his visual cortex...
bluemoon: that is a truly fantastic image! Bravo!
Thank-you very much Garstor :-)